¶ IPpay
Contents:
- Contact details and support
- Installation
- Configuration
- Service agreement
- Saved payment credentials
- Invoice payment
- Balance top-up
- Charge invoices and balances
- Payment refunds
- Direct payments
¶ Contact details and support
IPpay is a Splynx add-on which allows refilling of customer balance and paying invoices via the IPpay payment gateway - https://www.ippay.com/.
To ensure uninterrupted access to IPPay's gateway, please contact their support team or Account Manager to provide your Splynx instance's IP address for whitelisting in their firewall. Failure to do so may result in blocked requests. Contact details are available below.
IPpay contact details:
Marel McMeekin - Account Manager
McMeekin@ippay.com
TEL: 561-206-9880 | Cell: 360-820-1387
Support: support@ippay.com
 The add-on can work with different credit cards and bank accounts (if cards or bank accounts are saved in customer profiles). It allows you to charge all customers using Direct debit orders.
¶ Installation
The add-on can be installed in two methods: via the CLI or the Web UI of your Splynx server.
To install the IPpay add-on via CLI, the following commands can be used:
apt-get update
apt-get install splynx-ippay
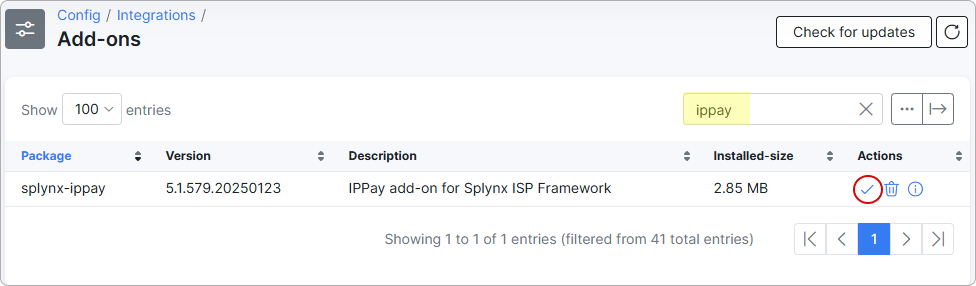
To install it via the Web UI, navigate to Config → Integrations → Add-ons:

Locate or search for the splynx-ippay add-on and click the Install icon in the Actions column:
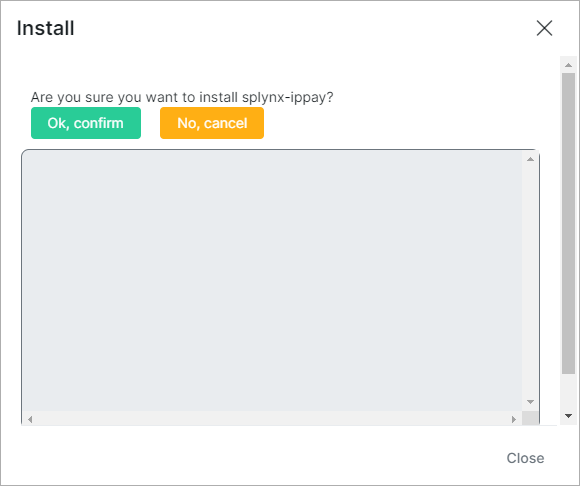
Click the OK, confirm button to begin the installation process:
¶ Configuration
After the installation process is complete, you need to configure the add-on by navigating to Config → Integrations → Modules list:

Locate or search for the splynx-ippay add-on and click the Edit (Config) icon in the Actions column:

Enable entry points for the Customer portal, then click on Save:
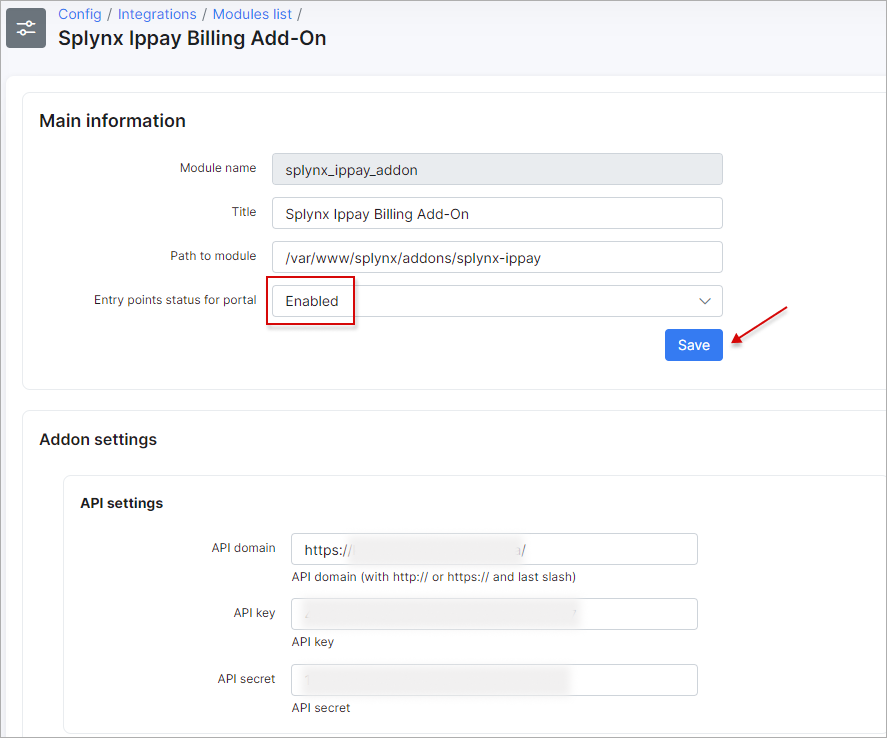
The multi-card / multi-bank UI applies to the Customer Portal only — the admin-side 'Customer → Billing → Payment accounts' section still shows saved accounts for reference, but adding accounts, switching the default, and removing accounts are done by the customer on the Portal. Method types other than credit cards and bank accounts are not supported by this add-on.
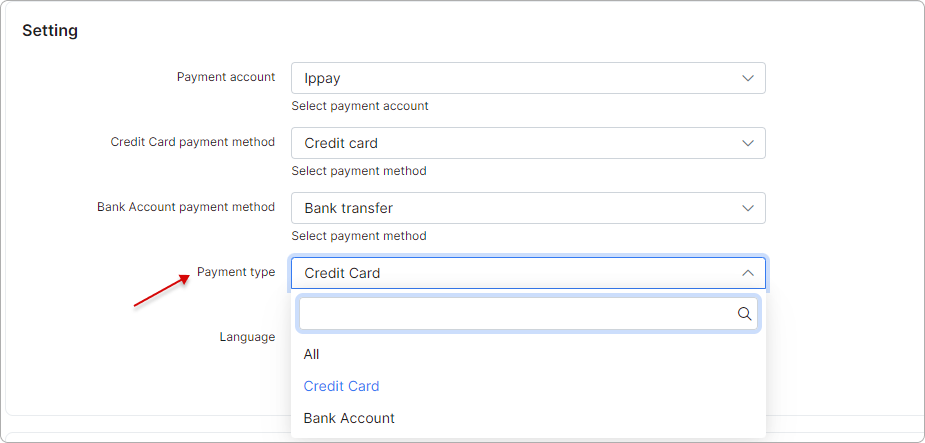
¶ Setting
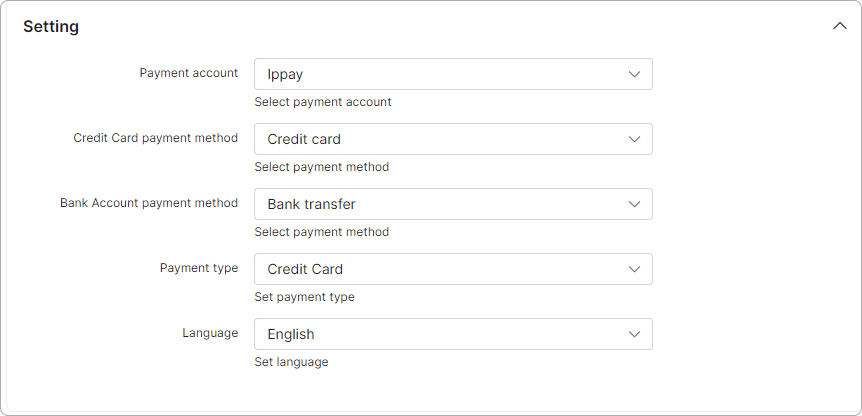
In this section, you can specify settings related to payment accounts, types, language, etc.:
¶ Pay setting

- Payment statement grouping - specify how payments are grouped together in the Payment Statements.
¶ Email settings
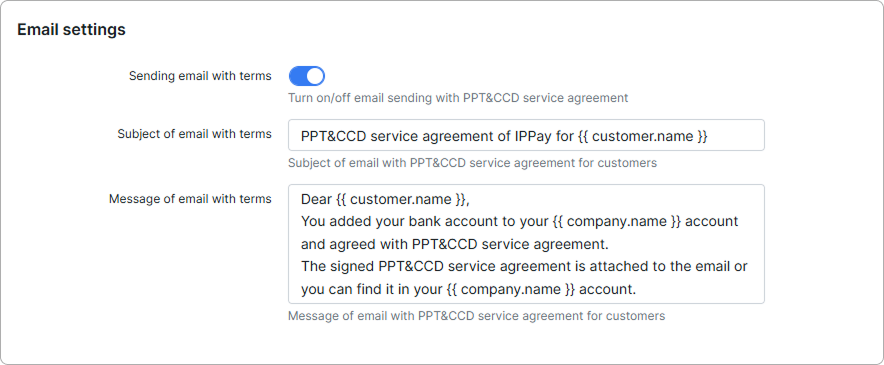
- Sending email with terms - enable this toggle to send emails to customers with the PPT&CCD service agreement (as per NACHA standards).
- Subject of email with terms - subject of the email with the PPT&CCD service agreement for customers.
- Message of email with terms - message of the email with the PPT&CCD service agreement for customers.
¶ Partners settings
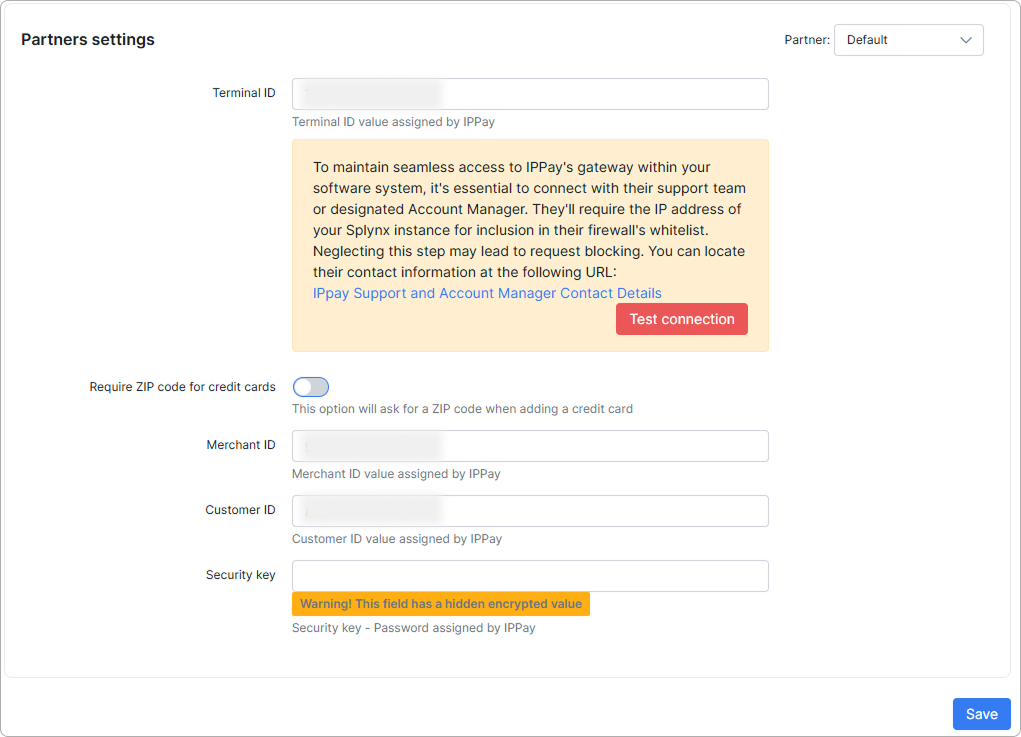
- Terminal ID, Merchant ID, Customer ID, and Security key - can be obtained from your IPpay account;
- Require ZIP code for credit cards - if enabled, it prompts the customer to enter a ZIP code when adding their credit card. The ZIP code value will be stored here, and you can update it manually.
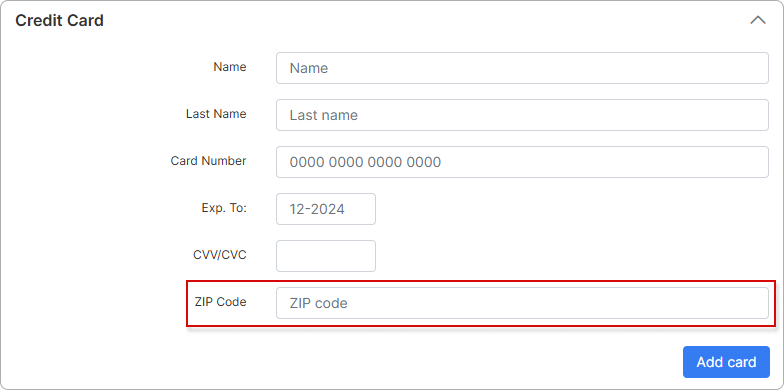
If the zip code option is enabled in the configuration, the customer's credit card form will include a new field for the zip code:
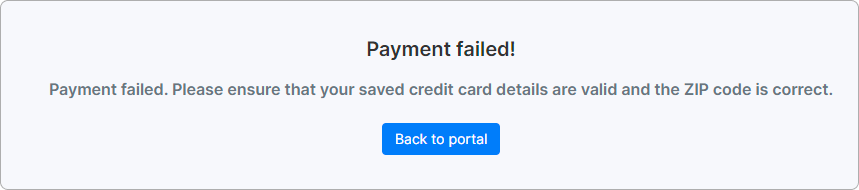
If the zip code option is enabled but the zip code field is empty in the customer's credit card, their payments may be declined.
Then you'll get such a warning:
To prevent this, it is necessary to specify the zip code for each account. We have created a special script to facilitate this process. However, if you encounter any difficulties with the payments, please contact our support team, and we will be glad to assist you: support@splynx.com
- Enable failed payment notifications - the toggle enables/disables notifications sent to customers when an automatic payment fails.
When the toggle is enabled, you can select the payment methods to monitor. If a payment using any of the selected methods fails, the system sends a notification to the customer.
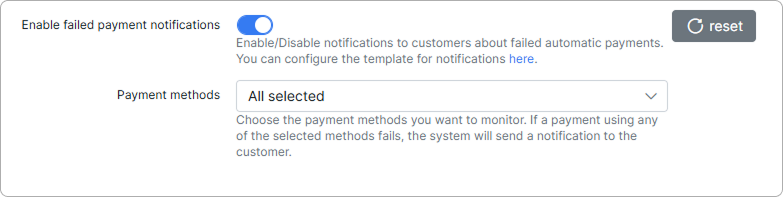
You can configure the notification template under Config → Finance → Notifications (Global tab) in the Failed payment notification section.
¶ Service agreement
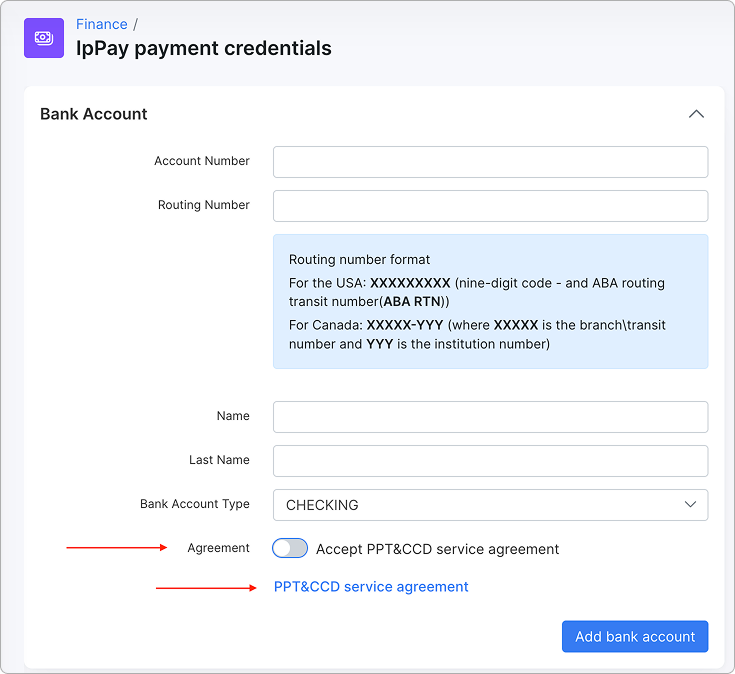
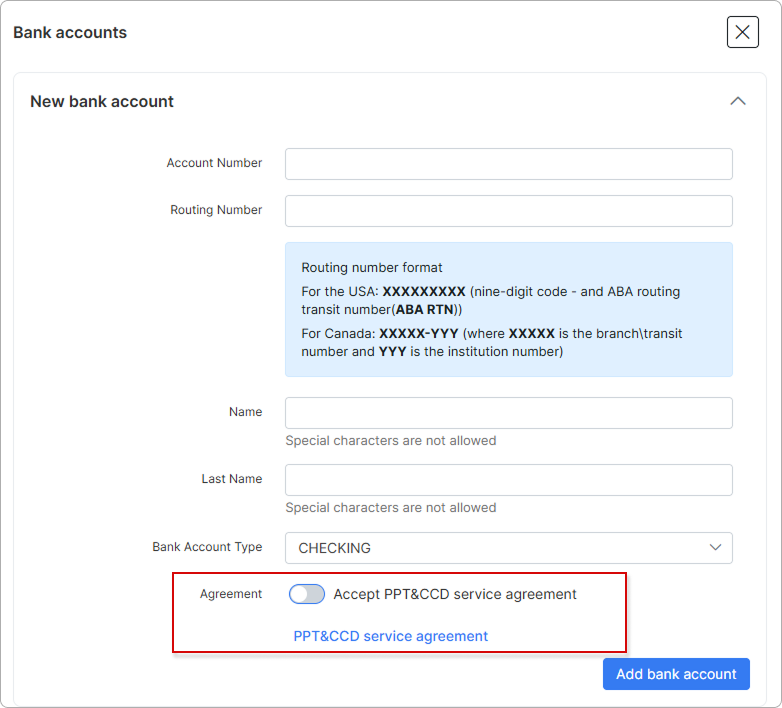
When filling in the bank account details, you need to accept the PPT&CCD service agreement to save them.
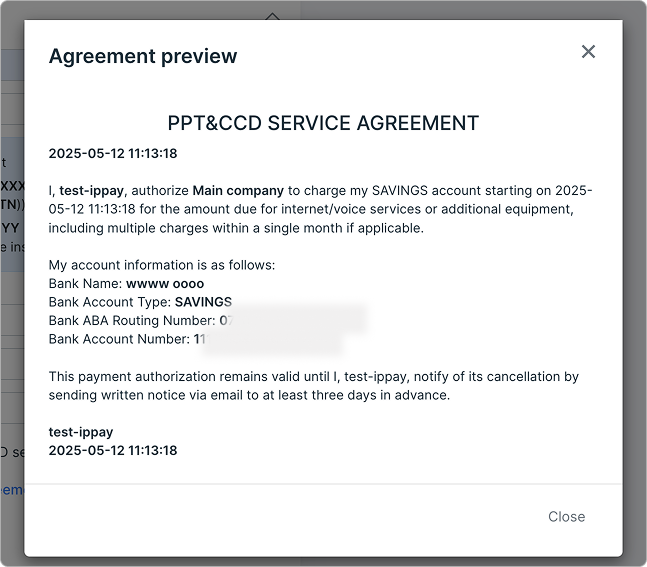
When clicking the PPT&CCD Service Agreement, a modal window opens with a preview of the contract that will be sent to the customer.
If the customer has already provided their bank account details, this information will be automatically inserted into the contract:
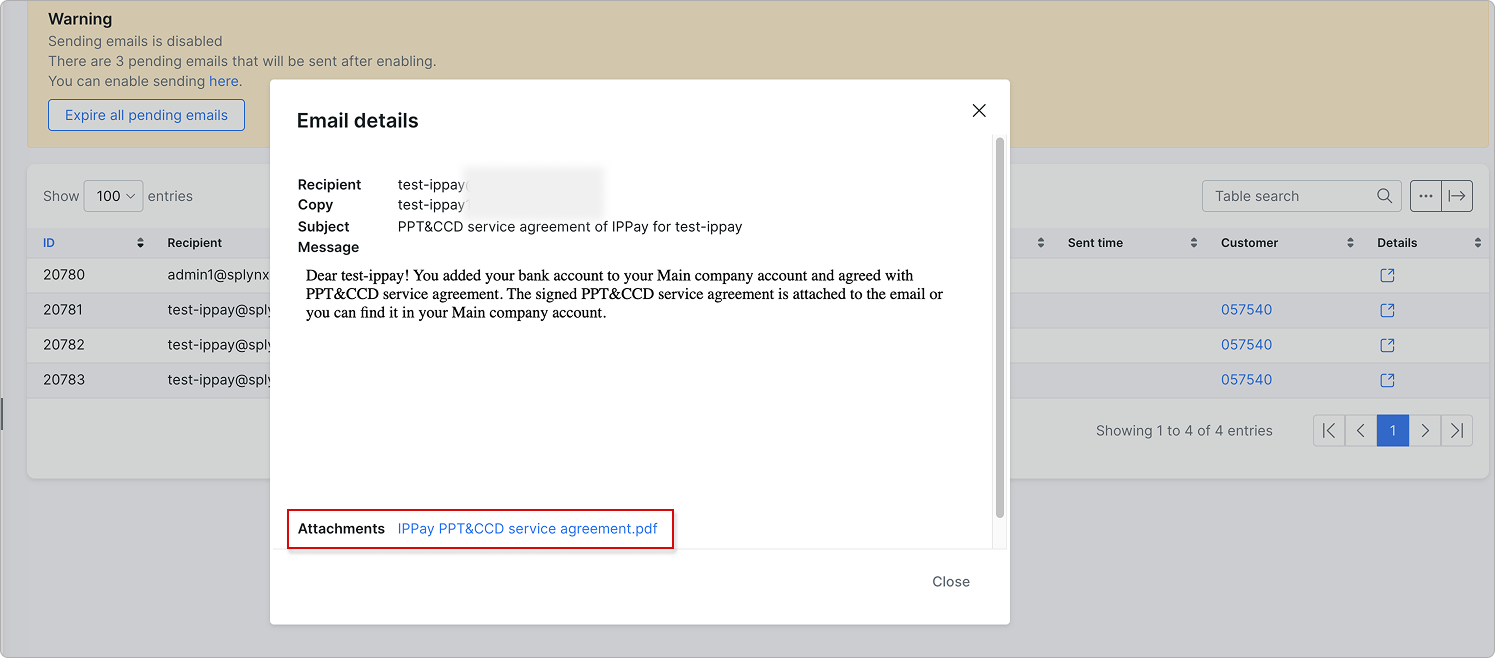
When the customer adds a payment method, an email is automatically sent to the provided address. The attached document is titled IPPay PPT & CCD Service Agreement:
If no email address is provided, the document will not be delivered.
Once downloaded, the agreement will be stored in the customer's profile under the Documents tab with the title IPPay PPT & CCD Service Agreement:

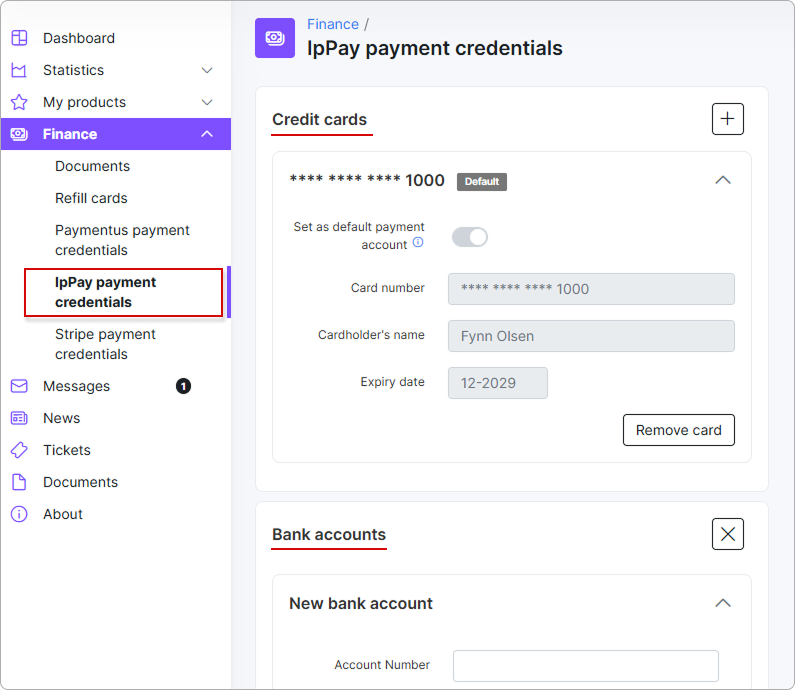
¶ Saved payment credentials
After completing the configuration, customers can manage their IPpay credentials on the Customer Portal in Finance → IpPay payment credentials. The page has two blocks — Credit Cards and Bank accounts — and each block can hold any number of entries.
All customer personal information related to credit cards and bank accounts is stored encrypted in the database.
¶ Credit cards
Each saved card is shown as its own entry with the cardholder name, card number, and expiry date. See Managing multiple accounts to learn how to add another card, switch the default, or remove an entry.
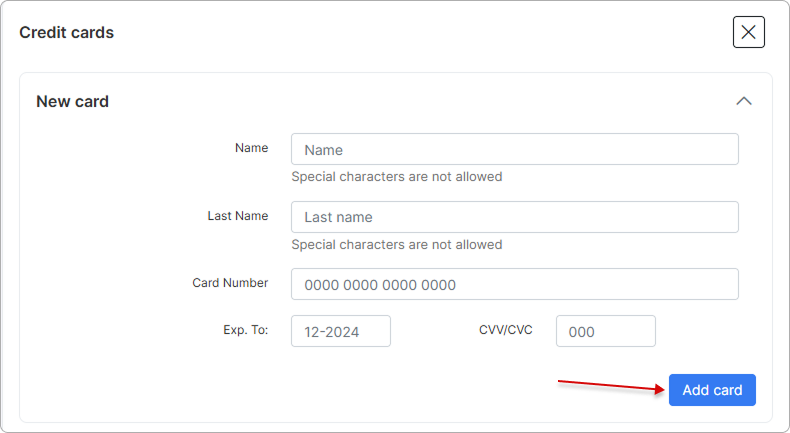
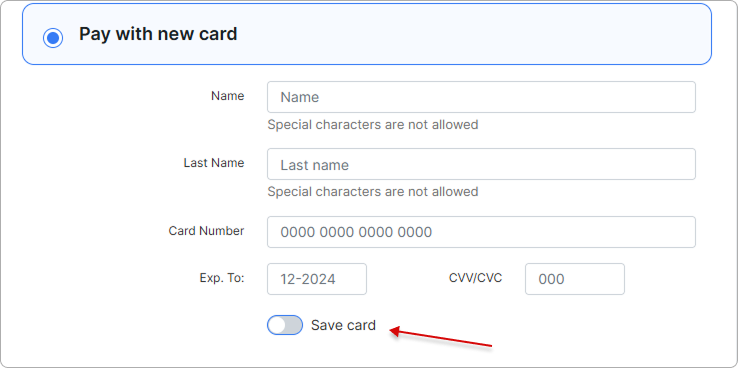
To add a card, click the + button at the top right of the Credit Cards block, fill in the Name, Last Name, Card Number, Exp. To, and CVV/CVC fields, then click Add card. If the Require ZIP code for credit cards option is enabled in the add-on settings, the form also includes the ZIP code field (see Partners settings).
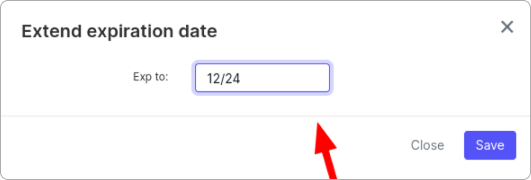
Click Extend expiration date to manually update the card's expiration date from the Customer Portal:
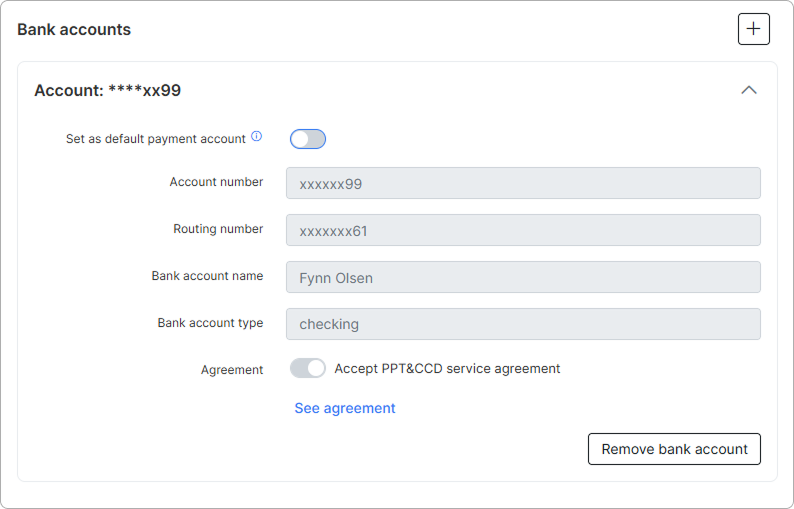
¶ Bank accounts
Bank account support must be enabled first — in the IPpay add-on settings, select the bank account type alongside the credit card:
Each saved bank account is shown as its own entry with the account number, routing number, bank account name, and bank account type. See Managing multiple accounts for how to add another account, switch the default, or remove an entry.
To add a bank account, click the + button at the top right of the Bank accounts block, fill in the account details, and accept the PPT&CCD service agreement (see Service agreement) before saving.
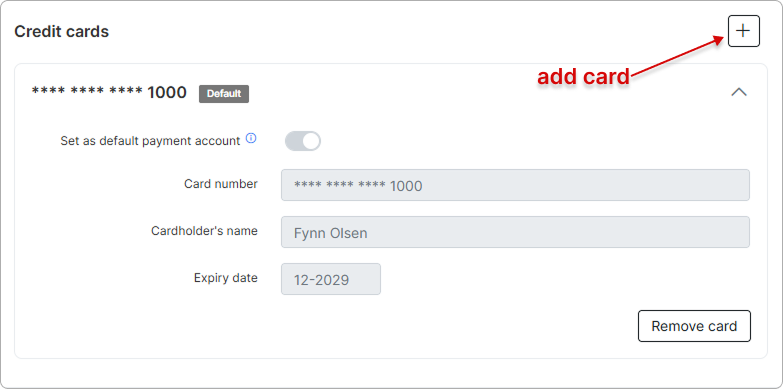
¶ Managing multiple accounts
The Credit Cards and Bank accounts blocks behave the same way — both let the customer save any number of entries, mark one of them as the default, and remove entries they no longer need.
Add an account
Click the + button at the top right of the block to open the add form above the existing entries. After saving, the new entry appears in the same block, alongside any previously saved accounts.

Set the default account
Each entry has a Set as default payment account toggle. Enabling the toggle on an entry marks it as the default and automatically disables the toggle on every other entry — only one account can be the default at a time, and the default is shared across both blocks (a default card excludes a default bank account, and vice versa). The default is used by automatic invoice charges and balance autocharges, and is pre-selected on the pay page.
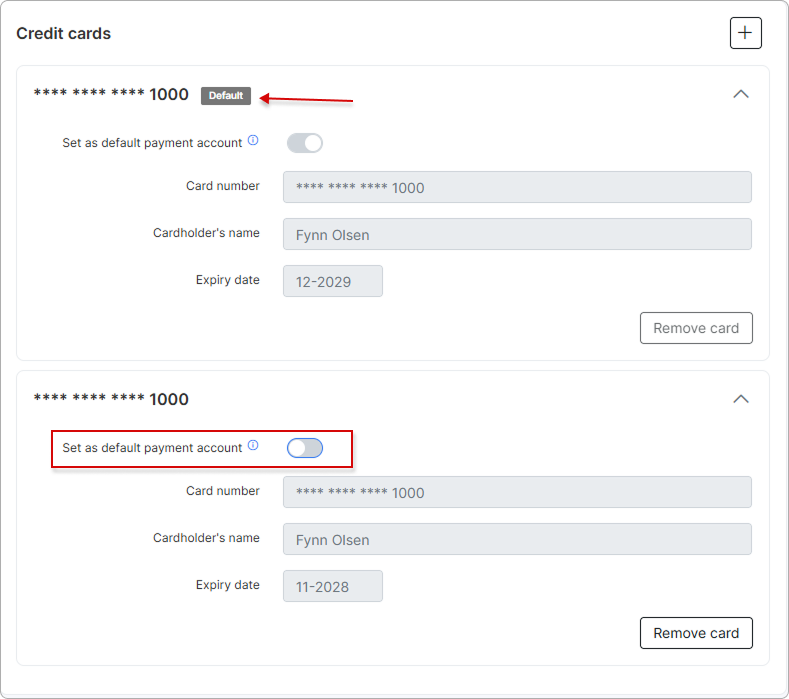
Only one card or bank account can be set as default — switching the toggle on a different entry moves the default to that entry.
Remove an account
Click the Remove card or Remove bank account button on the entry to delete it. The current default account cannot be removed while it is the only account on the page — add another account first, or move the default to a different entry, and then remove the original one.

Default payment method cannot be removed
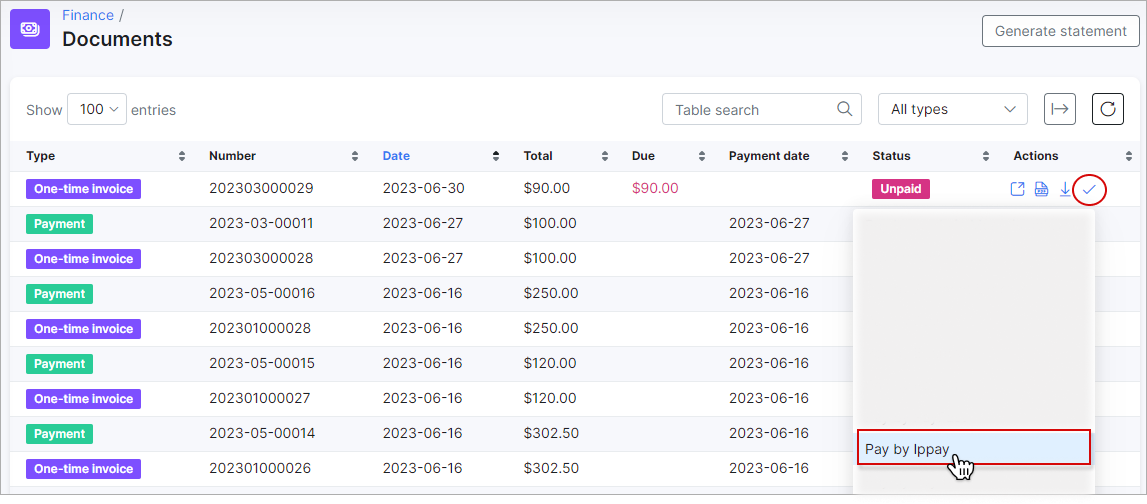
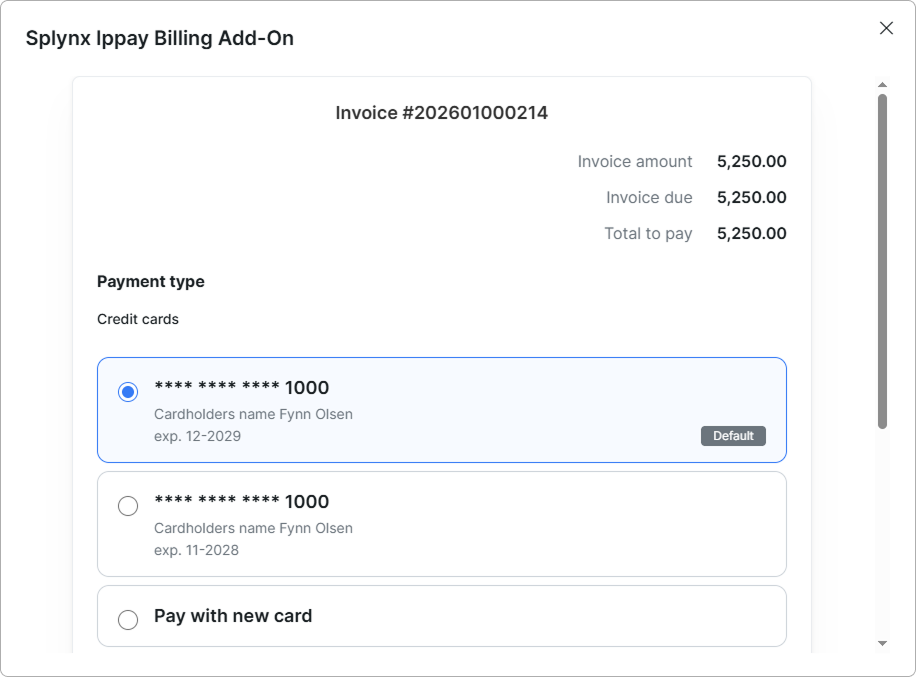
¶ Invoice payment
Customers can pay their invoices from the Customer Portal in Finance → Invoices or from the Dashboard. The pay page lists every saved IPpay credential as a radio list with the default entry pre-selected, plus a Pay with new card / Pay with new bank account option for one-off details.
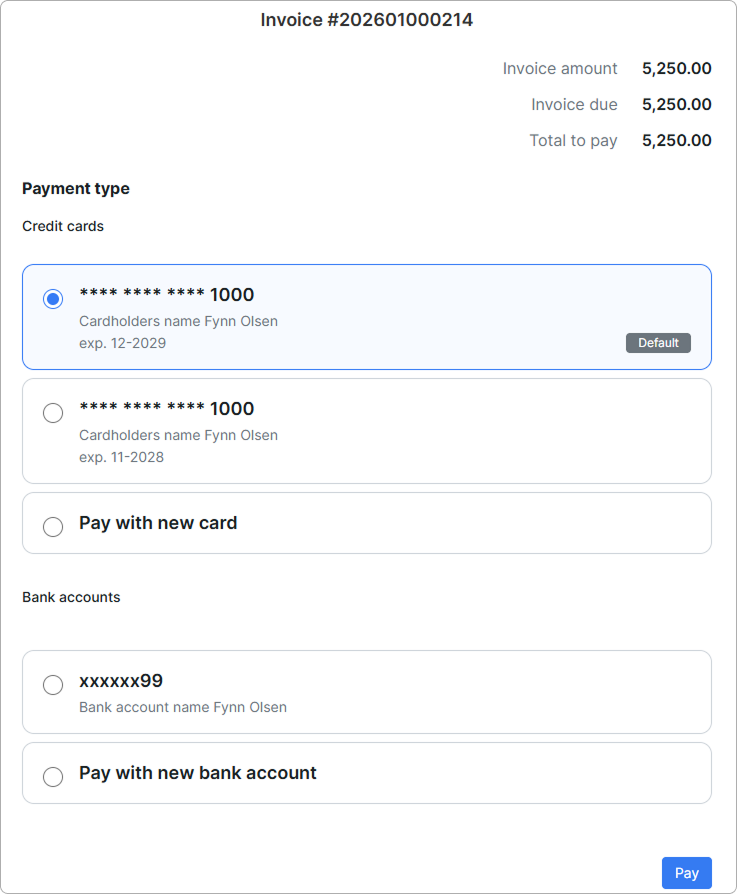
When the customer selects a saved entry, the payment is processed using that entry's credentials. When Pay with new card or Pay with new bank account is selected, a credentials form appears; if the customer enables the Save card toggle, the new method is stored as an additional entry on the IpPay payment credentials page.

If one or more saved methods exist, the administrator can pay the invoice directly from the customer's profile using the same radio list:

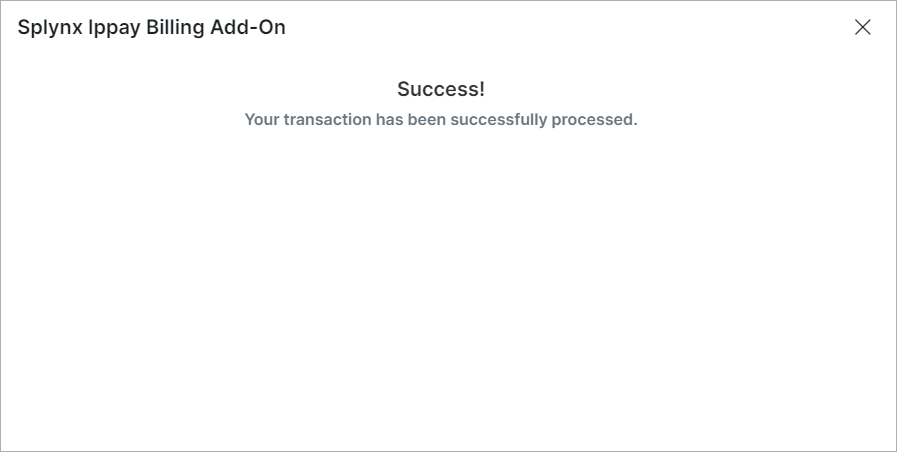
If everything goes well, the invoice is marked as Paid on both the customer and admin portals:

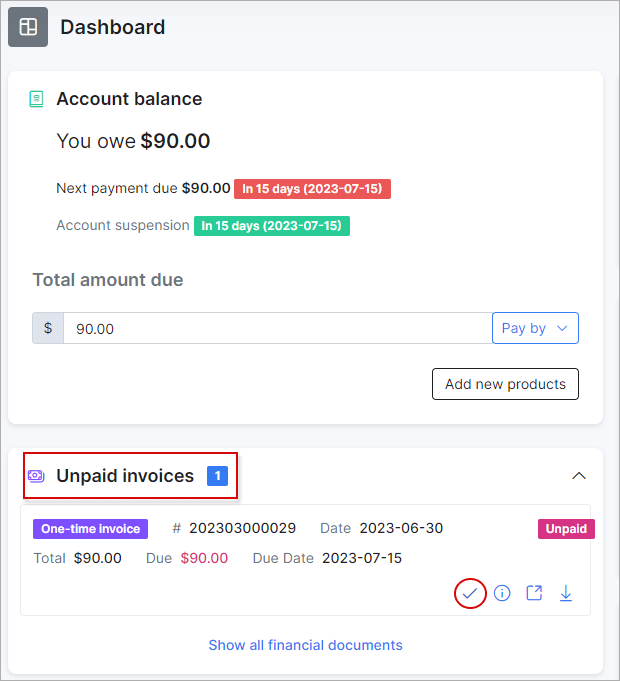
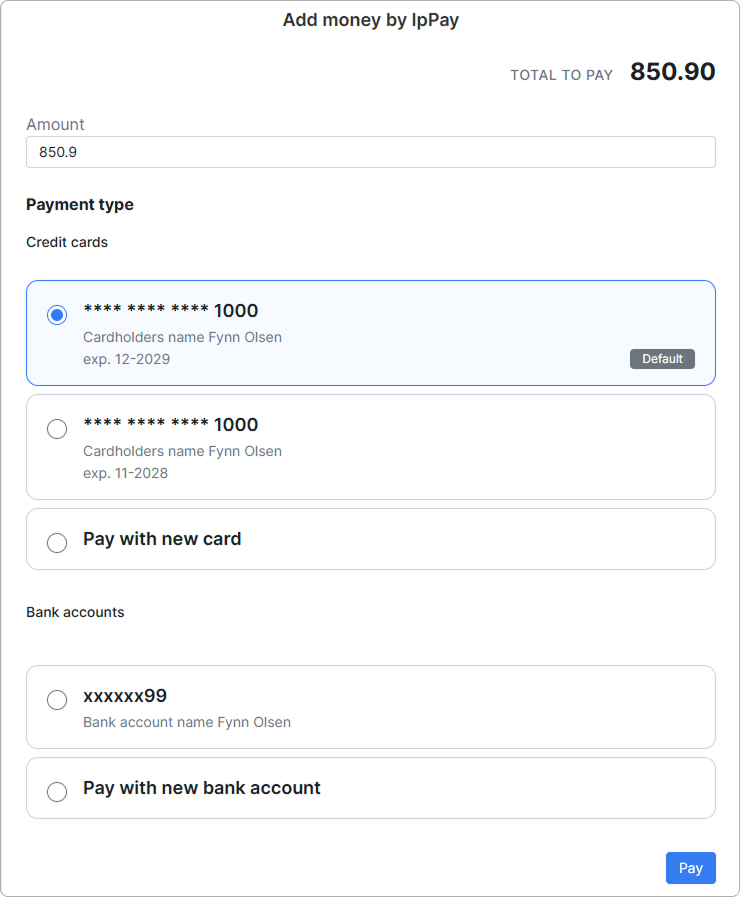
¶ Balance top-up
Customers can top up their balance from the Dashboard using the Pay by button. The top-up page shows the same radio list of saved methods as the invoice pay page, with the default entry pre-selected and a Pay with new card / bank account option for one-off payments.

¶ Charge invoices and balances
You can charge all customers' invoices and balances using one button. Navigate to Finance → Invoices, set the period and click on Charge as depicted below:
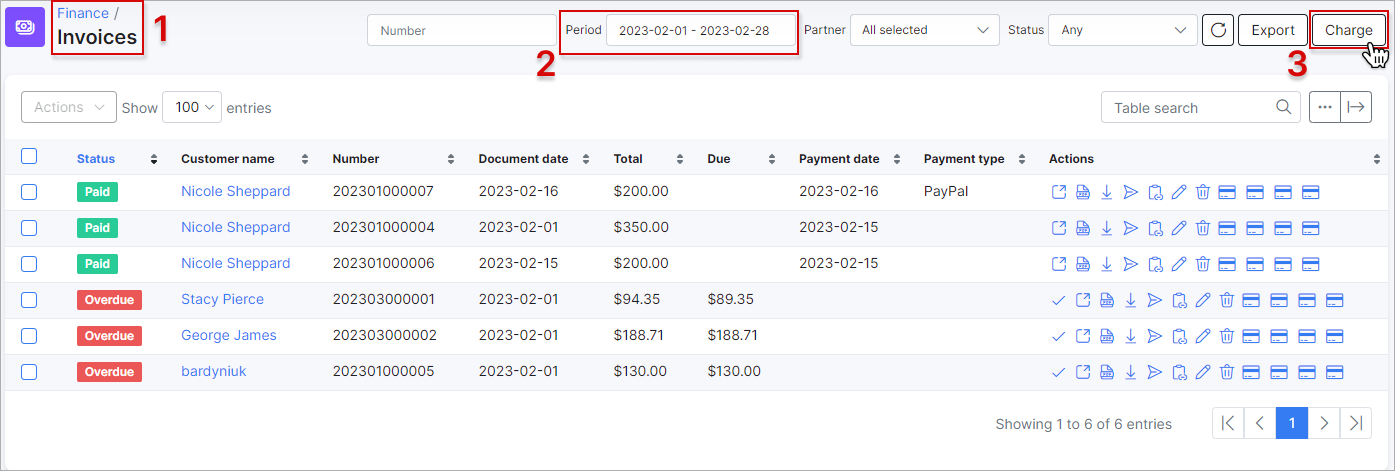
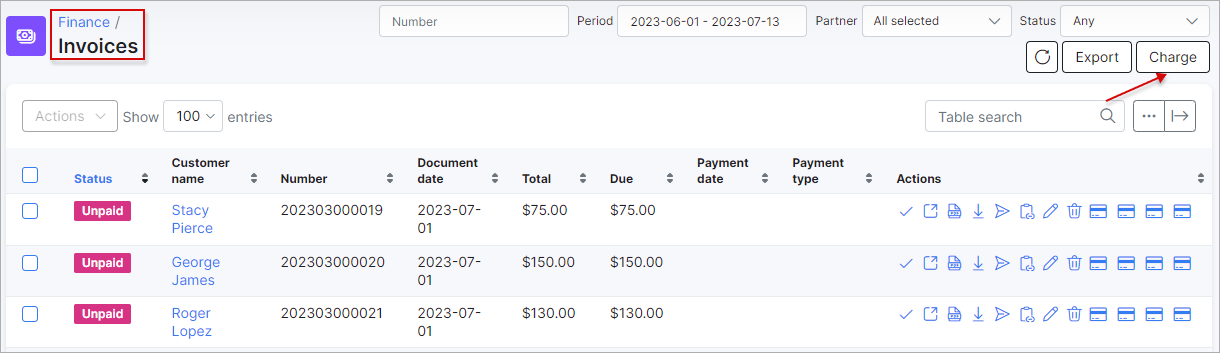
¶ Charge invoices
Navigate to Finance → Invoices, set the period and click the Charge button as depicted below:
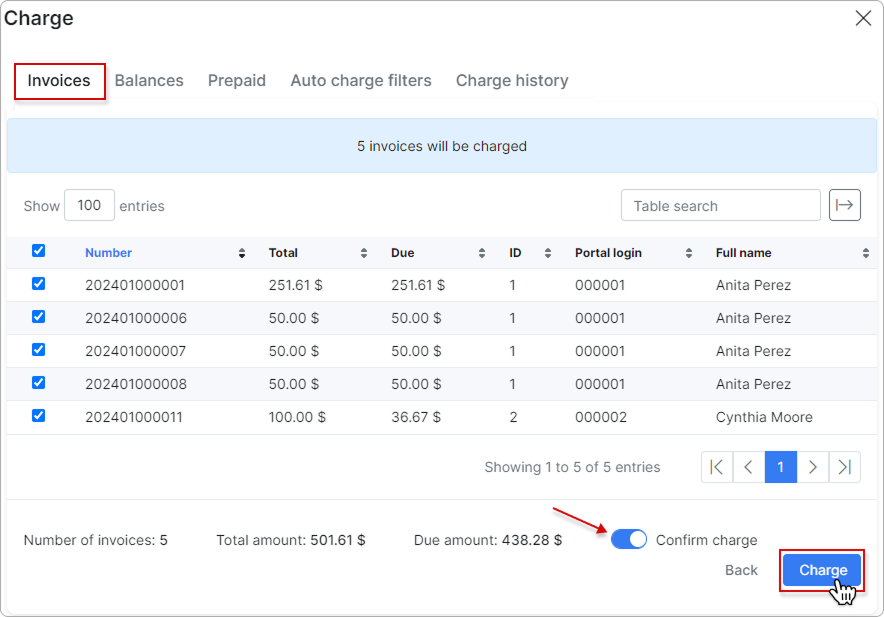
Select ippay as the External handler in the Invoices tab, and then click the Next button:

In the new window, toggle the Confirm charge switch to enable it, and then click the Charge button to complete the charging process:
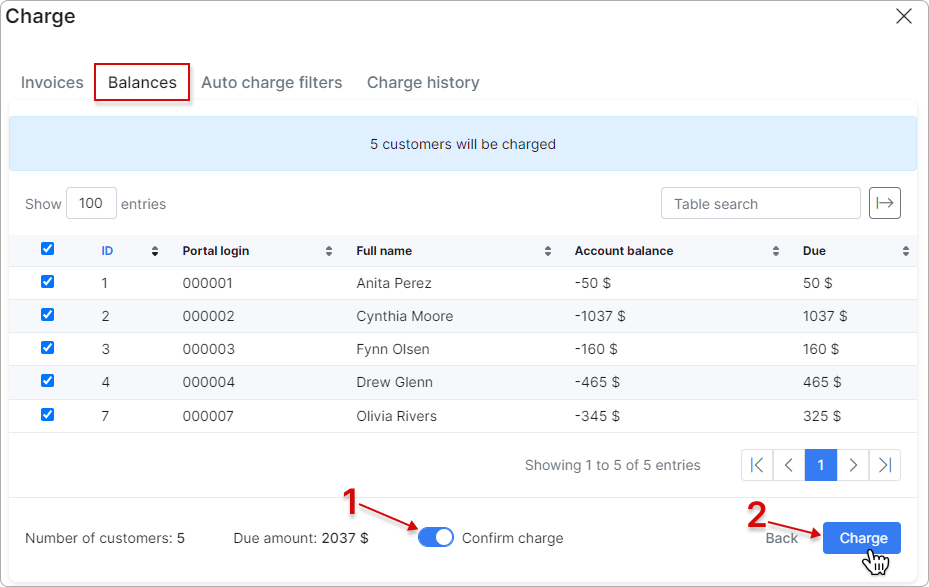
¶ Charge balances
To charge balances, select ipPay outstanding balances as the External handler in the Balances tab, and then click the Next button:
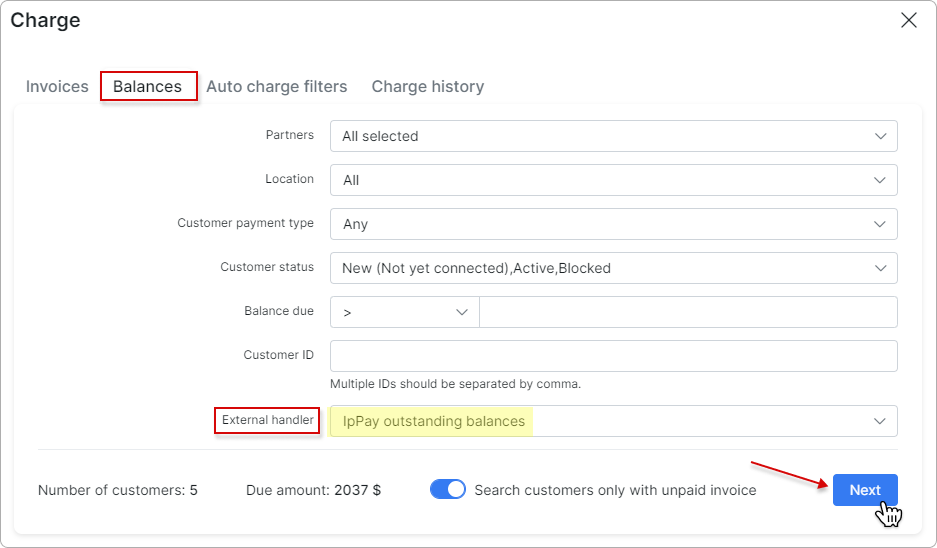
In the new window, toggle the Confirm charge switch to enable it, and then click the Charge button to complete the charging process:
To learn more details about how to charge invoices and balances, please read Invoices

¶ Payment refunds
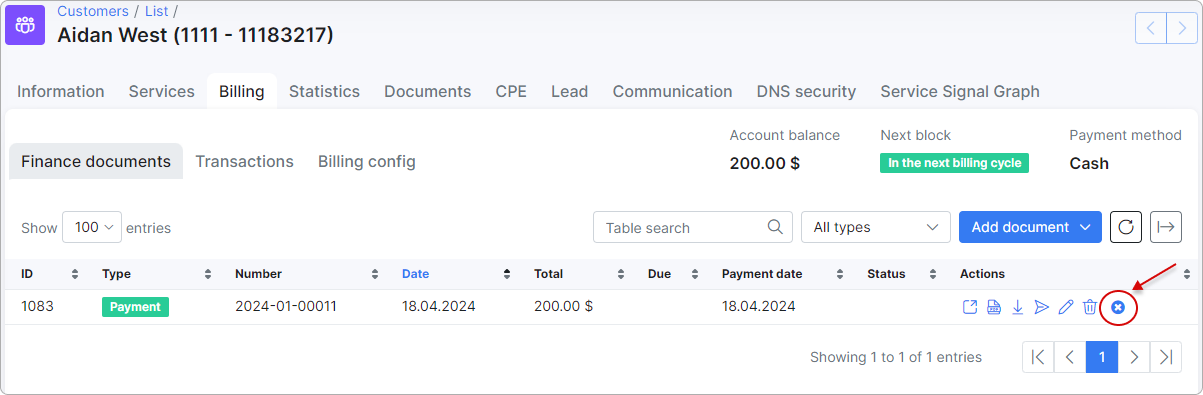
Payments made with IPpay can be refunded to the customer with the Refund button:
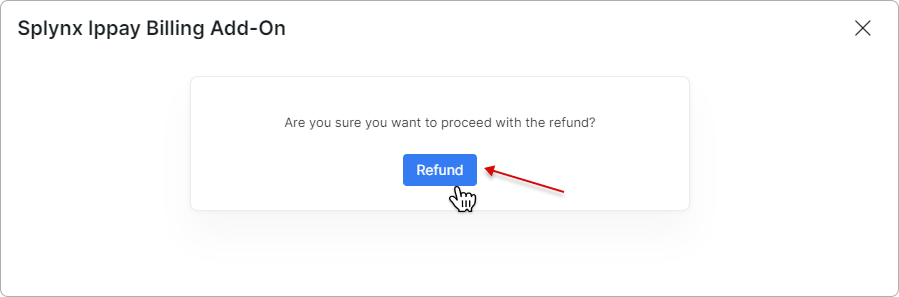
Then, a credit note will be generated for the refunded amount, and the refund will be processed immediately.
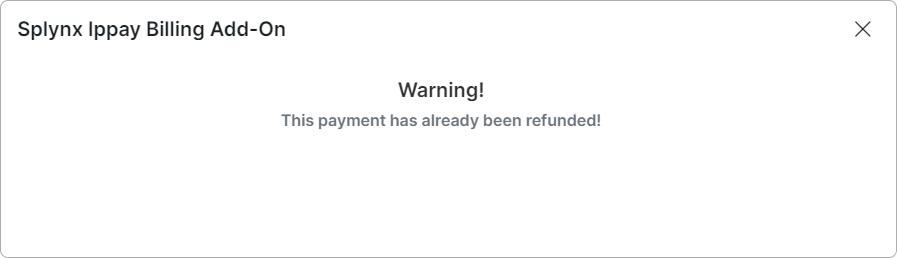
If the payment has already been refunded, you will receive a warning message:
¶ Refund target method
Each IPpay payment now records the credential that was used (card sale, bank sale, or automatic charge). When the payment is refunded, the refund is sent back to that exact account, even if the customer has since changed the default or added other accounts.
For legacy transactions made before the multi-account update — where no account id was stored on the payment — the refund falls back to the customer's current default account.
¶ Direct payments
Using payment links is the simplest way to accept payments made with a credit card or bank account. This feature is available in the IPpay add-on for paying Invoices and Proforma Invoices.
It provides convenience and simplicity for your customers, leading to an increase in on-time payments. For instance, you can include a payment link in the email containing the (proforma) invoice. As a result, customers can quickly make payments by clicking on the link instead of logging into their Portal page.
If customers have saved their payment credentials on the Portal, they won't need to provide further details when using the direct payment link in the future. However, if the credit card is not linked on the Portal, the payment details will need to be entered each time the payment link is used.
To create a direct payment link, please use the patterns below:
To pay the Invoice:
by invoice ID
https://<splynx_domain_address>/ippay/direct-pay-invoice-by-id?item_id=<Invoice_id>
by invoice number
https://<splynx_domain_address>/ippay/direct-pay-invoice?item_id=<Invoice_number>
To pay the Proforma Invoice:
by proforma invoice ID
https://<splynx_domain_address>/ippay/direct-pay-proforma-by-id?item_id=<proforma_id>
by proforma invoice number
https://<splynx_domain_address>/ippay/direct-pay-proforma?item_id=<proforma_number>