¶ FNB bank integration add-on
- Overview
- Installation
- FNB integration requirements
- Splynx configuration
- FNB Reference Mapping
- Manual fetch
¶ Overview
The FNB bank integration add-on for Splynx automates the reconciliation of bank transactions with your FNB account and supports multiple bank accounts.
By securely connecting to the FNB API using OAuth credentials (Client ID and Secret), this add-on retrieves bank statements on a schedule and matches incoming payments to customer accounts or invoices using a predefined reference.
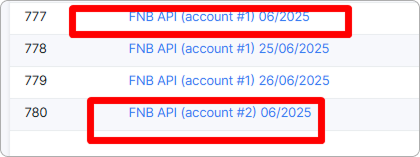
To avoid duplicate payments, we use the Reference ID to identify and match transactions.
If two payments have the same Reference ID on the same day, only the first one will be processed. Any additional payments with the same reference will be ignored.
Always use a unique Reference ID for each payment to make sure it's processed correctly.
Once matched, payments are automatically recorded in Splynx under a designated payment method (e.g., "FNB"), eliminating the need for manual imports or reconciliations.
This integration streamlines financial workflows, enhances billing accuracy, and ensures customer accounts are updated with minimal administrative effort.
If you are currently using an FNB bank feed in your accounting software (for example, Xero, Sage, or QuickBooks), you need to turn off that bank feed once you enable the Splynx FNB integration.
The reason is that the Splynx add-on already connects directly to your FNB account through the secure API and automatically pulls in transactions. If both the accounting software and Splynx are connected to the same bank feed, you will receive duplicate transactions when reconciling payments, which can lead to mismatches, double entries, and inaccurate financial reporting.
¶ Installation
You can install the add-on via the CLI or through the Splynx Web UI.
- CLI installation:
Run the following commands:
apt-get update
apt-get install splynx-fnb
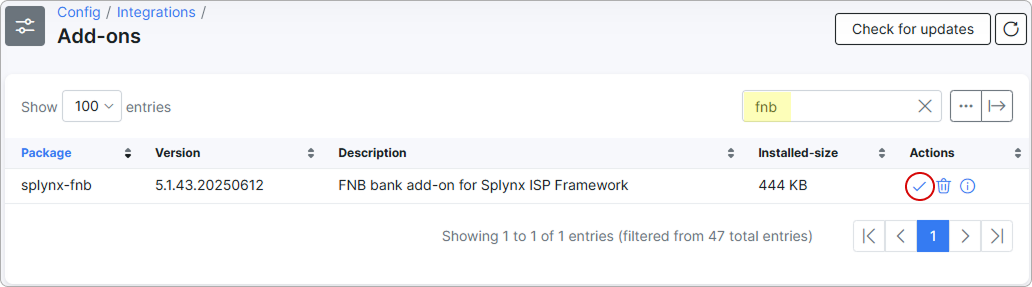
- Web UI installation:
Navigate to Config → Integrations → Addons:

Locate or search for the "splynx-fnb" addon and click on the install button in the Actions column:
Click the OK, confirm button to begin the installation process:

¶ FNB integration requirements
To enable the FNB API integration, the requirements listed below must be fulfilled on the FNB side.
¶ Account conversion
The FNB account must be converted to an Enterprise Business Account to allow API access.
If you currently have a standard Business Account, please email chris@splynx.com with the subject line: Splynx FNB IntegrationInclude the following details in your email:
- Business Name:
- FNB Account Number:
- Person Responsible for the Account:
- Contact Number:
- Contact Email:
We will then submit these details to FNB, and their Integration Channel Manager for your region will contact you to assist with the account upgrade.
¶ Activating Integration Channel
Once your account is upgraded to Enterprise, follow these steps:
-
Log in to FNB Online Banking.
-
Navigate to
Business Solutions → Integration Channel. -
Click
Get Started, then accept the terms and conditions. -
Click
View My Service Tasks. -
Change the integration type from Host-to-Host to API.
-
Scroll down and subscribe to the Transaction History API.
¶ Configuring API Access
During the subscription process, follow these steps:
-
Consumption Method – Select "On my own behalf".
-
Connectivity Protocols – Click
Add Connectivity Protocol.-
Set a connectivity nickname of your choice.
-
Set Connectivity Type to REST API.
-
Acknowledge that a Client ID and Client Secret will be generated and must be securely stored.
-
-
Context – Add the contact person responsible for the integration.
Complete the process to generate the Client ID and Client Secret.
These credentials are only shown once. If they are lost, they cannot be recovered.
¶ Entering credentials in Splynx
Once you have the credentials:
-
Go to Splynx Admin Portal:
Config → Integrations → Module list → Splynx FNB Bank Integration. -
Enter the Client ID, Client Secret, and the linked bank account number.
¶ FNB pricing notice
Please note that FNB currently provides 30 statement requests per month for free.
This means:
-
If you run the integration daily, the integration will typically be free.
-
If you choose to run the integration more frequently (e.g. hourly), you will be billed per request after the free limit is reached.
The current cost is approximately R1 per additional request.
It is up to you to decide whether to prioritize cost efficiency (daily sync) or more frequent updates (hourly sync) depending on your operational needs.
¶ Splynx configuration
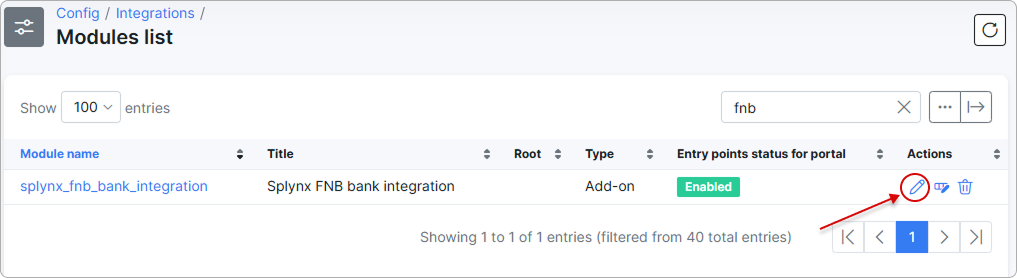
To configure the add-on in Splynx after completing all necessary settings on the FNB side, go to Config → Integrations → Modules list and locate the 'splynx_fnb_bank_integration' module. Then, click the Edit icon:
You need to configure the Common settings here for the add-on to function properly in Splynx:
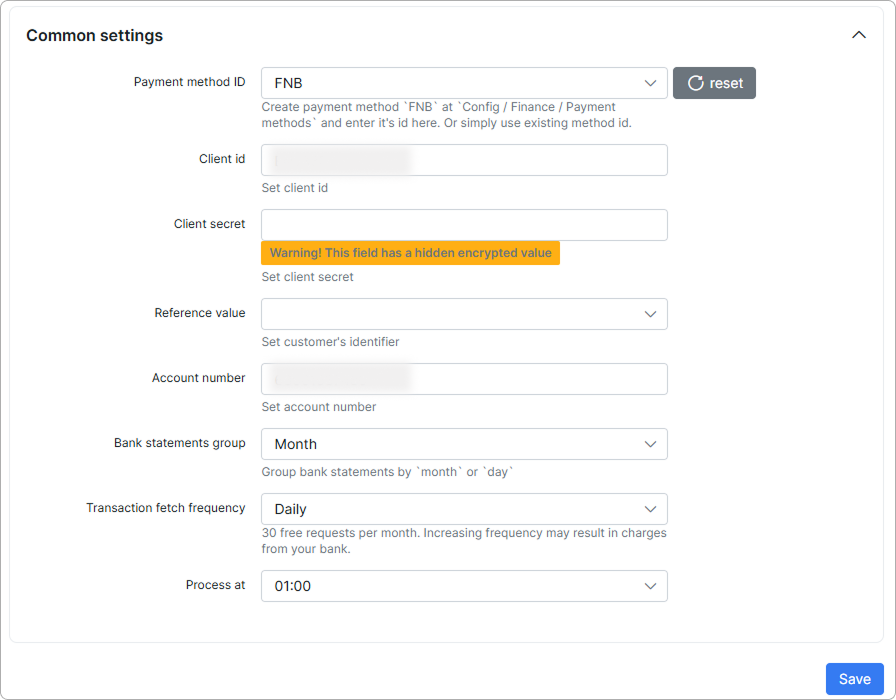
-
Payment method ID - create payment method FNB at
Config → Finance → Payment methodsand enter its ID here. Or simply use an existing method ID. -
Reference value - set the customer's identifier: either Portal login or Portal name.
-
Bank statements group - group payment statements by Month or Day.
-
Import from date - specify the starting date for fetching bank statements.
Then proceed to the Bank account settings:

-
Enable processing bank account - enable the toggle to activate processing for this bank account.
-
Client ID and Client Secret - these credentials are obtained after configuring API access on the FNB side.
-
Account number - set the linked account number.
-
Alias - the bank account alias to display instead of the account ID in bank statements:
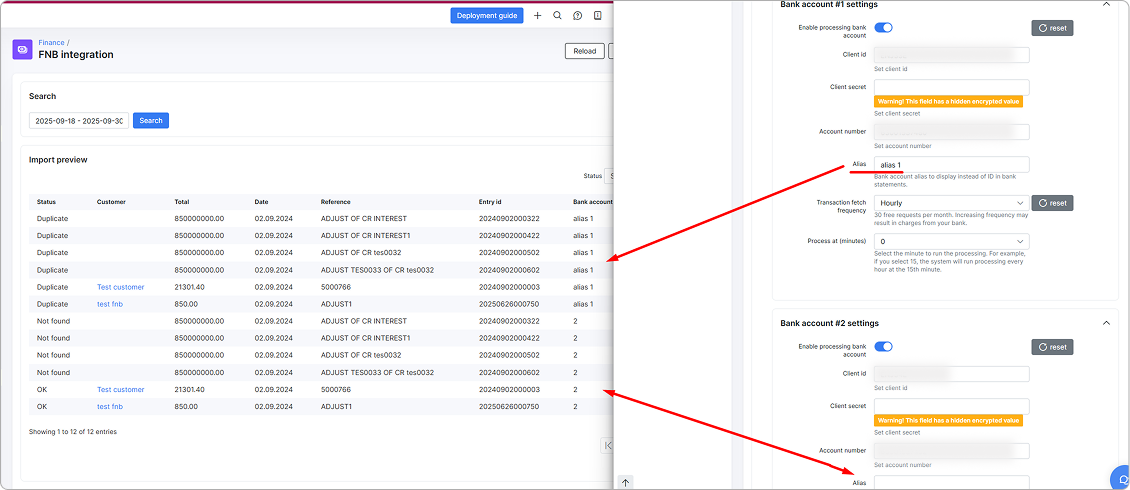
- Transaction fetch frequency - set the transaction fetch frequency for this bank account.
(Disabled, Daily, Hourly, Once every 2 days, Hybrid (daily + hourly)).
30 free requests per month. Increasing frequency may result in charges from your bank.
- Process at - set the scheduled time for processing payments.
After this, transactions will be processed automatically at the specified time.
When you select the hybrid option, you can fetch transactions for specific days and hours. Additional fields appear, allowing you to configure the frequency:
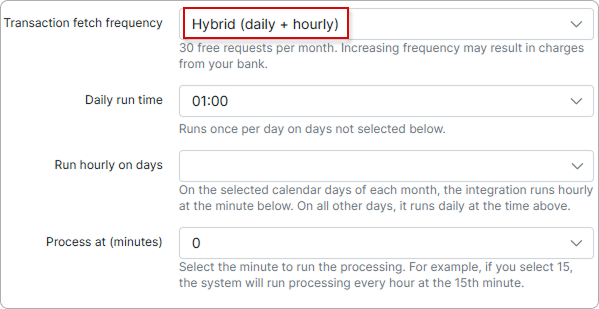
-
Daily run time - runs once per day on days not selected below.
-
Run hourly on days - on the selected calendar days of each month, the integration runs hourly at the minute below. On all other days, it runs daily at the time above.
-
Process at (minutes) - select the minute to run the processing. For example, if you select 15, the system will run processing every hour at the 15th minute.
¶ Multiple bank accounts
To activate multiple bank accounts, switch on the corresponding toggle and enter the required details:

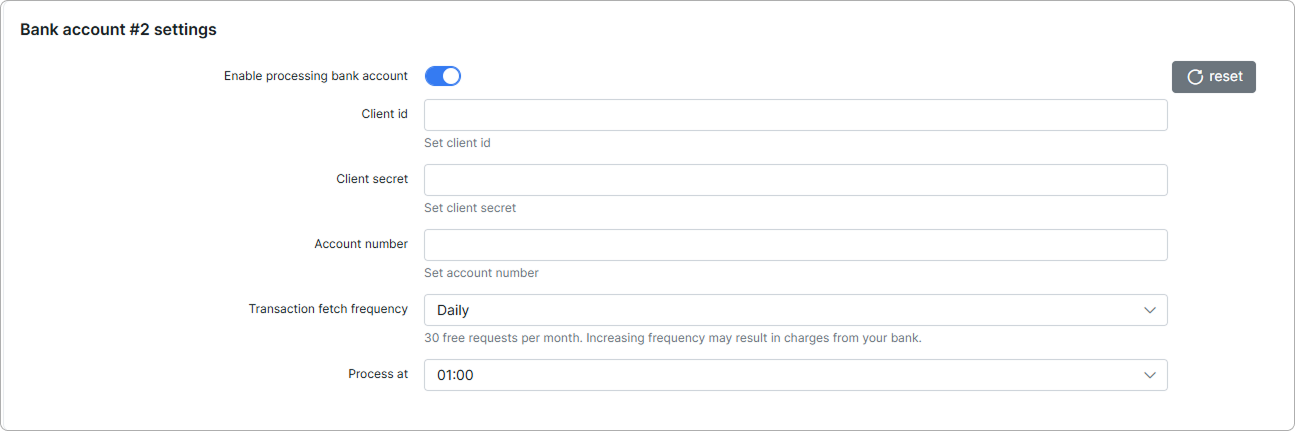
You can enable up to five bank accounts.
In the Import preview section of the FNB Integration, the bank account ID will be shown in its respective column:
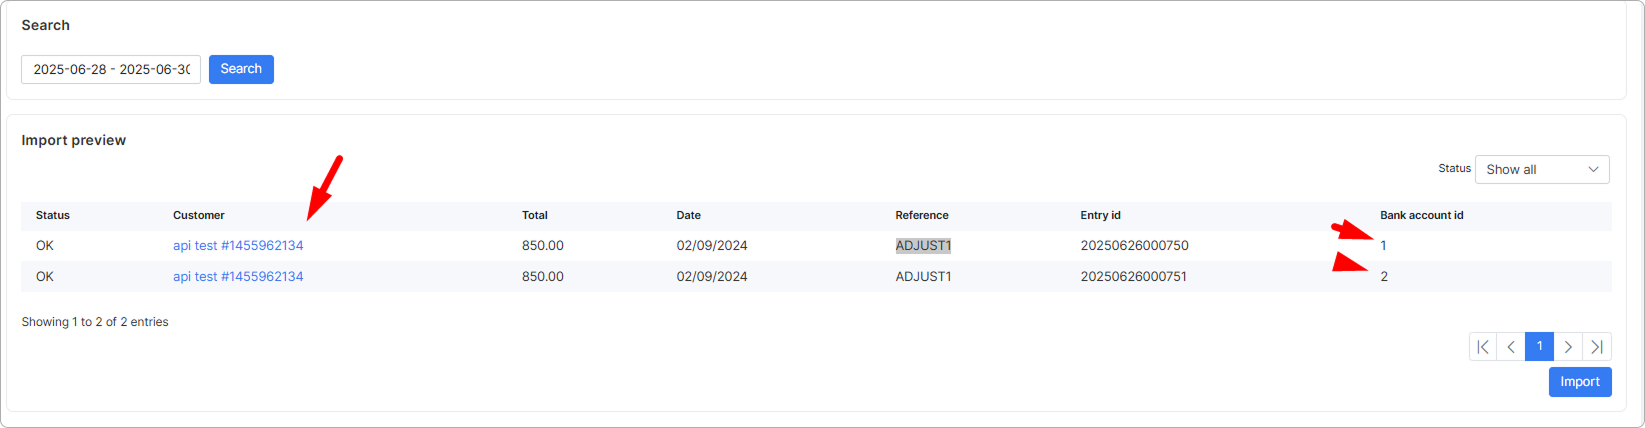
In the Payment statement history, each bank account will have a separate entry with its corresponding number:
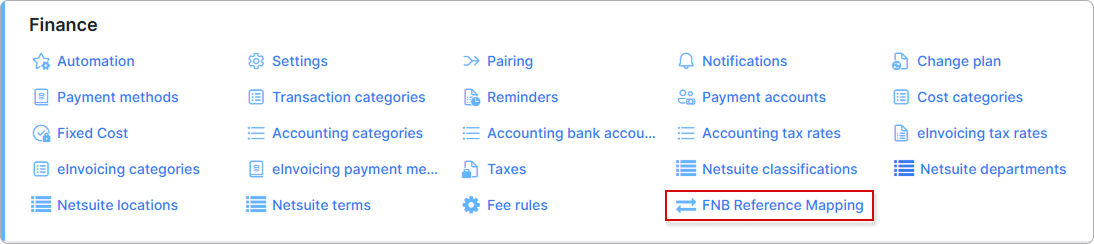
¶ FNB Reference Mapping
Starting from v5.2, payment-to-customer pairing is managed from a dedicated tool at Config → Finance → FNB Reference Mapping. Use it to link FNB references that would otherwise land as Not Found to the correct customer, without having to run a manual import.
Mappings are global — a single rule applies across all connected bank accounts, and it only affects transactions with the Not Found status. Standard matching by Reference value (Portal login / Portal name) is not overridden.
Pairings created in earlier versions via the Manual pairing icon in the Payments list are migrated into the Reference Mapping tool automatically on upgrade to v5.2.
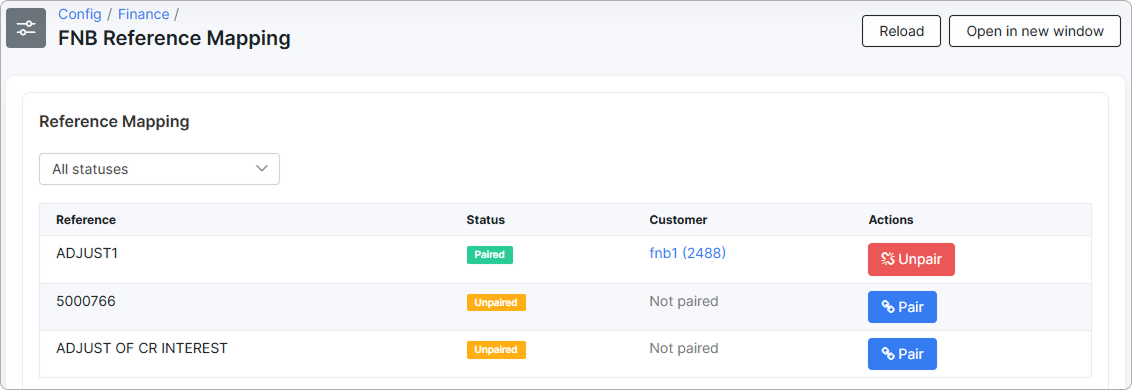
¶ Reference Mapping table
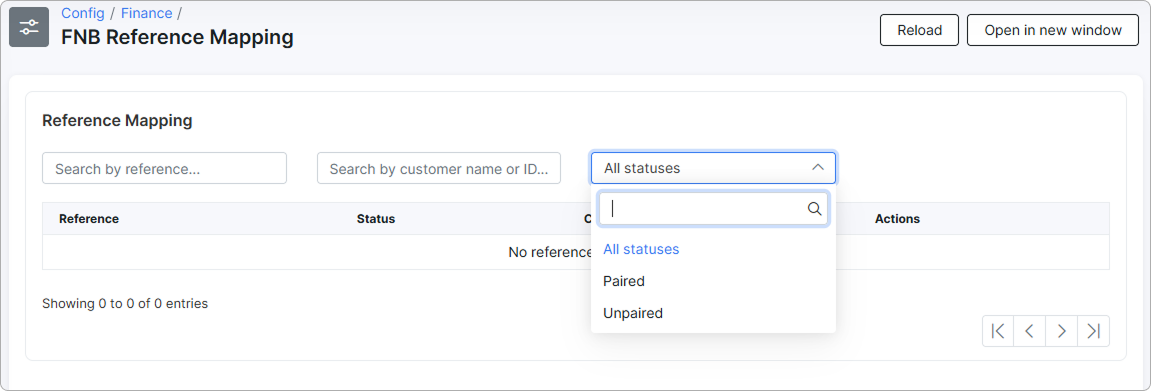
The table lists FNB references collected by the add-on during imports. It has the following columns:
- Reference — the FNB reference string that could not be matched automatically.
- Status — Paired (green) or Unpaired (orange).
- Customer — the customer linked to the reference, or Not paired when no customer is assigned.
- Actions — the blue
Pairbutton for unpaired references and the redUnpairbutton for paired references.
Use the Status dropdown above the table to filter entries — All statuses, Paired, or Unpaired.
The page header has the Reload and Open in new window buttons for refreshing the list and detaching the tool into a separate window.
¶ Pairing a reference
-
Click the
Pairbutton in the Actions column of an Unpaired row and select the customer to link to the reference. -
A scope confirmation modal opens with two options:
- Link future payments only — the rule applies to subsequent imports.
- Link future and past payments — immediately allocates previously Not Found payments that match this reference to the selected customer (backfill).
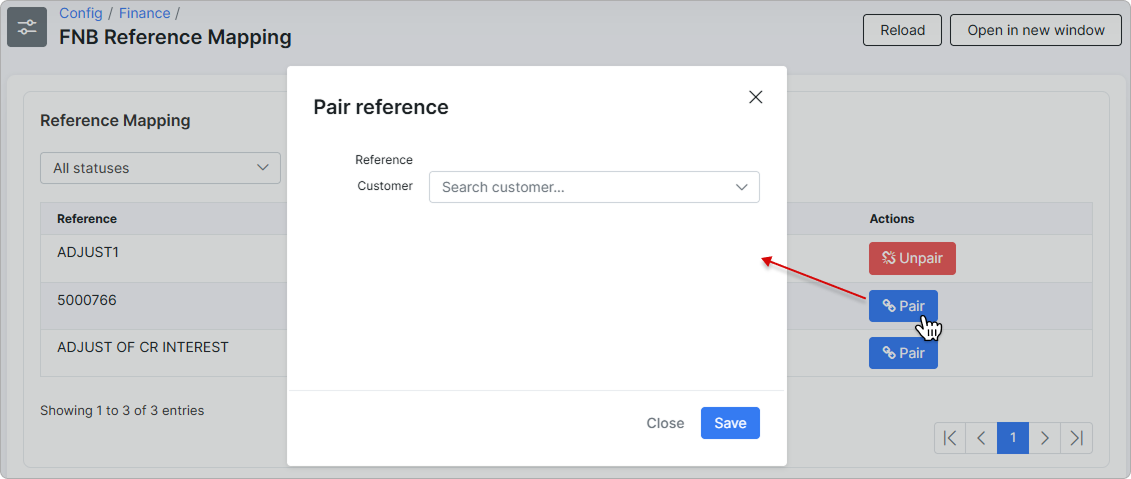
Multiple incorrect references (for example, "JOHN DOE 123" and "JOHNDOE123") can be paired to the same customer.
¶ Unpairing a reference
To remove an existing pairing, click the red Unpair button in the Actions column of a paired row. The Unpair reference confirmation modal opens with two options:
- Remove pairing only — the mapping is deleted, but payments already allocated through it remain allocated.
- Remove pairing + unallocate backfilled payments — the mapping is deleted and payments previously backfilled through it are unallocated.
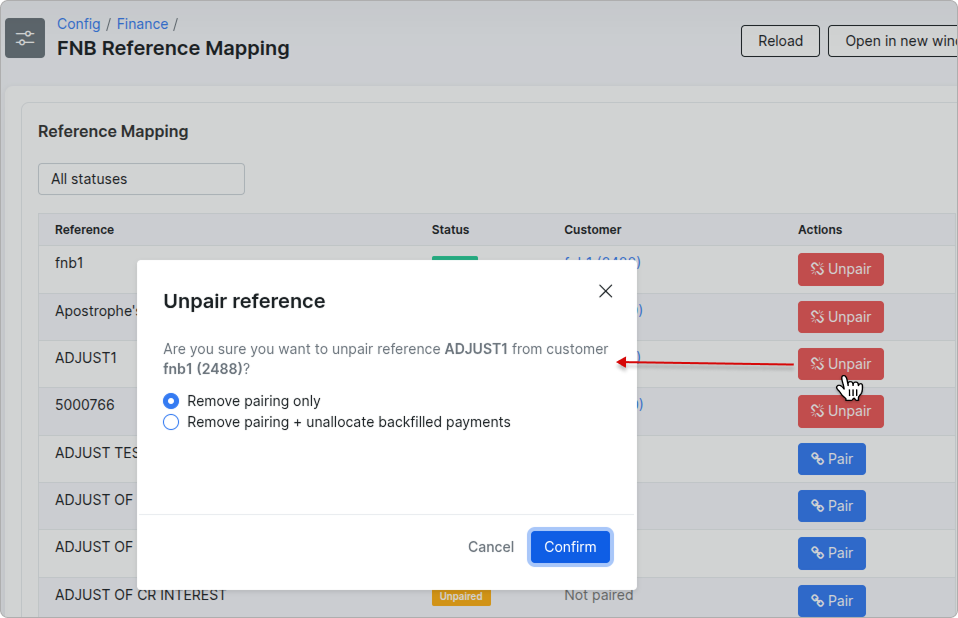
Click Confirm to apply or Cancel to close the modal without changes.
¶ Automatic reference collection
When the FNB add-on runs an import, any reference that does not match a customer is automatically added to the Reference Mapping table with the Unpaired status. You do not have to trigger a manual import to populate the list — new unknown references appear as soon as they arrive.
¶ Manual fetch
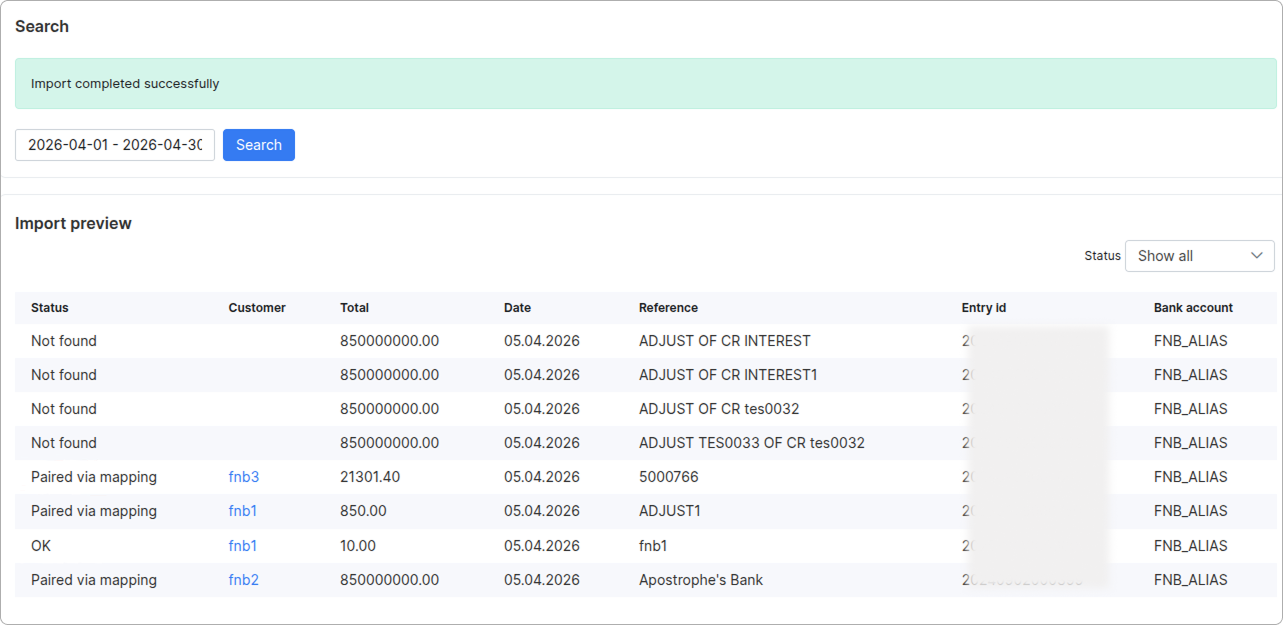
To manually fetch transactions from FNB, select the desired period in Finance → FNB integration and click Search.
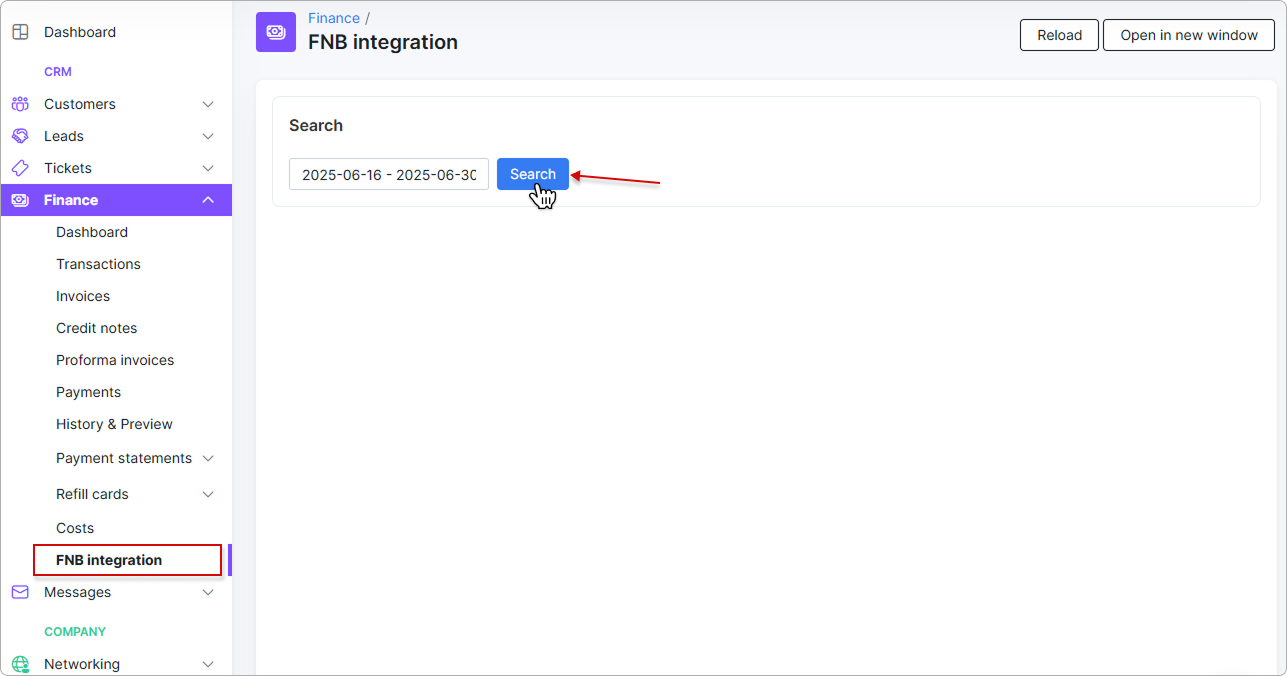
A preview table will appear, showing the customer's entries along with the transaction status, customer name, total amount, date, reference number, and Entry ID.
You can filter the entries by status using the dropdown in the top-right corner of the table.
If all details are correct, click Import at the bottom of the table to begin the process.
The Status column in the preview uses the following values:
- OK — the payment was matched automatically by the standard Reference value (Portal login / Portal name).
- Paired via mapping — the payment was matched through a rule configured in FNB Reference Mapping.
- Not found — no match was found by either method; the reference is added to the Reference Mapping table as Unpaired for later pairing.