¶ NetSuite accounting
- 1. Overview
- 2. Installation
- 3. Initial setup
- 4. Starting with NetSuite
- 5. Importing mapping
- 6. Mapping configuration
- 7. NetSuite additional attributes
- 8. Synchronization process
- 9. Other settings
- 10. NetSuite logs
¶ Overview
Splynx can sync customers, invoices/credit notes and payments with NetSuite accounting software.
For the NetSuite integration, there is a one-time payment of $1000. This integration package includes 2 hours of dedicated assistance from our engineers via the Zoom platform. Please be aware that the NetSuite integration is unique offering priced separately from our standard accounting add-on packages.
¶ Installation
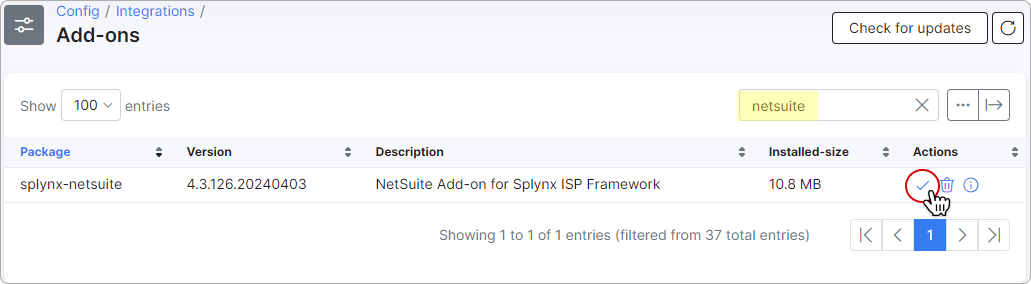
To install the NetSuite add-on, navigate to Config → Integrations → Add-ons:

Locate or search for splynx-netsuite in the list of add-ons. Next, click the Install button in the Actions column to begin the installation process:
To install the add-on via CLI, use the following commands:
apt-get update
apt-get install splynx-netsuite
¶ Initial setup
Firstly, create your NetSuite account, obtain the necessary credentials, and then proceed with the configuration within Splynx.
¶ NetSuite account
To start the integration process, you first need to have a NetSuite account.
After registration, you can obtain the necessary API keys to enter them into your Splynx account.
¶ API keys
API keys for NetSuite accounting can be obtained through the following steps:
-
Log in to NetSuite: Access your NetSuite account with an administrator or a role with sufficient permissions to manage integrations.
-
Set Up Integration Role:
- Navigate to
Setup → Users/Roles → Manage Roles. - Create a new role (e.g., "Integration Role") with the necessary permissions for the API integration.
- Assign this role to the user account that will be used for the integration.
- Enable Token-Based Authentication (TBA):
- Go to
Setup → Company → Enable Features. - Under the SuiteCloud tab, ensure Token-Based Authentication is enabled.
- Create Integration Record:
- Navigate to
Setup → Integration → Manage Integrations → New. - Fill in the details for the integration (e.g., name, authentication method).
- Ensure Token-Based Authentication is checked.
- Save the integration to get the Consumer Key and Consumer Secret. These are part of your API keys.
- Create Access Tokens:
- Go to
Setup → Users/Roles → Access Tokens → New. - Select the application (integration), user, and role you created earlier.
- Click
Saveto get the Token ID and Token Secret.
- Compile API Keys:
You will now have the following set of credentials required for accessing NetSuite API:
- Consumer Key
- Consumer Secret
- Token ID
- Token Secret
For security reasons, the values for Token ID and Token Secret are only displayed on the initial setup page of the NetSuite account. They cannot be retrieved from the system. If you did not retain this information, you will need to create a new token.
Ensure that you store these credentials securely as they grant access to your NetSuite account. These keys will be used in your API requests to authenticate and authorize the integration with Splynx.
¶ Configuration in Splynx
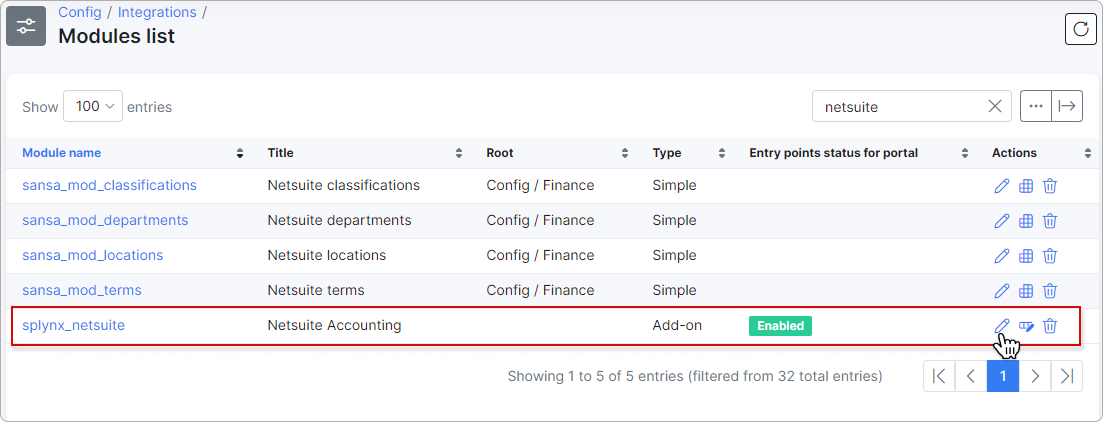
Before beginning work with NetSuite, you need to configure it in Splynx. To do this, navigate to Config → Integrations → Modules list:

Locate the splynx_netsuite module, and click the Edit button next to it in the Actions column:
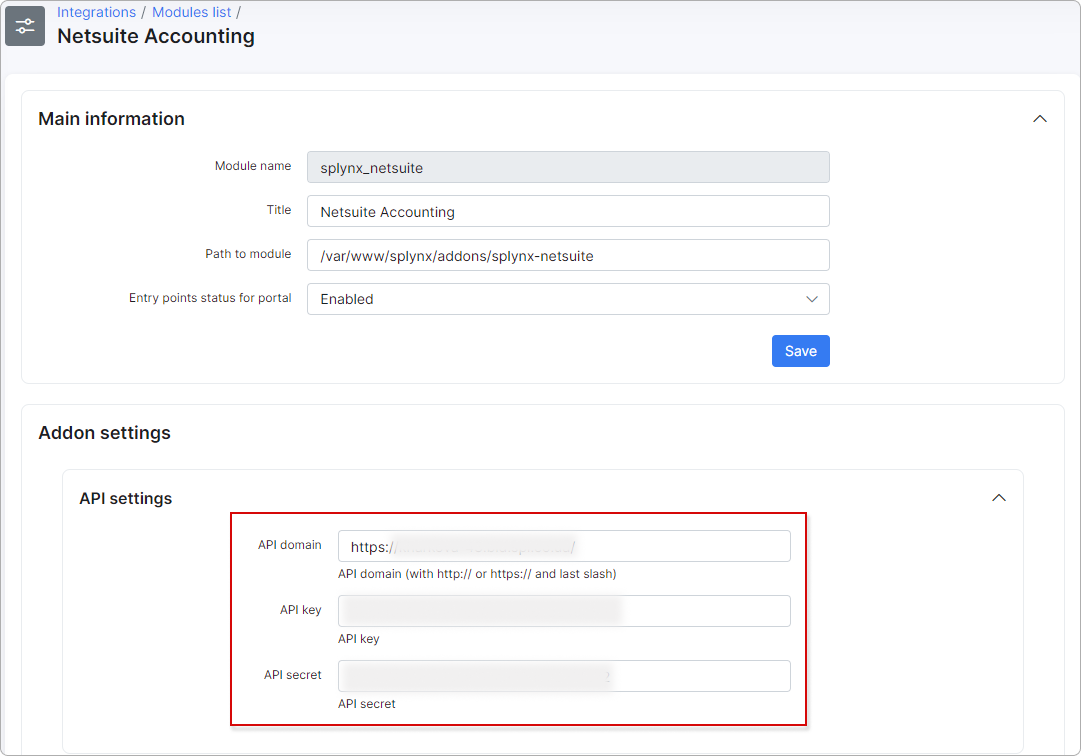
¶ Splynx API settings
Do not change the API key and API secret that are set by default:
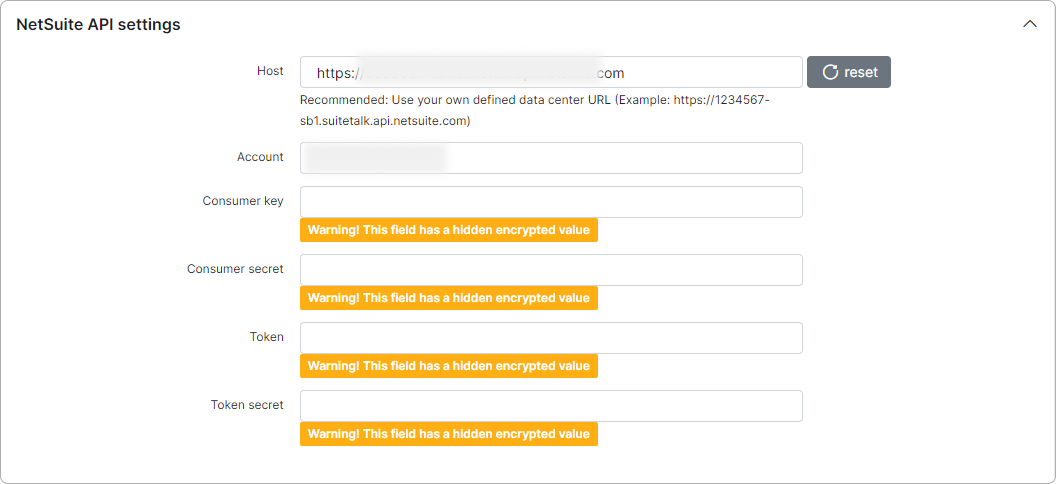
¶ NetSuite API settings
Please specify the credentials obtained from your NetSuite account here:
¶ Synchronization settings
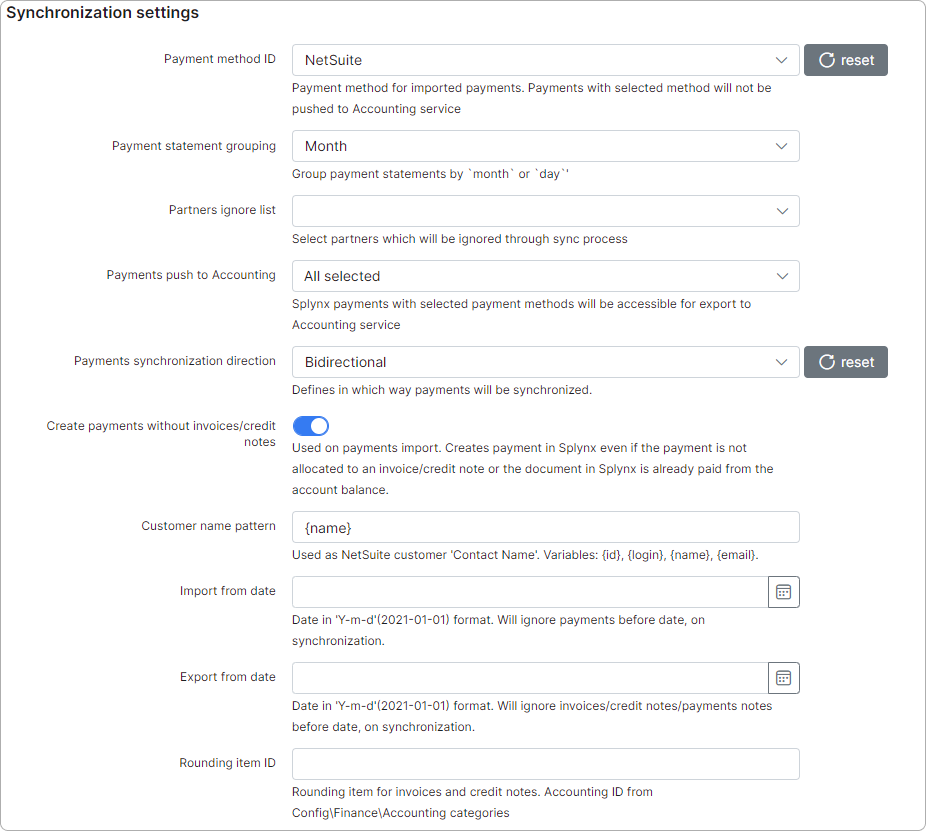
- Payment method ID - select the payment method for imported payments;
Payments with selected method will not be pushed to Accounting service. - Payment statement grouping - group payment statements by Month or Day;
- Ignore inactive customers - toggle this option to exclude inactive customers and their financial documents during sync. However, if a customer was synced before deactivation or manually paired, their financial documents will still be included;
- Push document number to NetSuite - controls which system numbers the exported documents. When enabled (default), the Splynx invoice/credit note number is sent to NetSuite as the Transaction ID (
tranId). When disabled, Splynx omits the number and NetSuite assigns its own sequential number from its numbering series. Disable it when NetSuite must be the source of official document numbering, for example to satisfy a tax regulator; - Partners ignore list - the customers, invoices/credit notes and payments of the selected partners WILL NOT be synced with NetSuite;
- Payments push to Accounting - Splynx payments made with selected payment methods will be accessible for export to NetSuite;
- Payments synchronization direction - define the direction for payment synchronization: NetSuite → Splynx, Splynx → NetSuite, or Bidirectional;
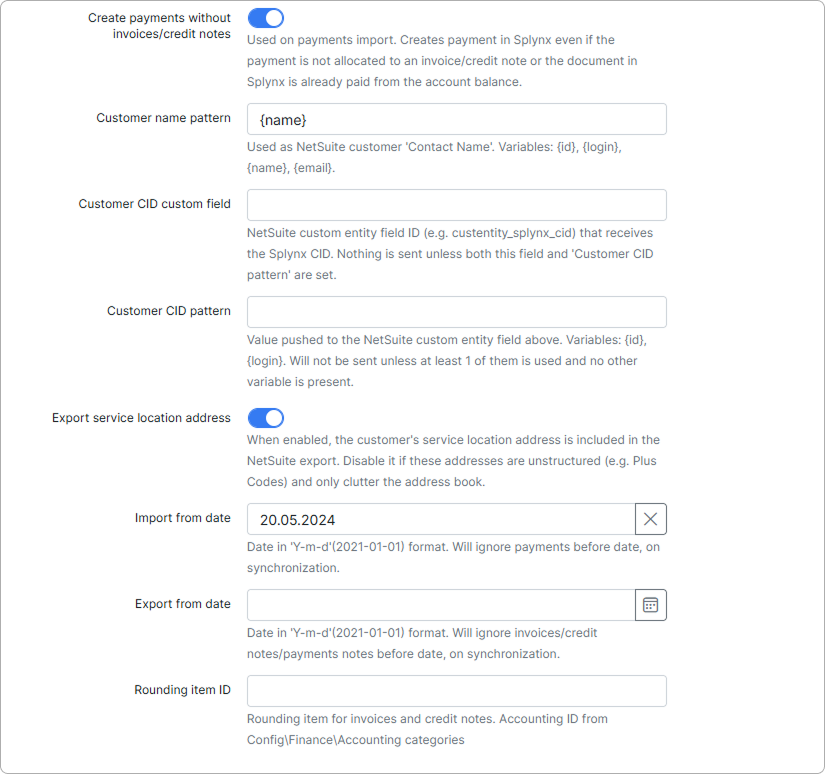
- Create payments without invoices/credit notes - used for payments import. If enabled, creates a payment in Splynx even if the payment is not allocated to an invoice/credit note or if the document in Splynx is already paid from the account balance;
- Customer name pattern - you can export customers to NetSuite with modified names according to the specified pattern. The value is sent as the NetSuite customer Contact Name. Variables may include:
{id},{login},{name},{email}; - Customer CID custom field - the ID of the custom entity field in NetSuite that receives the Splynx customer ID, or CID (for example,
custentity_splynx_cid). Create the field in NetSuite first, then enter its ID here. Nothing is sent unless both this field and Customer CID pattern are filled in; - Customer CID pattern - the value pushed to the NetSuite custom entity field specified above. The following variables can be used, separately or combined:
{id},{login}. The value is not sent unless at least one of them is used and no other variable is present; - Export service location address - when enabled (default), the customer's service location address is included in the NetSuite export as a separate entry in the customer's address book. Disable it if your service location addresses are unstructured — for example, Plus Codes instead of a street — and only clutter the address book. Disabling affects the Splynx service location address block only; the Splynx billing address and Splynx customer address blocks are still exported;
- Import from date - specify the date from which to start importing payments, which is useful for not importing historical payments that are not relevant or already accounted for;
- Export from date - specify the date by which invoices, credit notes, or payments will not be exported;
- Rounding item ID - specify the rounding item for invoices and credit notes. The accounting ID can be obtained from Config → Finance → Accounting categories.
Customer CID custom field and Customer CID pattern work independently of Customer name pattern. This means you no longer need to put '{id}' or '{login}' into the name pattern to get the CID into NetSuite — keep the name pattern as '{name}' so the first name / last name split on export is not affected, and push the CID through the custom entity field instead.
¶ Cron settings (automatic synchronization)
These are the global settings for automatically syncing items between the two platforms in any selected syncing direction:
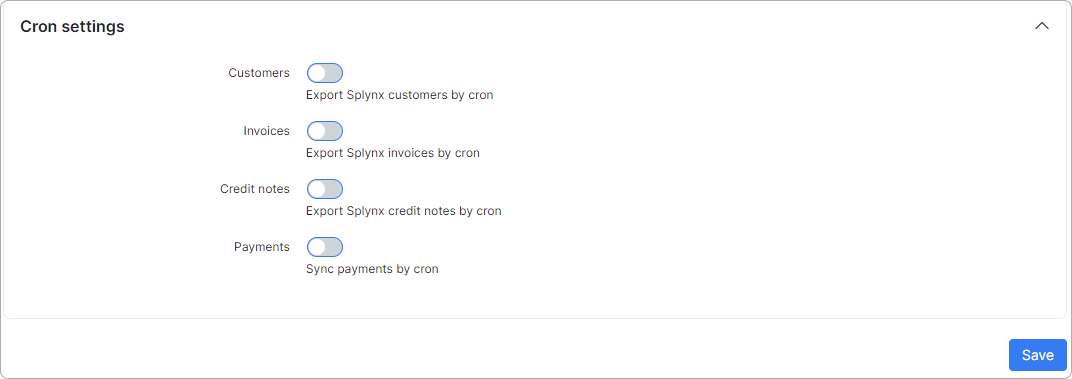
 All cron toggles are disabled by default.
- Cron launch time - set the time when cron jobs are launched for automatic synchronization, in
HH:MMformat (for example,07:42). To run the synchronization several times a day, enter multiple values separated by commas — for example,07:00,13:00,19:00. - Customers - enables/disables automatic syncing of customers;
- Invoices - enables/disables automatic syncing of invoices;
- Credit notes - enables/disables automatic syncing of credit notes;
- Payments - enables/disables automatic syncing of payments.
It is recommended that all settings in the Cron settings section be disabled during the initial setup of the add-on to prevent automatic syncing of these elements via cron jobs. The first import and export should be performed manually in Finance → NetSuite Accounting.
¶ Starting with NetSuite
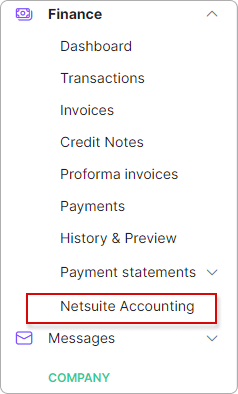
After the installation process is completed, the NetSuite Accounting item will appear under the Finance section:
¶ Importing mapping
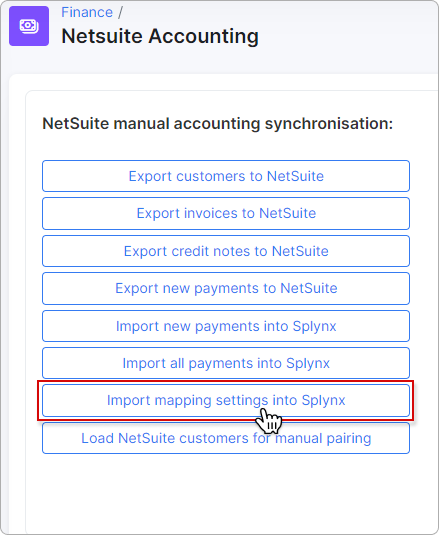
The next step is to import the mapping settings into Splynx. To do this, navigate to Finance → Netsuite Accounting:
¶ Mapping configuration
To sync invoices, credit notes, and payments, you need to configure mappings in the Config → Finance:

¶ Accounting categories
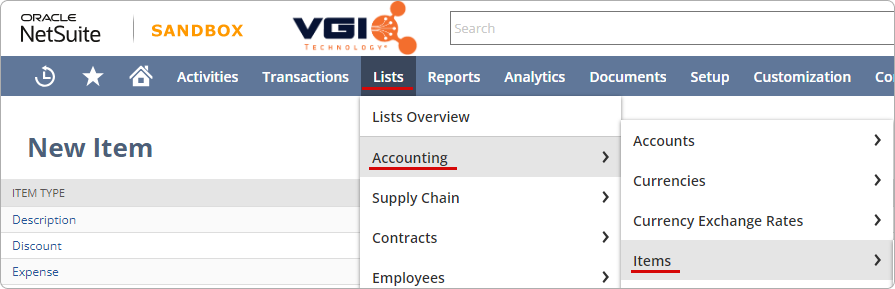
All accounting categories from NetSuite (Lists → Accounting → Items) must be assigned to transactions categories in Splynx (Config → Finance → Transaction categories):
NetSuite:
Splynx:
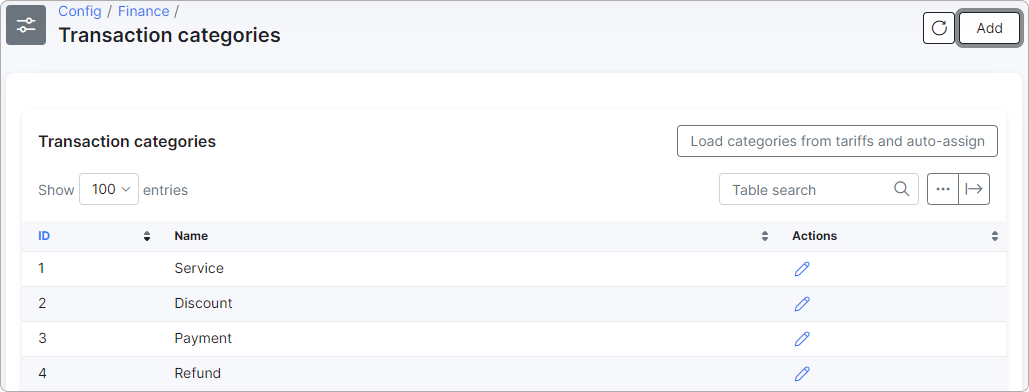
This can be done in two ways:
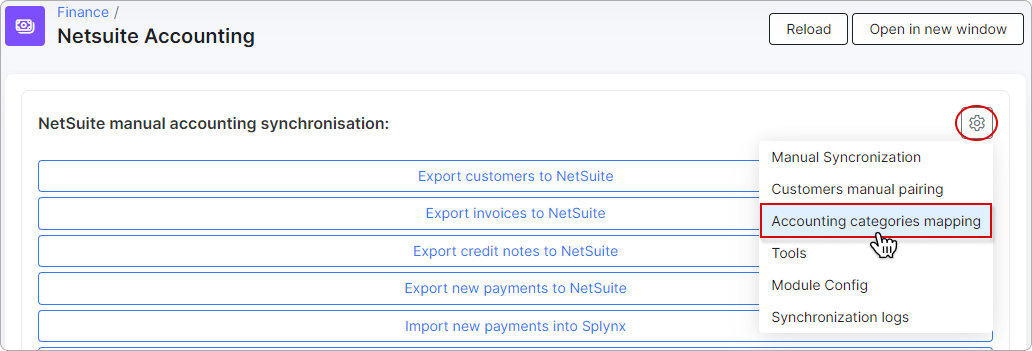
- By clicking on the
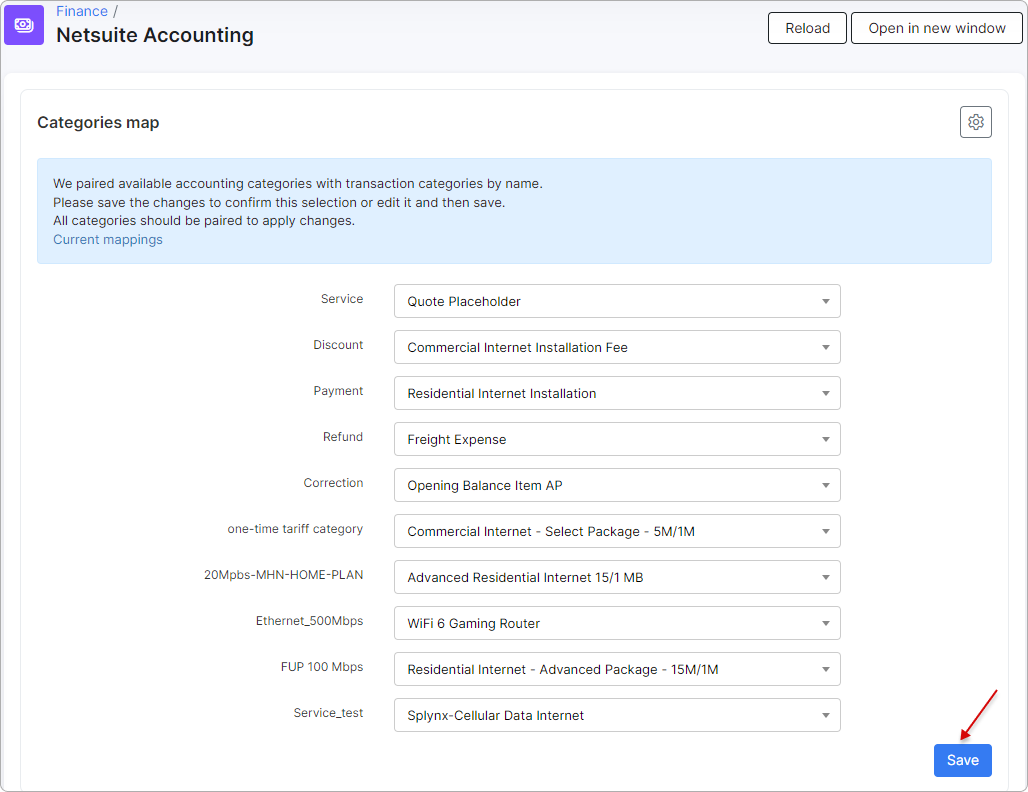
Accounting categories mappingitem in the Settings menu under Finance → NetSuite Accounting; it will generate a preview of the transaction categories that will be paired with accounting categories by category name. You can manually select another category to pair from the dropdown list. Afterward, click theSavebutton to initiate the pairing process:
- Under
Config → Finance → Accounting categories:
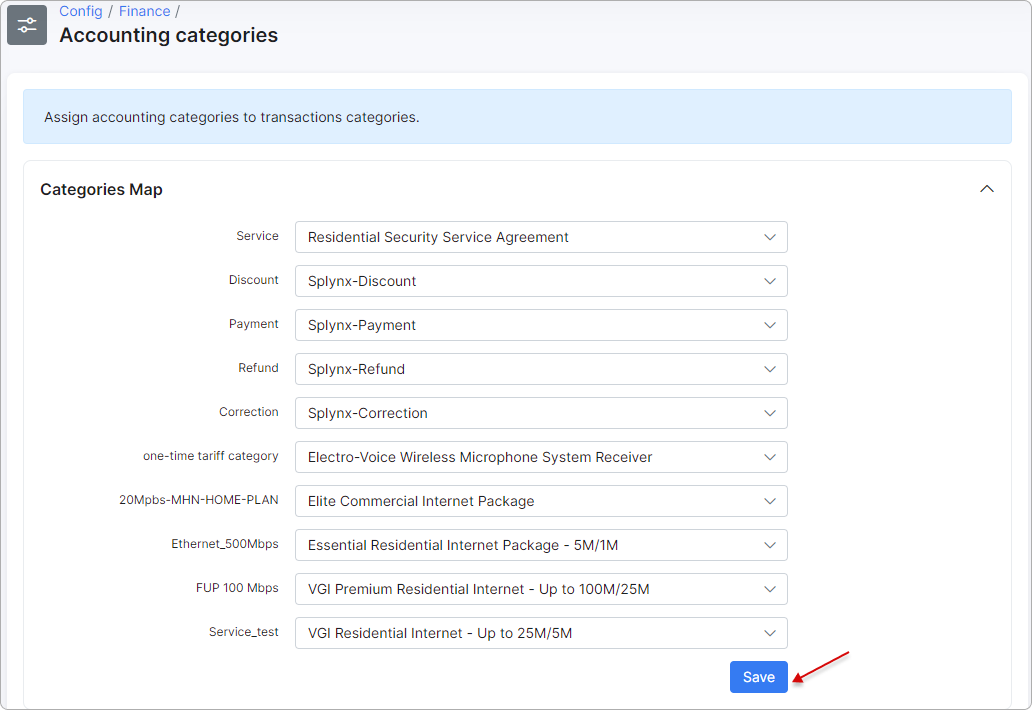
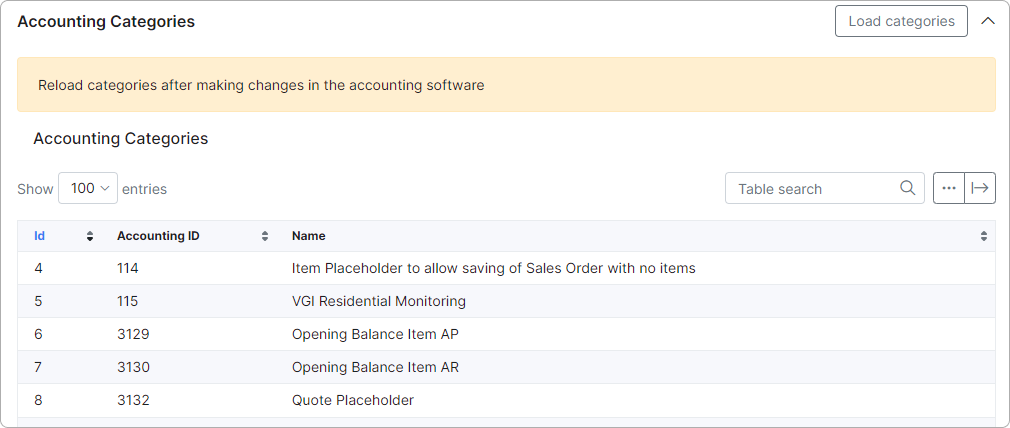
List of accounting categories loaded into Splynx:
¶ Accounting bank accounts
As soon as the relevant categories are configured, we can proceed with bank accounts. Navigate to Config → Finance → Accounting bank accounts.
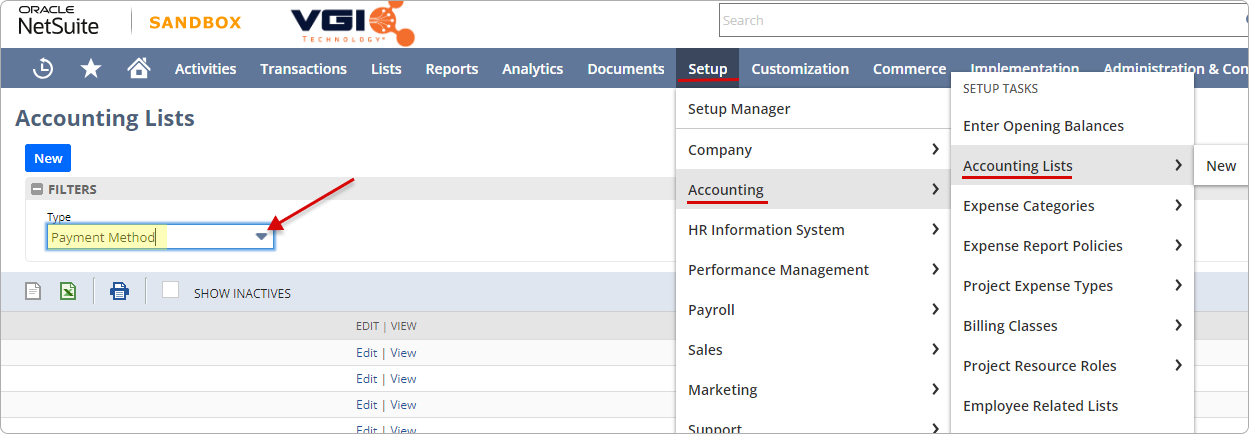
Assign the NetSuite bank accounts (NetSuite: Setup → Accounting → Accounting Lists) to payment methods (Config → Finance → Payment methods) in Splynx.
Payment methods in NetSuite:
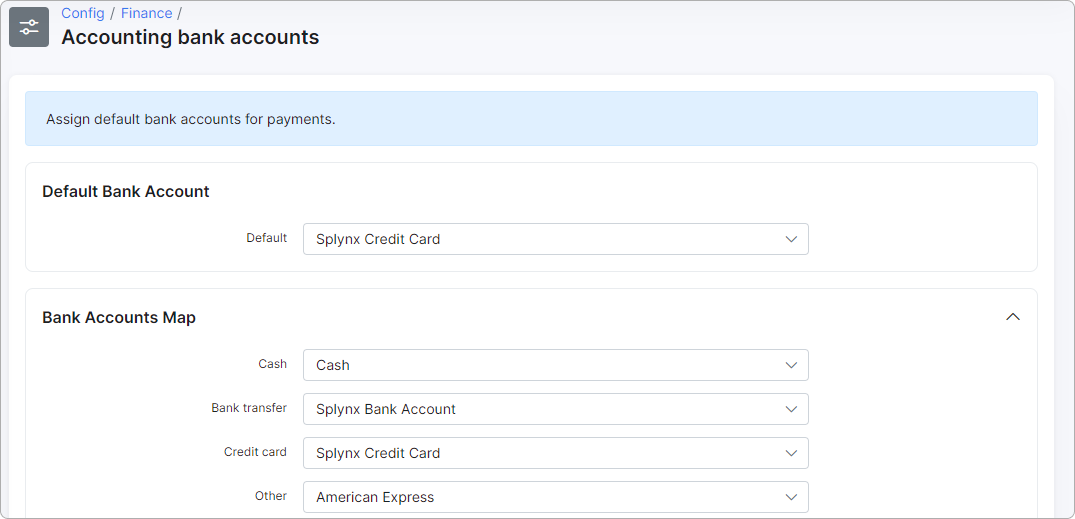
Also, the default bank account should be selected. Then click on Save.
Bank accounts map in Splynx:
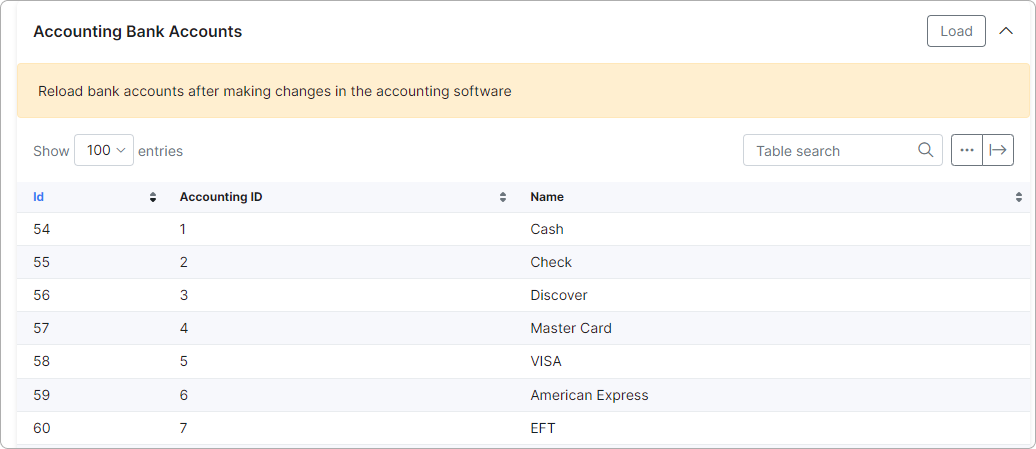
List of NetSuite bank accounts loaded into Splynx:
¶ Accounting tax rates
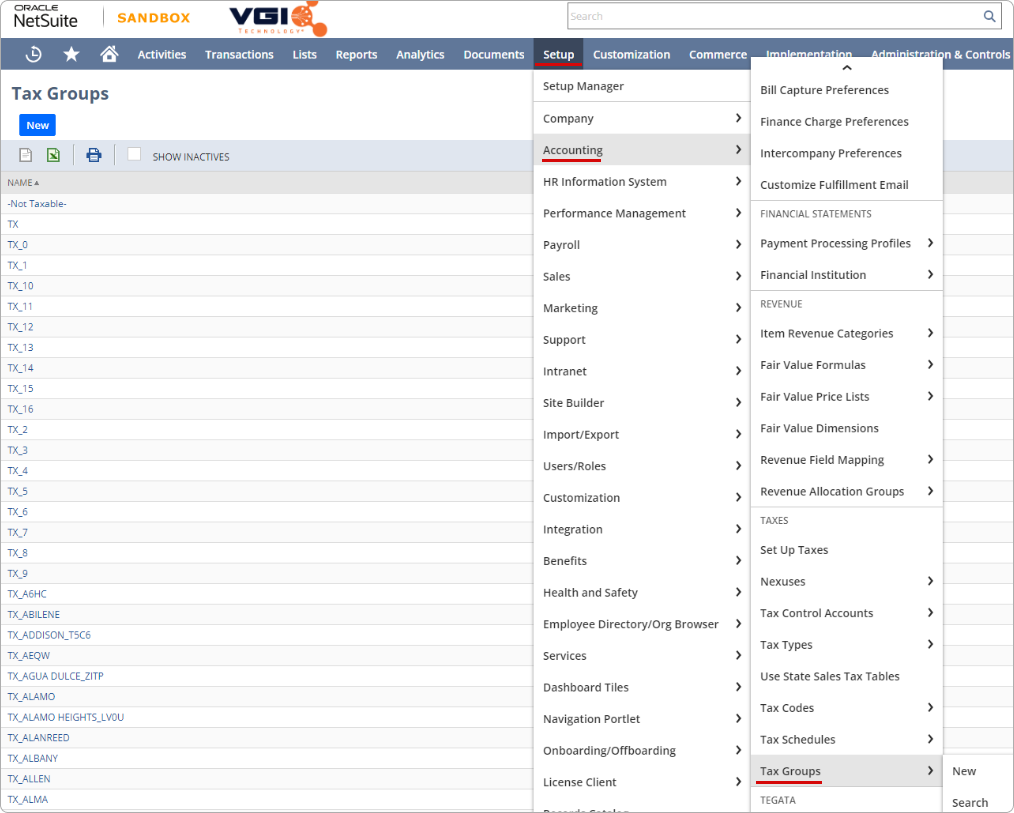
You can set tax rates in NetSuite under Setup → Accounting → Tax Groups:
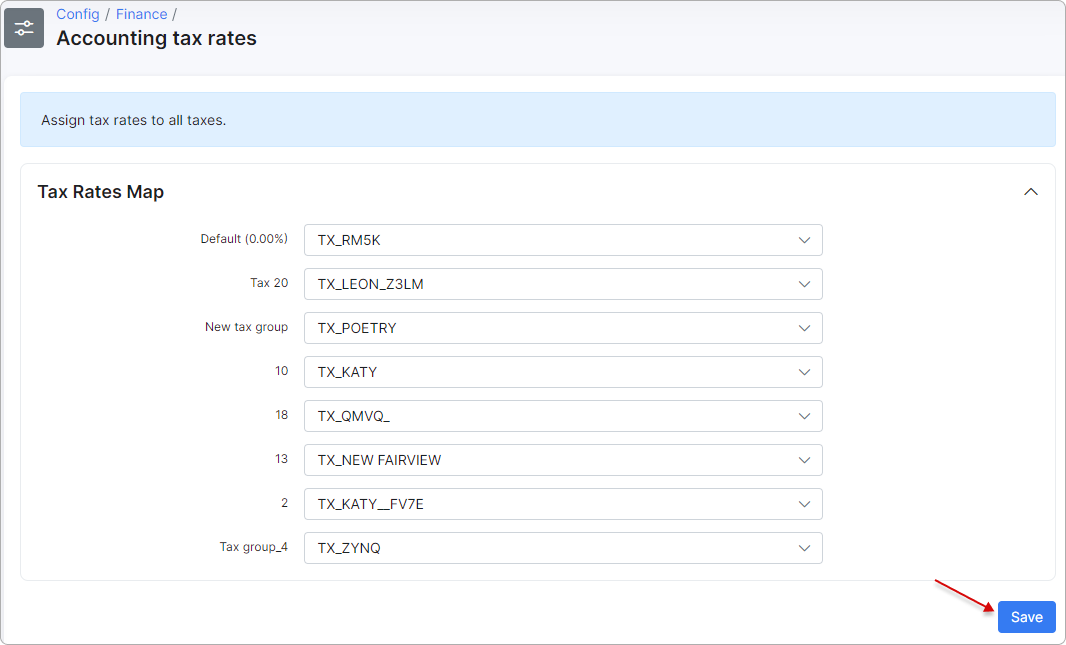
After that, to assign tax rates from Splynx to those from NetSuite, navigate to Config → Finance → Accounting tax rates in the Splynx interface. Then click on Save.
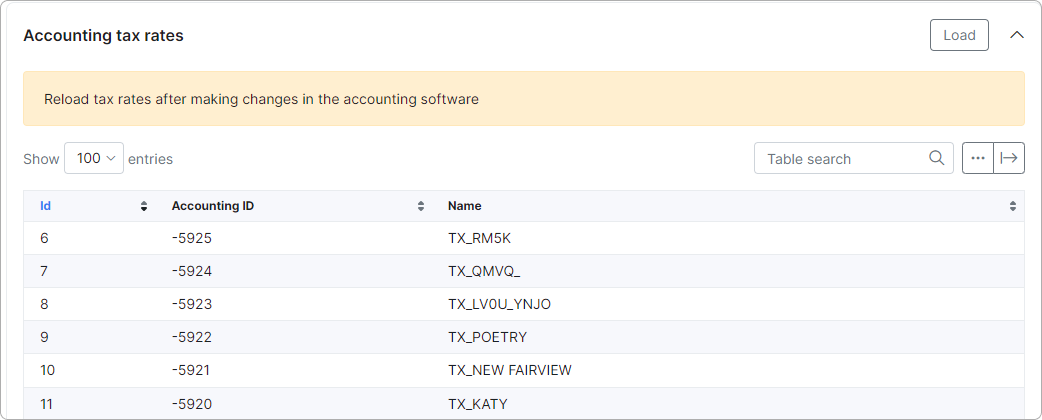
List of NetSuite tax rates loaded into Splynx:
¶ NetSuite additional attributes
Additional attributes required for syncs will be loaded when importing the mapping settings into Splynx to simple modules and added as a relation AF to customers, invoices, and credit notes.
Such attributes can be configured in Config → Finance by selecting the necessary item:

¶ Classifications
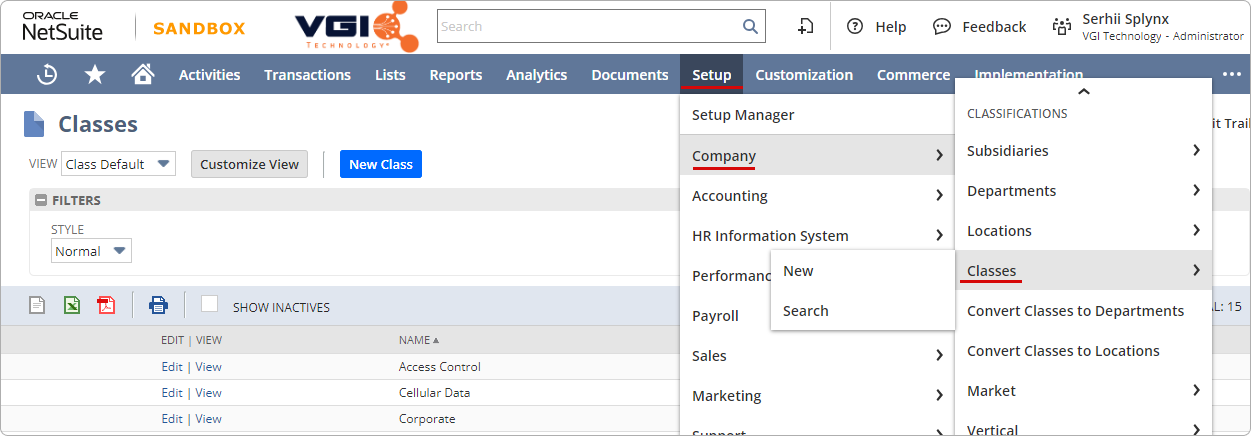
NetSuite: Setup → Company → Classes:
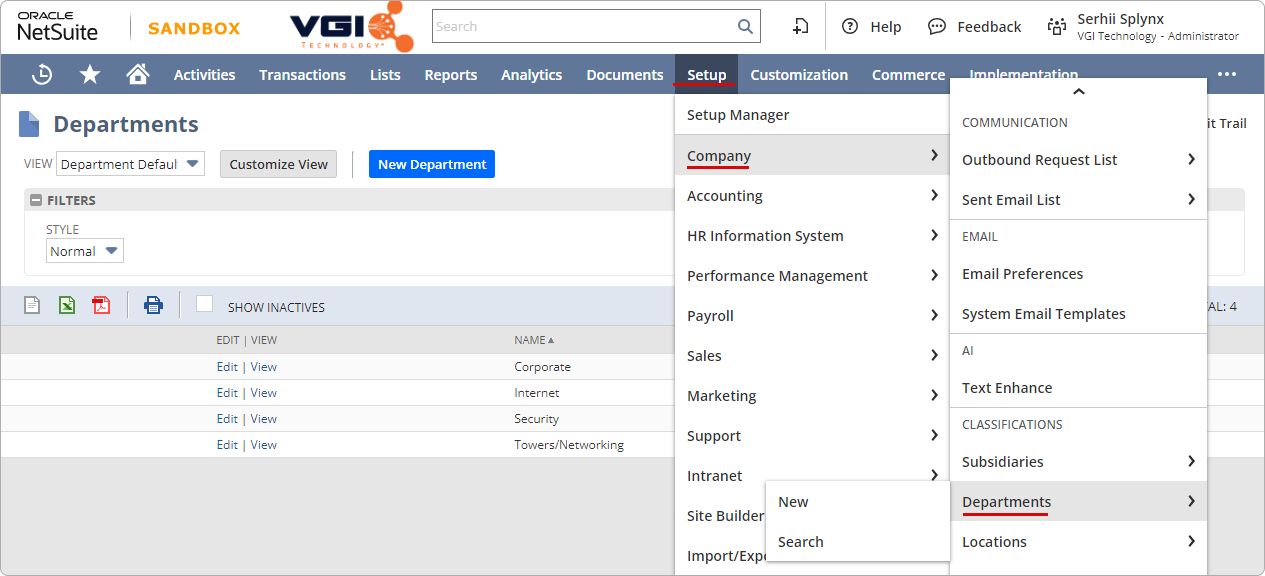
¶ Departments
NetSuite: Setup → Company → Departments:
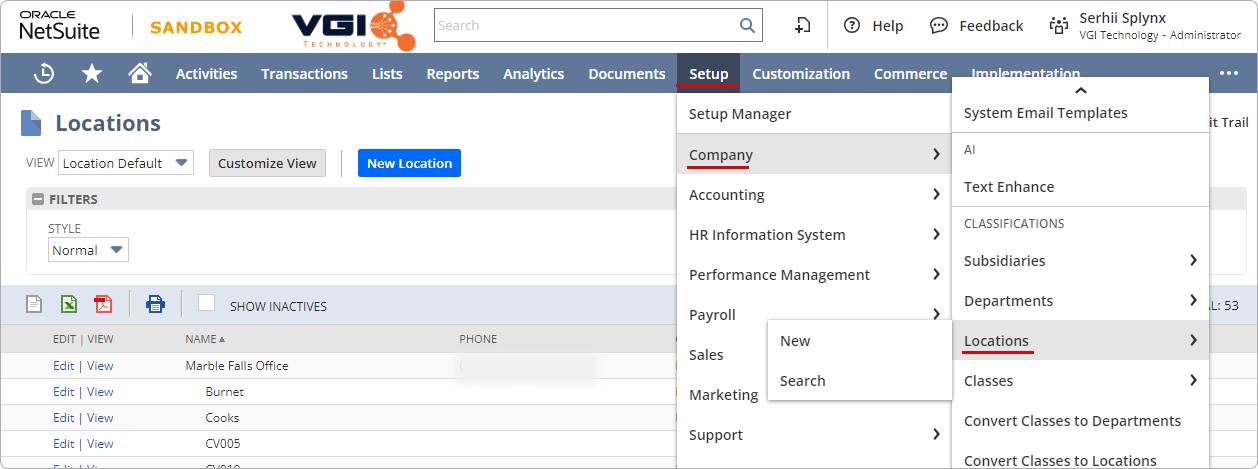
¶ Locations
NetSuite: Setup → Company → Locations:
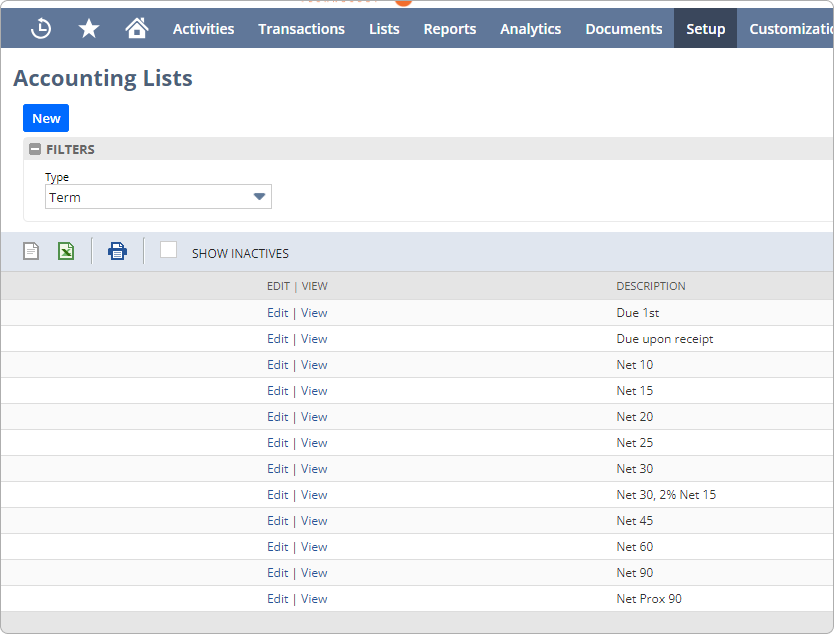
¶ Terms
NetSuite: Setup → Accounting → Accounting Lists → Terms:
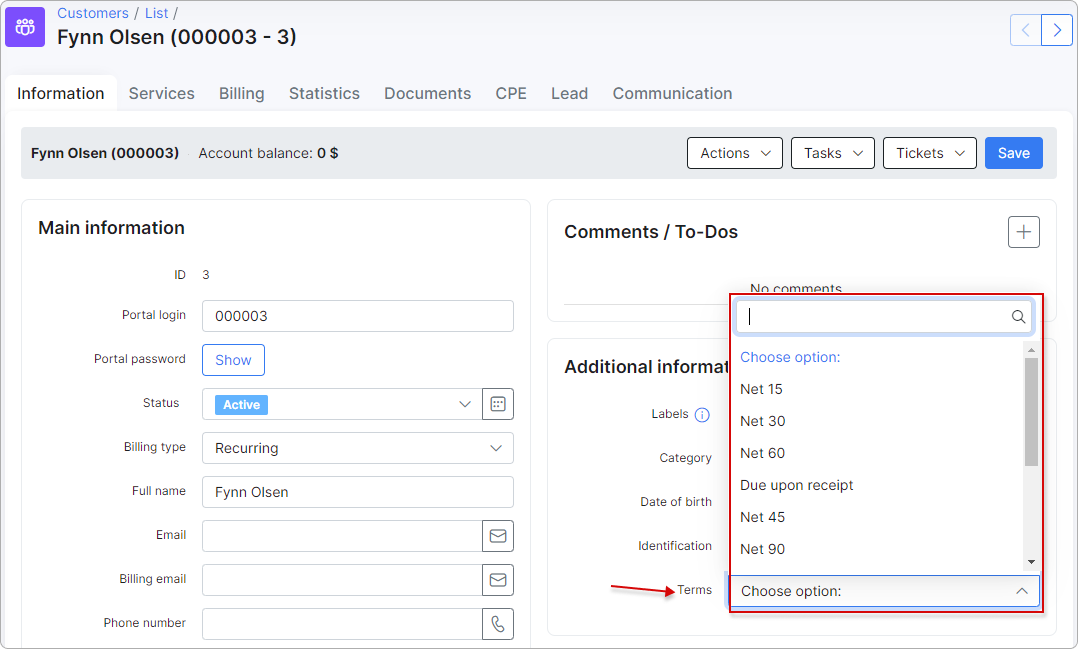
In Splynx, you can set up Terms for customers in their Information section. These will be used for invoice and credit note exports:
¶ Synchronization process
¶ Customers
When the accounting settings are complete, you can export customers from Splynx to NetSuite or match existing clients in the databases:
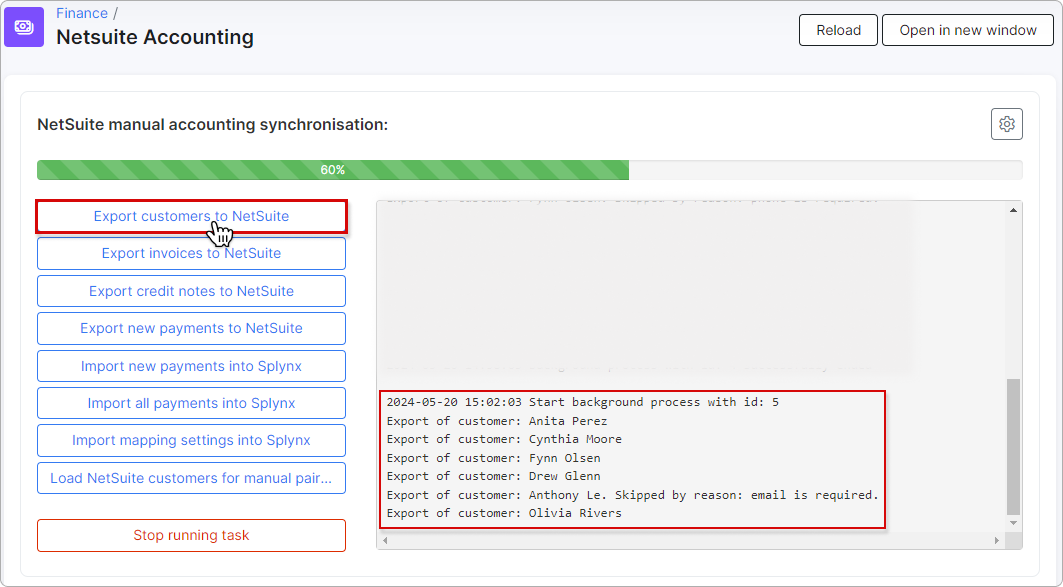
Then check if all clients were pushed to NetSuite:
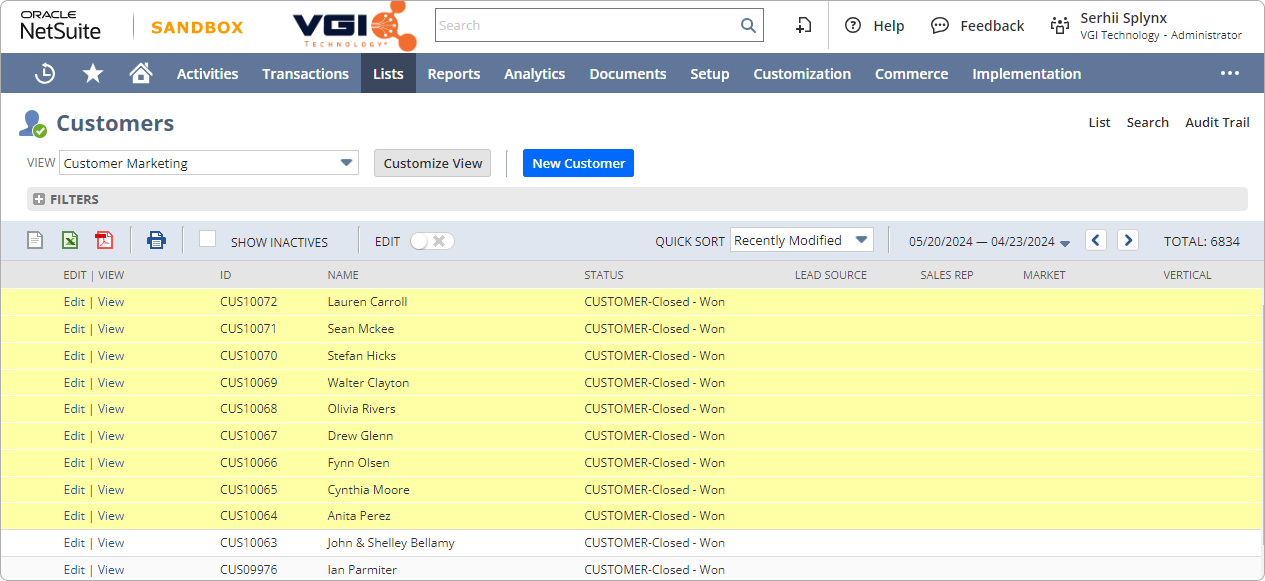
Customer service addresses will be exported to NetSuite (if populated in the format: 'street, city, zip'). To leave service location addresses out of the export entirely, disable Export service location address in the add-on configuration.
Ensure that the customers for export have an email address, phone number, ZIP code, and street address in their Splynx profiles.
¶ Invoices and Credit notes
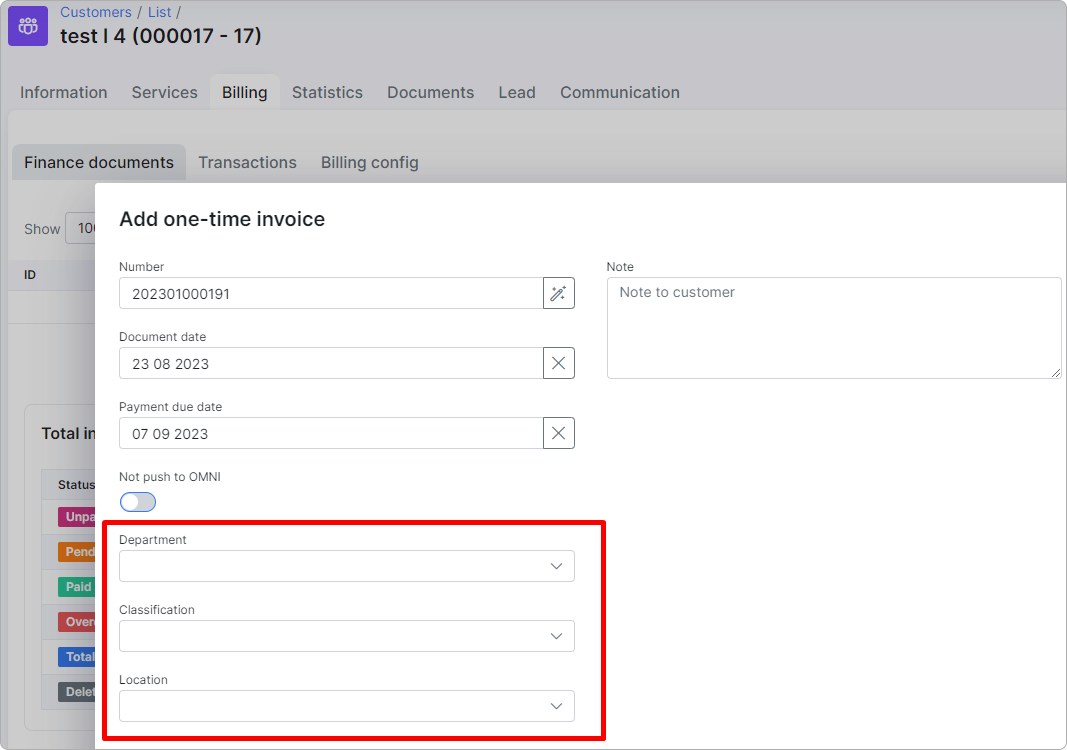
For invoices and credit notes, there are additional fields that need to be populated. By default, none of these fields are required, but you have the option to make them mandatory in both NetSuite and Splynx.
Once the customers' export is completed, you can export invoices/credit notes:
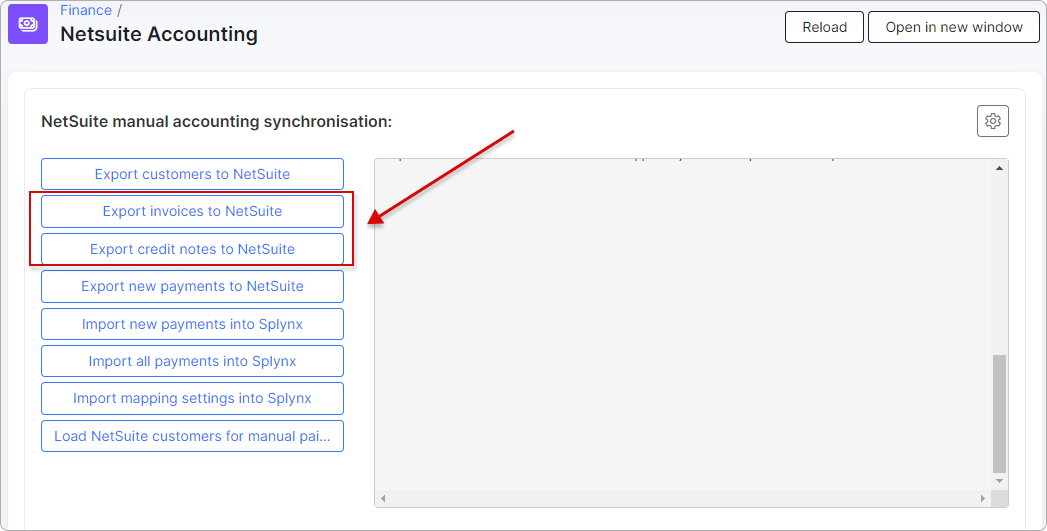
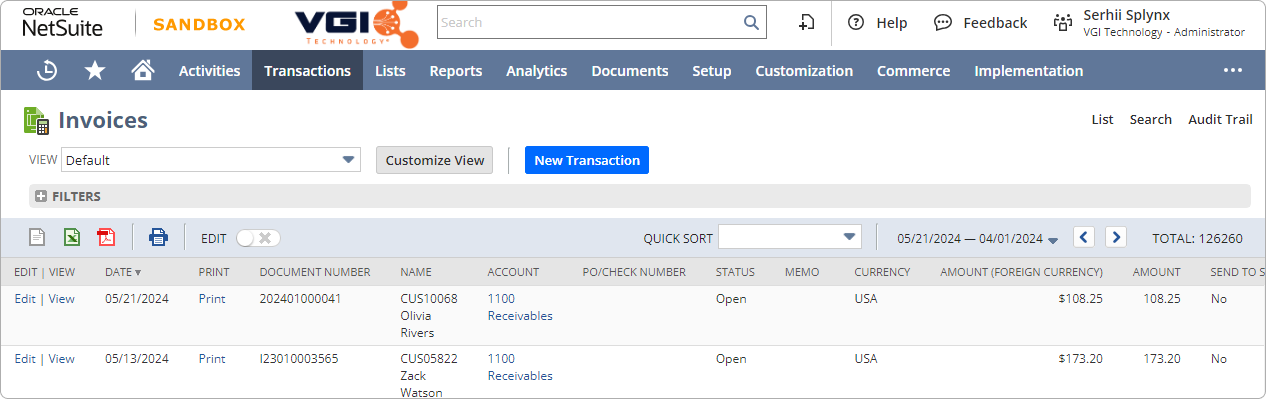
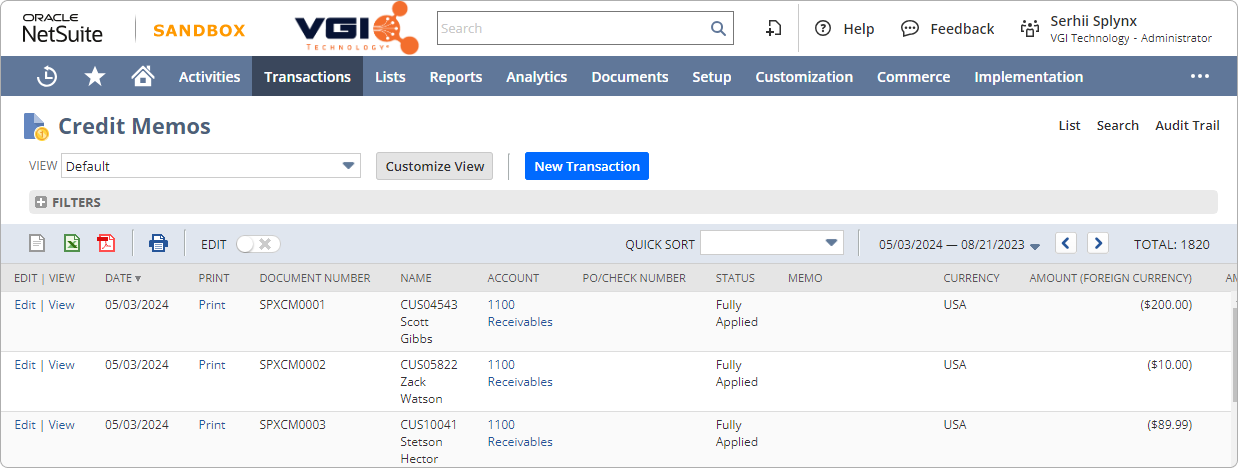
Check if all invoices/credit notes were pushed to NetSuite:
Invoices
Credit notes
If Push document number to NetSuite is disabled in the add-on config, exported invoices and credit notes keep their Splynx numbers in Splynx, but NetSuite numbers them with its own series — so the same document has a different number in each system. Keep the option enabled if you rely on matching numbers across both platforms.
¶ Payments
First of all, you need to export payments from Splynx:
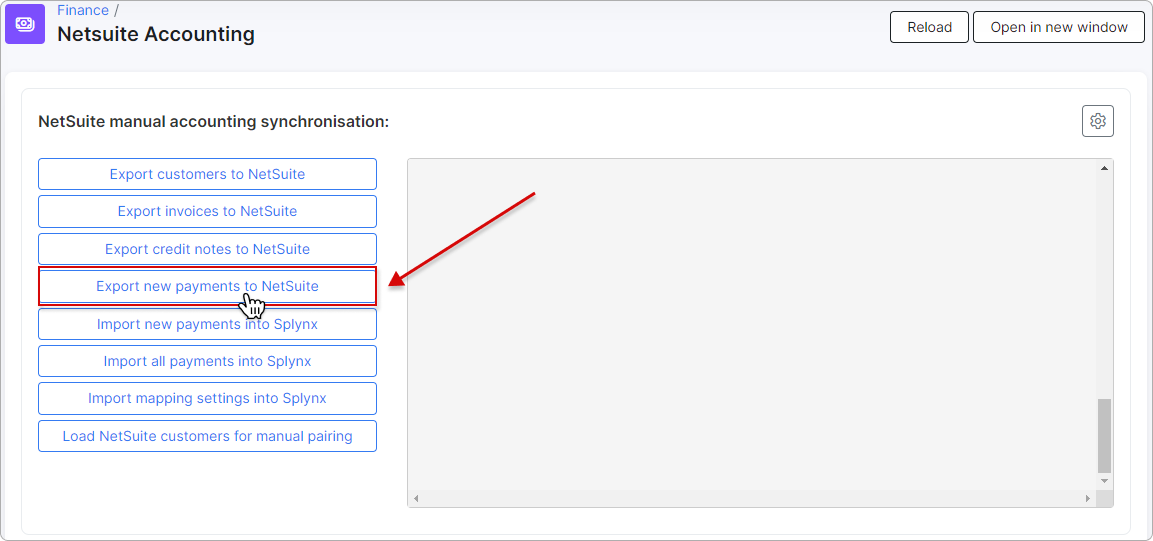
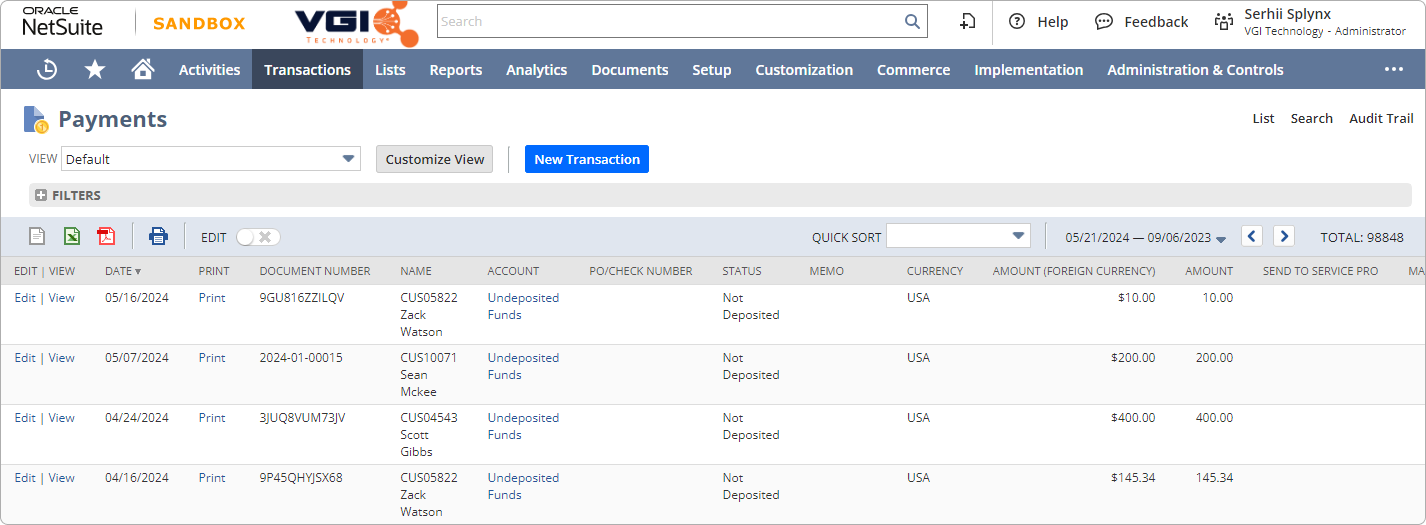
Here, we can see our exported payments in NetSuite:
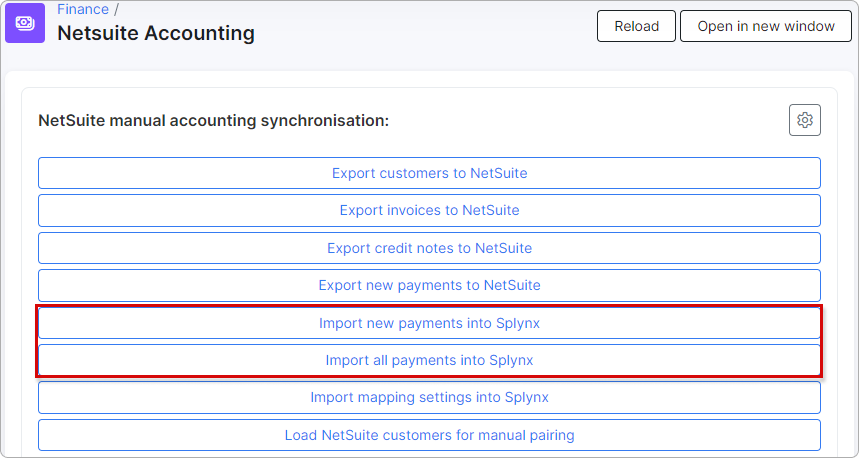
Payments can also be imported from NetSuite. You have the option to import either new payments exclusively or all payments.
Sometimes, when you need to create a payment for a later date on NetSuite, attempting to import such a payment by clicking on Import new payments into Splynx may result in import failure. In such cases, we recommend clicking the Import all payments into Splynx button instead.
If Create payments without invoices/credit notes is disabled in the add-on config and no invoice is added to Splynx, a payment statement will be created in Splynx. If the option is enabled, then a payment will be created for such a payment statement.
¶ Example of importing payments from NetSuite into Splynx
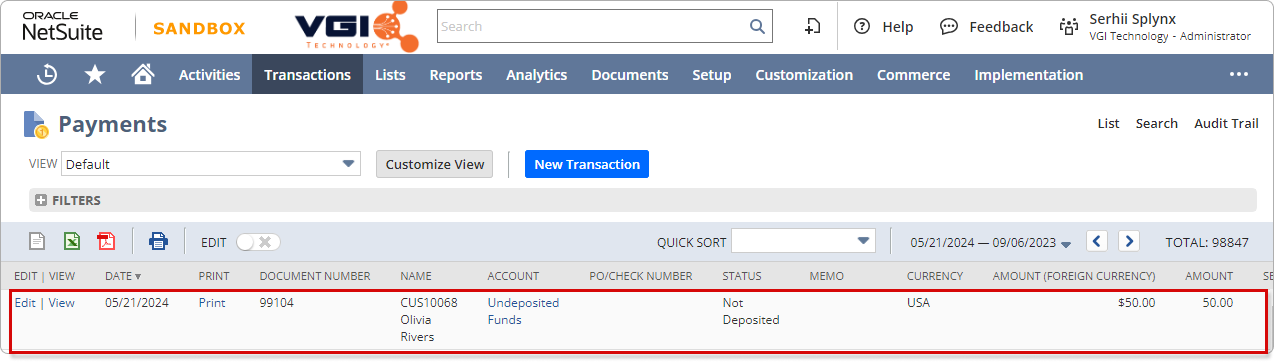
Here, we've created a payment in NetSuite:
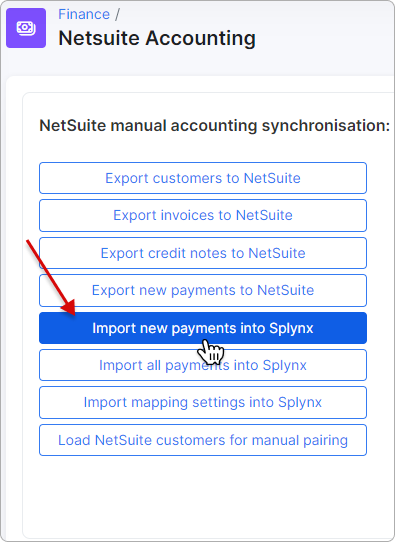
Now we need to import this payment into Splynx. Navigate to Finance → Netsuite Accounting and click the Import new payments into Splynx button:
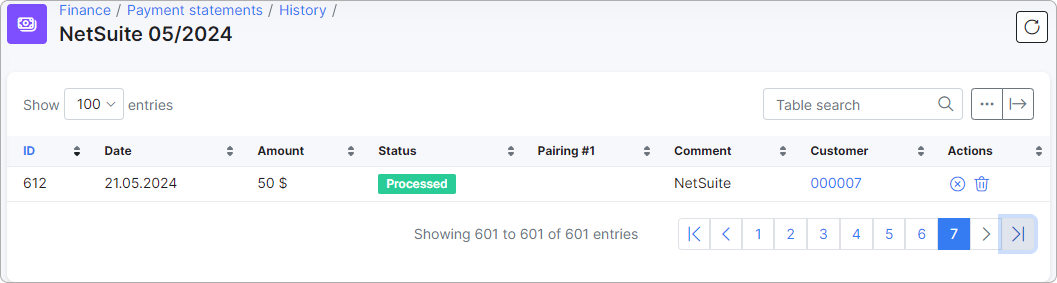
The payment was imported as a payment statement, and we can see it in the payment statement history:
¶ Other settings
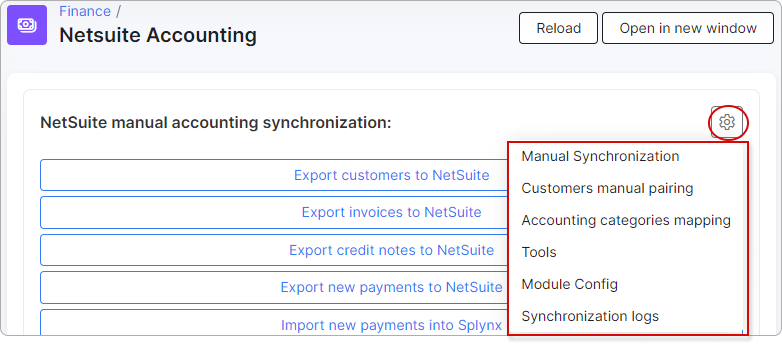
In this menu, you will find additional settings and tools related to the NetSuite add-on.
- Manual Synchronization - it opens
Finance → Netsuite Accountingwhen you are in another menu window; - Customers manual pairing - this function is used when there are existing customers in both Splynx and NetSuite, and they need to be paired so that both systems recognize them as the same customer.
Example of customers manual pairing
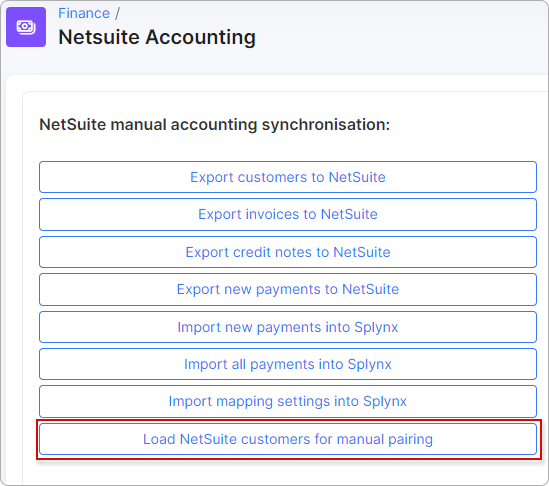
First, click the Load NetSuite customers for manual pairing button. This feature retrieves the customer list from NetSuite into Splynx, enabling the admin to manually pair customers without the need to recreate them in either platform.
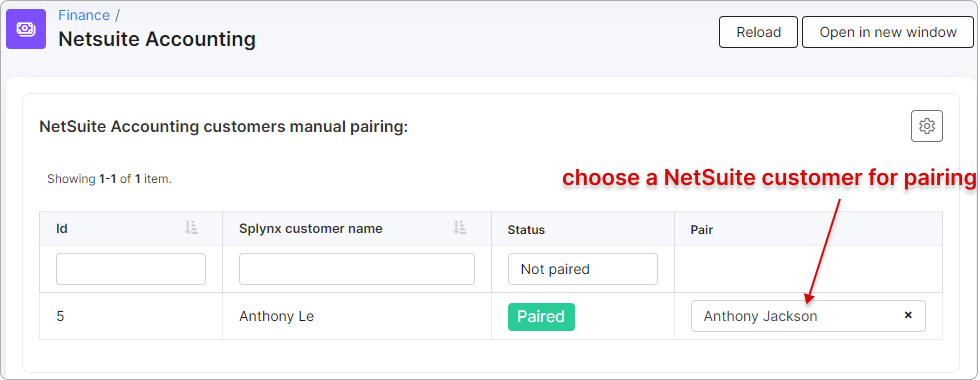
Then navigate to Customers manual pairing and enter the name of the customer you wish to pair with the Splynx customer. If successful, the status will change to Paired:
-
Accounting categories mapping - the link is used to automatically map accounting categories instead of performing the mapping manually;
-
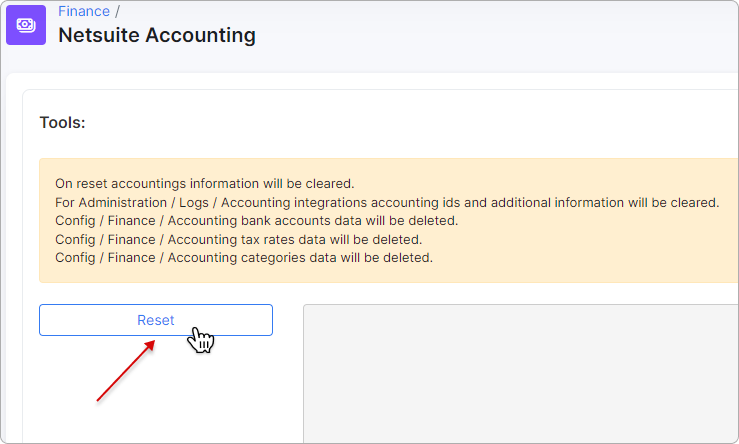
Tools - this menu is used for resetting the accounting database. All items previously selected in
Accounting categories,Accounting bank accounts, andAccounting tax rateswill be erased:
-
Module Config - the link is used to open the NetSuite add-on configuration page (
Config → Integrations → Modules list → Netsuite Accounting); -
Synchronization logs - the link is used to open the NetSuite logs under
Administration → Logs → Accounting integrations.
¶ NetSuite logs
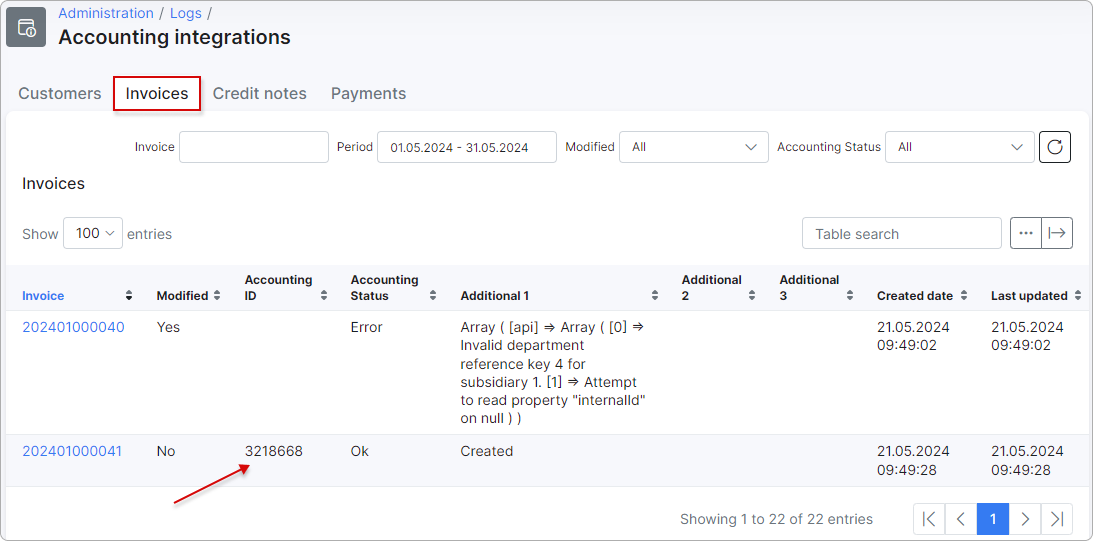
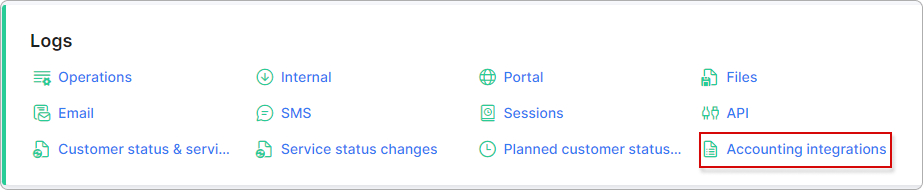
Sync logs can be found under Administration → Logs → Accounting integrations:
If a customer/invoice/credit note/payment has an Accounting ID, this indicates that it was synced; if not, it was not synced: