¶ Hooks
¶ CLI
A hook is a method used to augment or alter the behavior of a page or application through custom callbacks. These callbacks can be maintained, modified, and managed by third-party users and developers who may not necessarily be affiliated with the original application (Splynx). For instance, we demonstrate how to utilize hooks to send emails.
To send notifications on a particular action from Splynx, you can use hooks (Config → Integrations → Hooks).
First of all, you need to understand how hooks work. "Hooks" listen for an event you've selected, and if the event is triggered, they execute a script you've written in the "path" field. Additionally, a hook can send a data array when this event is called.
¶ Creating a hook
Let's create a new hook:

Before creating a hook you have to put a php-script into the home folder, and give it permissions 755:
chmod 755 script-file.php
Thereafter, a simple script should be created - to send an email notification. Of course, you can use your own script to execute another action.
#!/usr/bin/php

<?php

/* * don`t edit this block !!!! */
// Define STDIN
defined('STDIN') OR define('STDIN', fopen('php://stdin', 'r'));

// Get all data. Its is in JSON so we must decode it
$data = fgets(STDIN);

// Decode JSON
$data = json_decode($data, true);


/* * to send email edit this block */
$model = print_r($data,1); //print data-array
//send email
$to  = "mail_box_to@semple.com" ;                       //set your email
$subject = "Splynx test send-mailer";
$message = "{$model} \n Customer \"{$data['attributes']['name']}\" was created {$data['date']} by {$data['source']}";
$headers = "From: Admin <mail_box_from@semple.com>\r\n";

mail($to, $subject, $message, $headers);
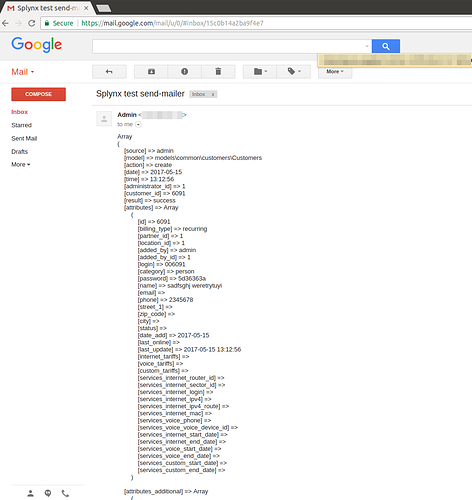
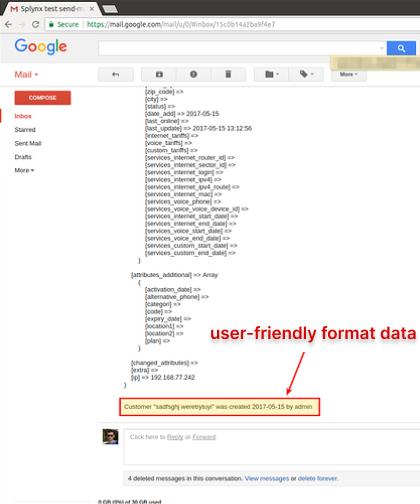
So, when a new customer is created, we will receive an email:


 To send emails, we used the mail-server : Sendmail, and by default, it sends emails in the local-network only. Therefor, if you want to send an email to external addresses, you have to reconfigure the sendmail.
Run the command to achieve this
sudo dpkg-reconfigure exim4-config
The following manual can be used as a guide - https://www.digitalocean.com/community/tutorials/how-to-install-the-send-only-mail-server-exim-on-ubuntu-12-04
¶ Custom named queues
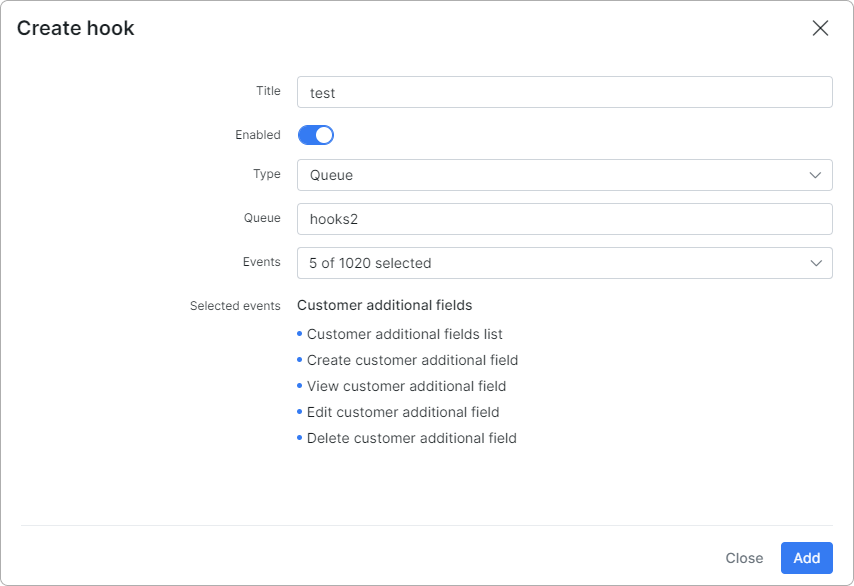
To use custom named queues, select the hook type 'Queue' and enter your queue name.

The following PHP script (based on BunnyPHP) can be used as an example to work with messages from custom named queues:
<?php

use Bunny\Channel;
use Bunny\Async\Client;
use Bunny\Message;
use React\EventLoop\Factory;

require '../vendor/autoload.php';

$connectOptions = [
 'host' => '127.0.0.1',
 'port' => 5672,
 'vhost' => '/',
 'user' => 'guest',
 'password' => 'guest',
];

$loop = Factory::create();
(new Client($loop))->connect()->then(function (Client $client) {
 return $client->channel();
})->then(function (Channel $channel) {
 return $channel->queueDeclare('hooks2', false, true, false, false)->then(function () use ($channel) {
 return $channel;
 });
})->then(function (Channel $channel) {
 echo ' [*] Waiting for messages. To exit press CTRL+C', "\n";
 $channel->consume(
 function (Message $message, Channel $channel, Client $client) {
 echo " [x] Received ", $message->content, "\n";
 },
 'hooks2'
 );
});
$loop->run();
 You need to use the same parameters when declaring a queue as in the example because this parameters uses Splynx when adding a message to RabbitMQ.
You will get a string like this: {"type":"","call":"","data":{"source":"admin","model":"models\\admin\\administration\\Locations","action":"get_list","date":"2017-09-20","time":"14:38:12","administrator_id":"1","customer_id":null,"result":"success","attributes":{"id":null,"name":null},"attributes_additional":[],"changed_attributes":null,"extra":null,"errors":null,"ip":"192.168.77.233"}}
Use function json_decode to decode it and use received data for your purposes.
¶ Webhooks
Webhooks allow you to build external Apps which subscribe to certain events on the Splynx system. When one of those events are triggered, we'll send a HTTP POST payload to the webhook's configured URL.
¶ Events
When configuring a webhook, you can choose which events you would like to receive payloads for.
¶ Handle webhook events
To validate an event you need to check the header X-Splynx-Signature, which contains the event signature. Signatures are generated from the response body string using the sha1 hash function and the secret as the HMAC key.
¶ Webhook delivery retries
Webhooks have a specific characteristic: they may fail to reach the designated WEB URL for various reasons.
In such cases, the webhook status is marked as failed, and the system automatically retries delivery multiple times at predefined intervals.
The retry attempts occur as follows:
- immediately after the failure
- after 1 minute
- after 10 minutes
- after 1 hour.
¶ Example PHP webhook handler
<?php

define('REQUEST_TYPE_PING', 'ping');
define('REQUEST_TYPE_EVENT', 'event');
define('CONTENT_TYPE_JSON', 'application/json');
define('CONTENT_TYPE_FORM_URLENCODED', 'application/x-www-form-urlencoded');

$headers = getHeaders();
$input = file_get_contents('php://input');
$contentType = isset($headers['Content-Type']) ? $headers['Content-Type'] : '';

// Parse payload data
if ($contentType == CONTENT_TYPE_JSON) {
    $postData = json_decode($input, true);
} else {
    parse_str($input, $postData);
}

$requestType = isset($postData['type']) ? $postData['type'] : null;

// Process ping request
if ($requestType === REQUEST_TYPE_PING) {
    http_response_code(200);
    exit('ok');
}

// Validate request type
if ($requestType !== REQUEST_TYPE_EVENT) {
    http_response_code(400);
    exit('Invalid request type!');
}

// Calculate signature from payload and secret
$secret = 'your secret';
$calculatedSignature = hash_hmac('sha1', $input, $secret);

// Signature from HTTP request header
$inputSignature = isset($headers['X-Splynx-Signature']) ? $headers['X-Splynx-Signature'] : '';

// Compare signatures
if (hash_equals($inputSignature, $calculatedSignature)) {
    http_response_code(200);
    echo 'ok';

    // Success, you can process event as you want
    // ...
} else {
    // Invalid signature, return from code
    http_response_code(401);
    exit('Unauthorized!');
}

// Specific PHP function for safe getting HTTP headers
function getHeaders()
{
    $headers = [];

    if (function_exists('getallheaders')) {
        $headers = getallheaders();
    } elseif (function_exists('http_get_request_headers')) {
        $headers = http_get_request_headers();
    } else {
        foreach ($_SERVER as $name => $value) {
            if (strncmp($name, 'HTTP_', 5) === 0) {
                $name = str_replace(' ', '-', ucwords(strtolower(str_replace('_', ' ', substr($name, 5)))));
                $headers[$name] = $value;
            }
        }
    }

    return $headers;
}


