¶ How to Connect your WhatsApp Number to Twilio
- Before you get started
- Get started in the Twilio Console
- Complete Meta Business Verification to increase limits
- Onboarding additional numbers
¶ Before you get started
You will need:
-
An upgraded Twilio Account. If you are new to Twilio, create a free account and upgrade it by linking a payment method.
-
A WhatsApp-compatible phone number.
-
An existing Meta Business Portfolio (formerly called a Meta Business Manager or Business Account), whenever possible.
Twilio strongly recommends using an existing Meta Business Portfolio, as Meta places strict messaging rate limits which are only lifted after your brand's Meta Business Portfolio has already completed Meta's Business Verification. You must use the Meta Business Portfolio of the brand that will be interacting with end users.
Before you proceed, check if anyone in your company has already created a Meta Business Portfolio. Typically, it's someone within the marketing department.
If your company has a Meta Business Portfolio already created, then a user with access will need to invite you as an administrator with full access, so that you have permission to create WhatsApp Business Accounts (WABAs) during the signup process or they will need to sign into the Twilio Console and complete the following steps.
If your company does NOT already have a Meta Business Portfolio, or if you cannot be added with administrator access to an existing one, then you will be able to create one using the process below. However, you will need to complete Meta Business Verification afterwards before you can move into production which requires submitting legal documents to Meta.
¶ Get started in the Twilio Console
-
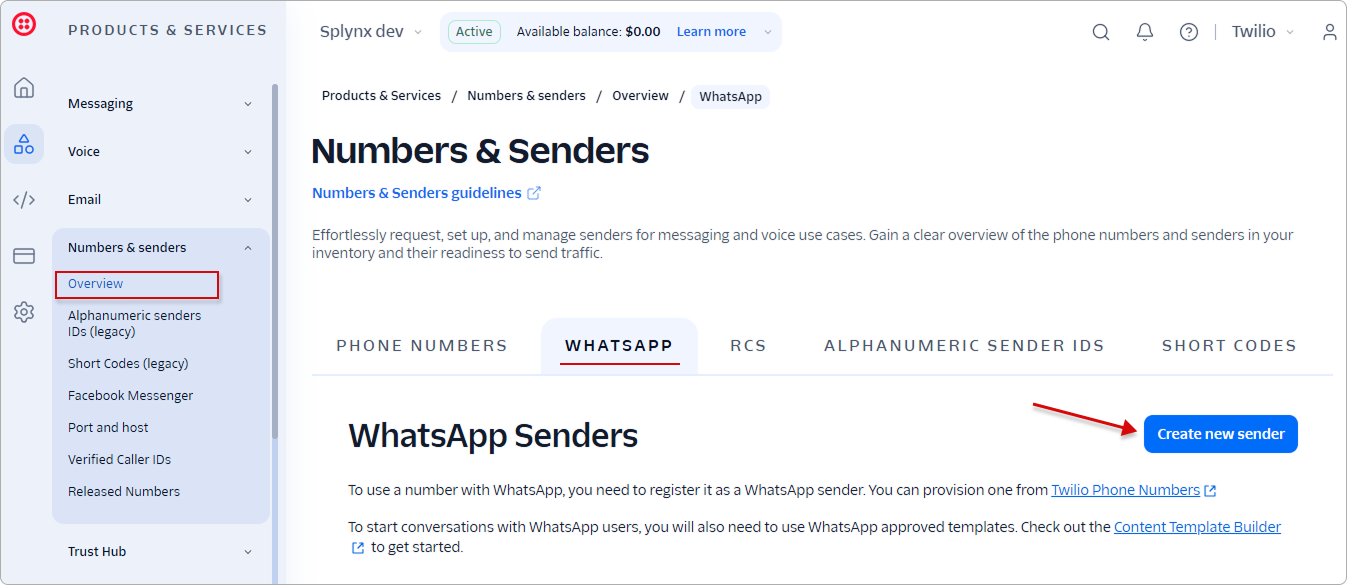
In the Twilio Console, navigate to Products & Services → Numbers & senders → Overview and open the WhatsApp tab. This is the WhatsApp Senders section of the console, where all your registered senders are listed.
-
Click
Create new sender. The New Sender page opens with the registration steps.
¶ Select a phone number to register
-
In the 1. Select a phone number to register block, choose the number you want to connect to WhatsApp:
- Twilio phone number — select an existing number from the Select Twilio number dropdown. If you don't have one yet, provision it first via the Twilio phone numbers link.
- My own phone number — bring your own number. You will validate it via a text message or a phone call later in the process.
-
Click
Continue.
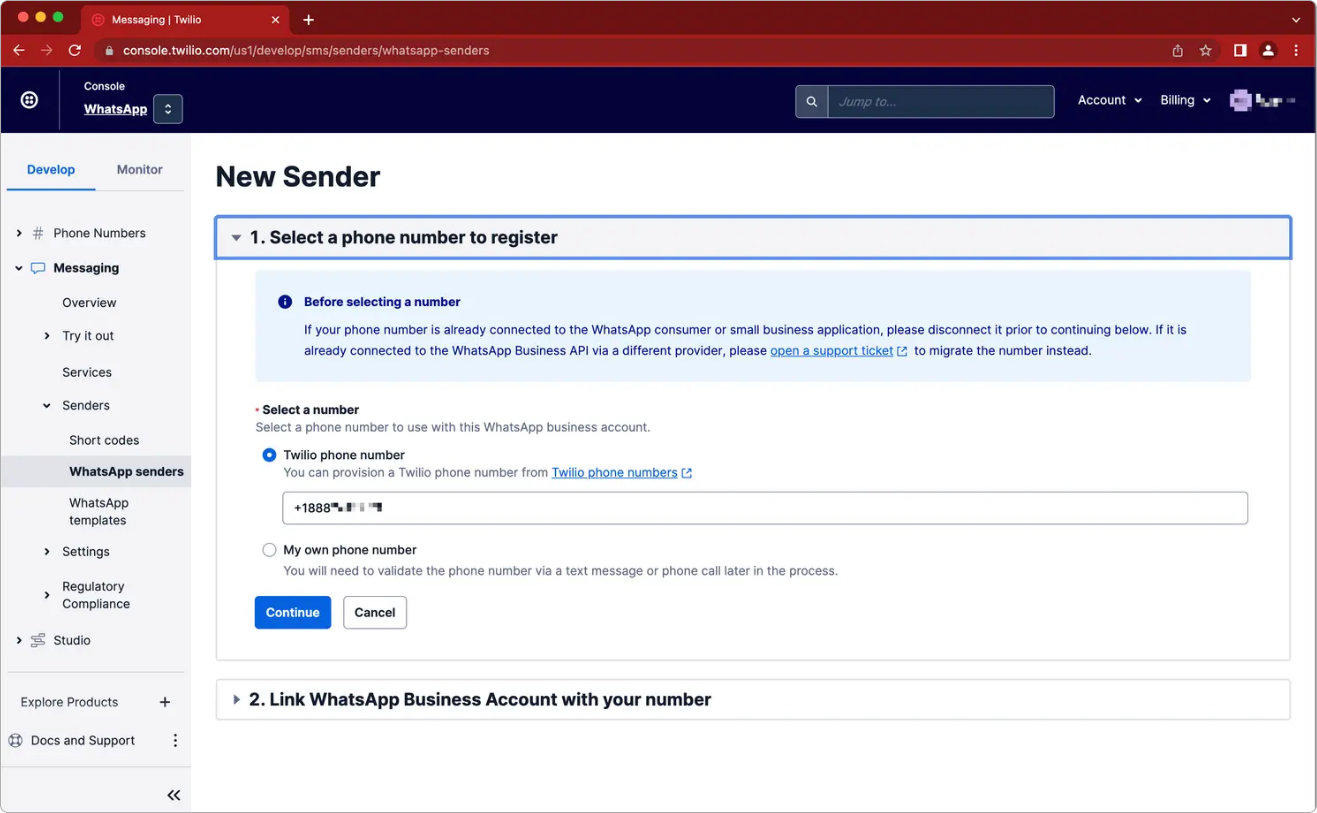
Before selecting a number. If your phone number is already connected to the WhatsApp consumer or small business application, disconnect it before continuing. If it is already connected to the WhatsApp Business API via a different provider, open a Twilio support ticket to migrate the number instead.
¶ Link your WhatsApp Business Account with your number
- The 2. Link WhatsApp Business Account with your number block opens. Click
Continue with Facebook— you will be directed to Facebook to set up WhatsApp in a pop-up window.
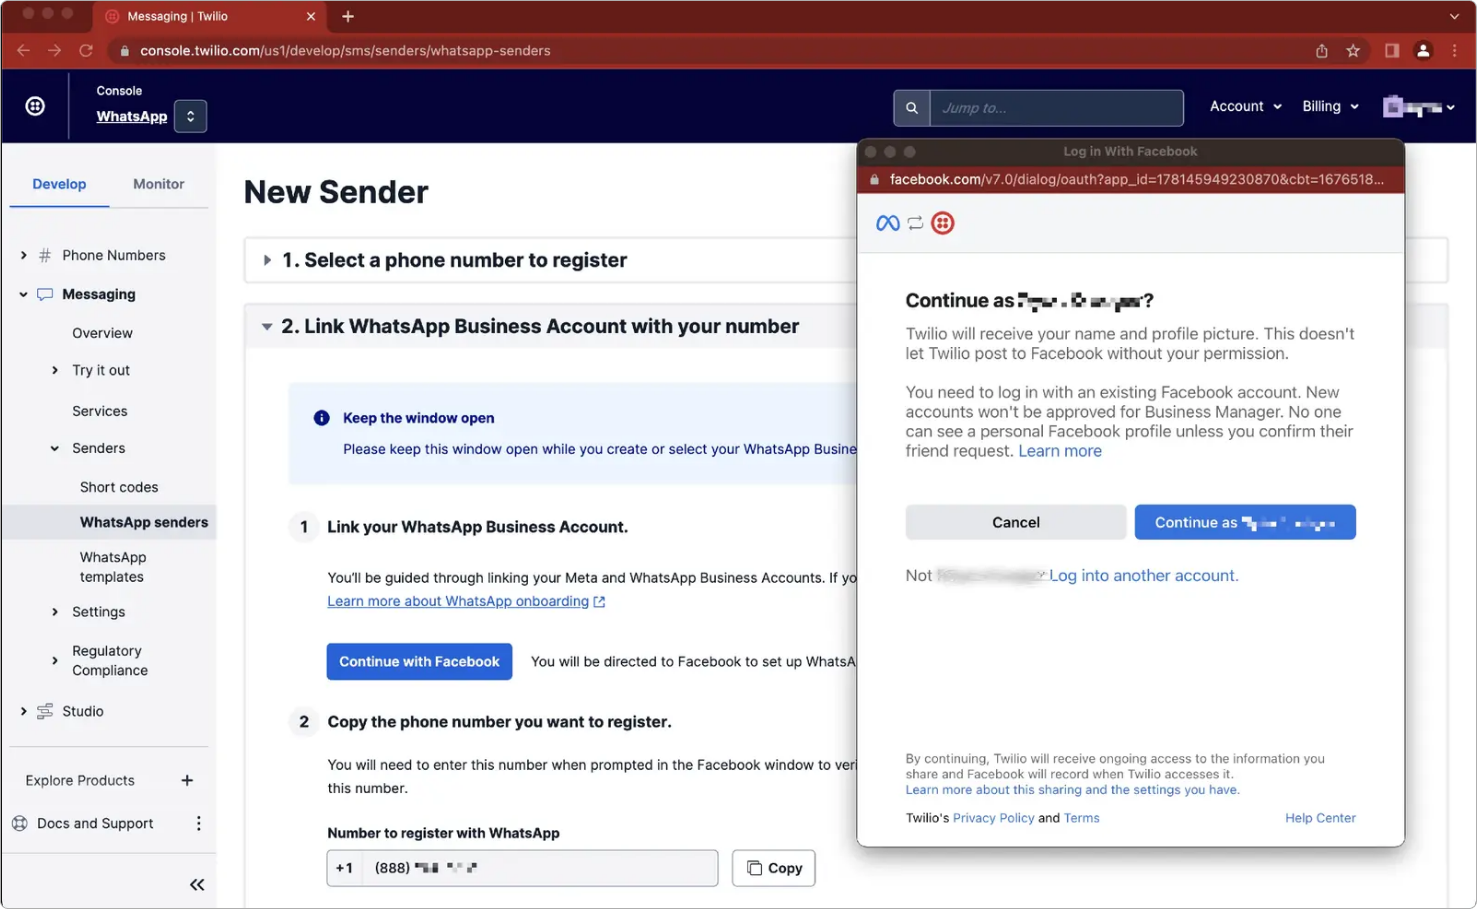
 Keep the Twilio Console window open. Do not close the pop-up window and do not navigate to a different page in the Twilio Console — you will need this window for the next steps.
If a WhatsApp account has already been connected to your Twilio account, the block shows the WhatsApp Business Account ID you must select in the Facebook window. Selecting a different WABA causes the request to be rejected.
Do NOT copy the URL of the pop-up window to send to another user as registration will fail. You must complete all of these steps using the same browser session in order for the data exchange between Meta and Twilio to work properly and register your WhatsApp Sender.
¶ Log into Facebook
- Log into Facebook if you haven't already or click
Continue as [your name]if you're already signed in. After logging in, you will be shown an overview of the process to connect your number to WhatsApp.
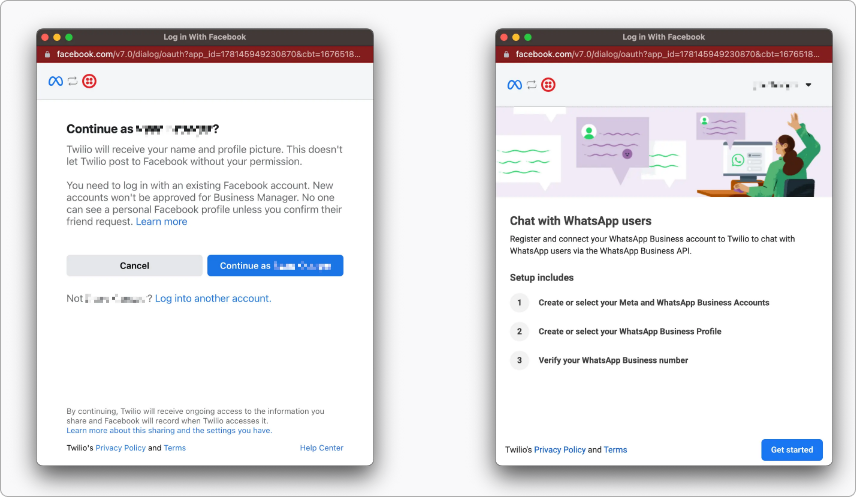
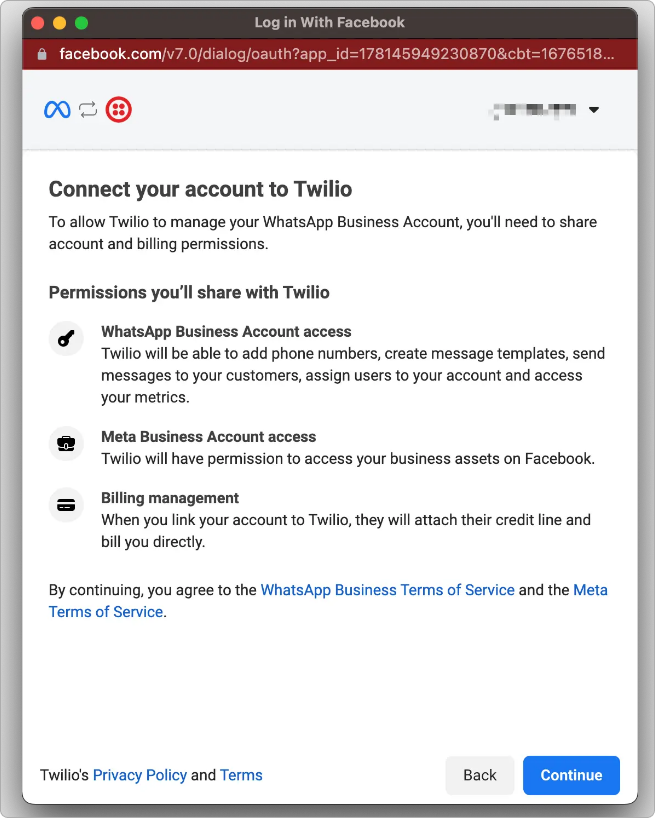
- Facebook will then ask you to allow Twilio to manage your WhatsApp Business Account. Click
Continueto proceed.
¶ Select your Meta Business Portfolio
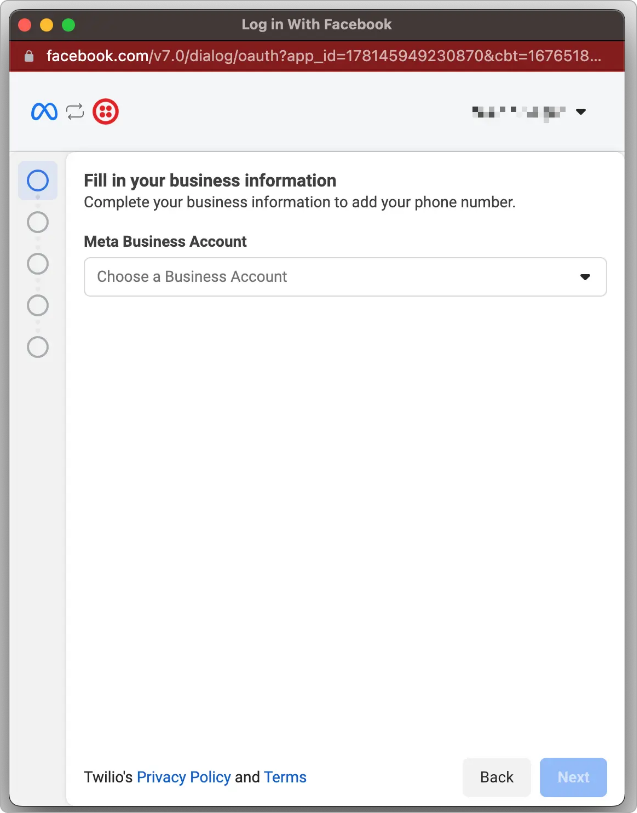
- On the next screen, select the Meta Business Portfolio for your business from the list. If you don't have one, you may create a new one by selecting the option Create a Business Portfolio.
¶ Create your WhatsApp Business Account and WhatsApp Business profile
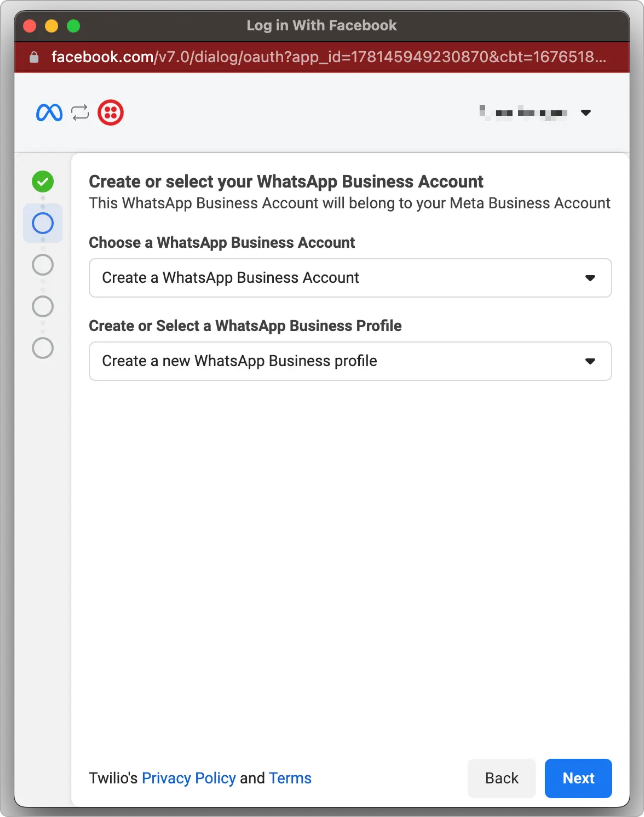
- Create or select your WhatsApp Business Account (WABA):
Do not select WABAs that have been created outside of Twilio. If you already have an approved WhatsApp Sender with another provider, create a new WABA to use specifically with Twilio in order to migrate your number.
-
If this is the first WhatsApp Sender you are onboarding in this Twilio account or subaccount:
- Select Create a new WhatsApp Business Account. Do not select WABAs created outside of Twilio.
-
OR if you are onboarding an additional WhatsApp Sender in the same Twilio account or subaccount:
- You MUST select the same WABA ID as shown in the Twilio Console window. Twilio requires all WhatsApp Senders in an account to be within the same WABA and maintains a 1 to 1 relationship between a Twilio account and a WABA.
-
Since you are onboarding a new WhatsApp Sender, select Create a new WhatsApp Business profile.
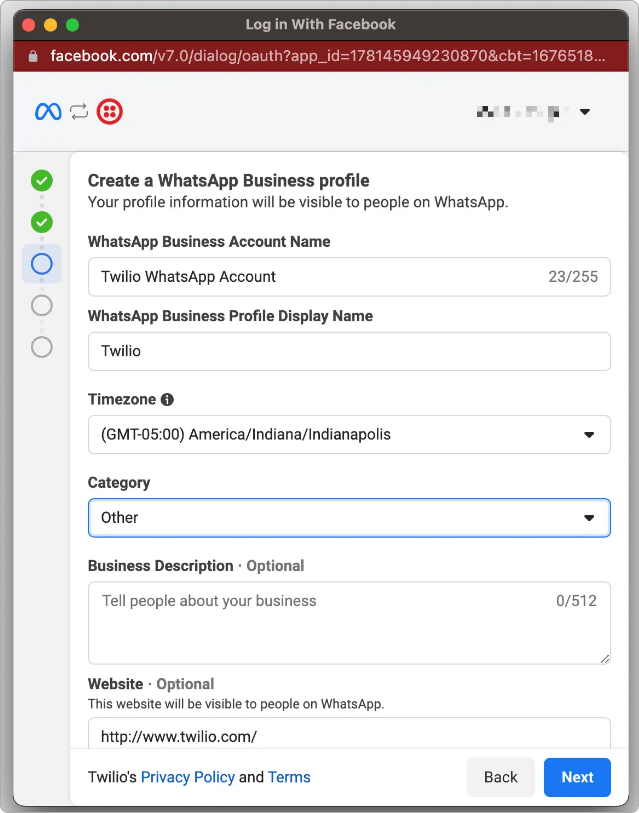
- On the next screen, you will need to enter in the following information:
-
WhatsApp Business Account Name - This is only used for internal purposes and is not consumer facing. If you had selected a WABA on the previous screen, you will not be able to change the name here.
-
WhatsApp Business display name - This is what your customers will see. It MUST meet the requirements set by WhatsApp.
-
Category - Select the category that best describes your business. This is shown to consumers when they view your profile and can be updated later in the Twilio Console.
-
You may optionally click
Show more optionsand fill out the below. These fields can be also be added or updated in the Twilio Console later:- Business Description - This is also shown to consumers when viewing your profile in the WhatsApp application.
- Website - This is also shown to consumers when viewing your profile in the WhatsApp application. Once you register your WhatsApp Sender, you will have the ability to add an additional website if you wish.
Display names cannot be changed without a support ticket
Meta reviews display name asynchronously after the WhatsApp Sender is registered. If the display name is rejected by WhatsApp, the phone number's messaging limit will drop to 250 business-initiated messages per 24-hour period and may risk disconnection by WhatsApp. We strongly recommend using your company name as a WhatsApp Sender's display name. as WhatsApp will reject anything that does not match the company name in the linked Meta Business Portfolio.
¶ Verify your WhatsApp Sender
In June 2024, Meta silently released the ability to "get a free WhatsApp number" using WhatsApp Self Sign-up that do not require verification. These numbers are currently untested within Twilio's system and Twilio does not recommend selecting that option until Twilio has thoroughly tested them within their system. Support for them is on Twilio's roadmap. In the meantime, select 'Add a new or existing number' and follow the instructions below.
- Meta requires you to verify phone number ownership as a part of the registration process. This is done by sending a verification code using either SMS or an automated voice call.
The Twilio Console guides you through this in the same 2. Link WhatsApp Business Account with your number block:
- Copy the phone number you want to register — the Number to register with WhatsApp field shows the selected number with a
Copybutton. Paste this number into the Facebook window when prompted. - Verify the selected number with WhatsApp — choose one of two methods: Verify via text messages or Verify via voice call.
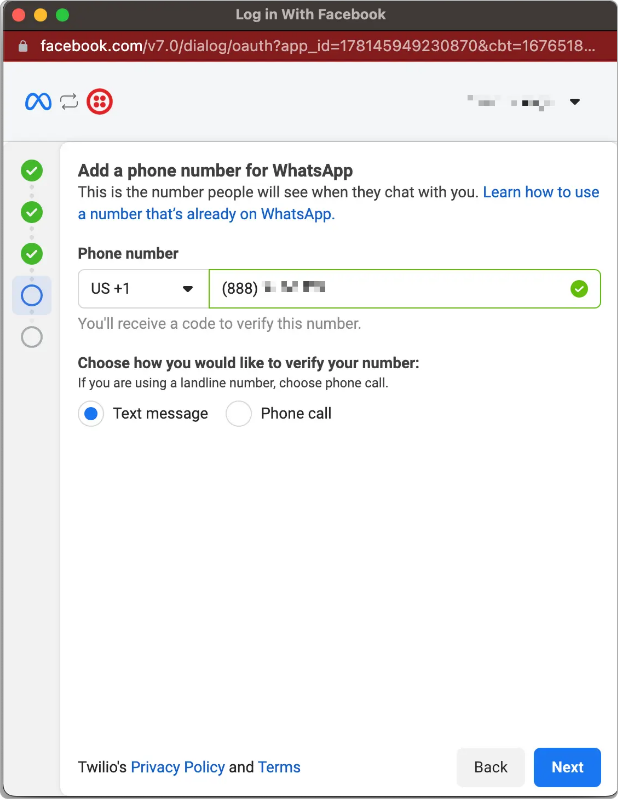
Follow the instructions below based on the type of phone number you are using for your WhatsApp Sender:
-
In the Facebook pop-up window, paste the number you copied in the Twilio Console, keep the Text Message verification method selected, and click
Send Code. -
Switch back to the Twilio Console window. Under Verify via text messages, the six code fields stay empty and the button shows Waiting until the message arrives — the verification code then appears in the fields automatically.
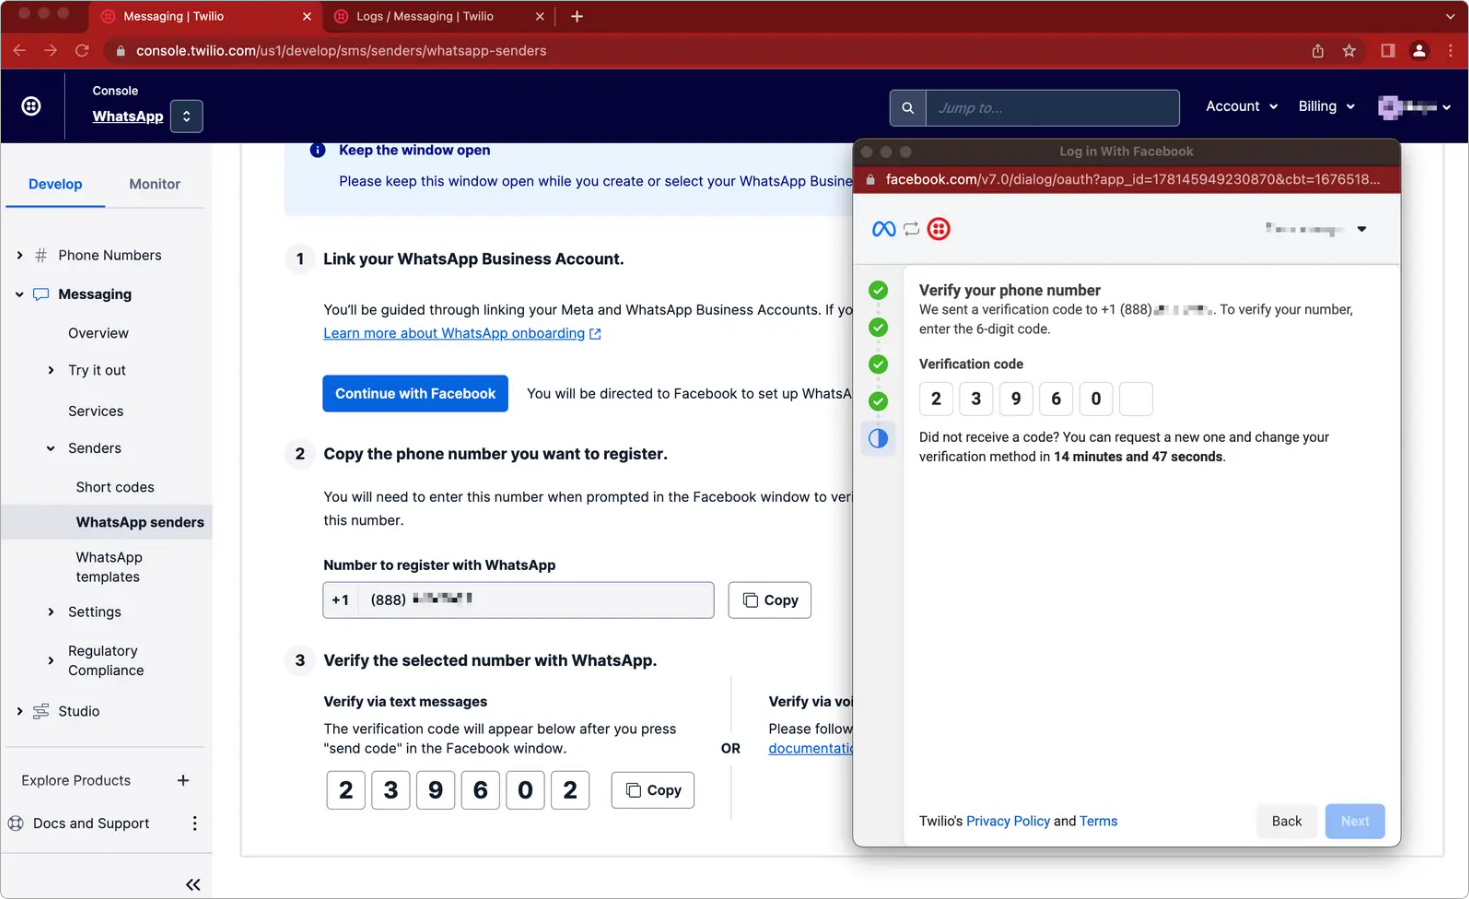
- Copy the code into the Facebook pop-up window and click
Next.
In order to receive the verification code from Meta, you first will need to configure your Twilio voice phone number if you haven't already. While there's several ways to do this, the instructions below can be used to forward the code to your email. However if your phone number is already configured, it's important to make sure that there is not an IVR or other automated system that will prevent you from receiving the code.
- In a new tab, navigate to the Active Numbers configuration page and look for the Twilio number that you are attempting to register with WhatsApp.
- Click on the phone number and scroll down to the Voice & Fax section to configure the number.
- In the Configure with dropdown, select the Webhook, TwiML Bin, Function, Studio Flow, Proxy Service option.
- Change the Webhook URL and use the Voicemail Twimlet following this convention:
http://twimlets.com/voicemail?Email=[your email address]
For example, your twimlet can look like this: http://twimlets.com/voicemail?Email=support@example.com
- Click the
Savebutton. - Now any incoming calls will be transcribed and sent to your email.
- Switch back to the pop-up window, and click
Phone calland thenNextto trigger the verification code. - Wait until you receive the code in your email. It may take up to 10 minutes.
- Enter in the verification code received in your email and click
Next.
In the Twilio Console, the Verify via voice call option links to Twilio's documentation with the same instructions.
If you are bringing your own non-Twilio phone number (BYON), then you will need to make sure you can receive the verification code yourself. If you are receiving the code by a phone call, then it's important to make sure that there is not an IVR or other automated system that will prevent you from receiving the code.

If you have tried several times and still cannot receive the verification code from Meta, Twilio strongly suggests using a different phone number. If you require using the specific phone number you had selected, then open a support ticket and Twilio will contact Meta to make changes on how the code is being sent or discuss alternative methods to verify ownership of the phone number with Meta.
¶ Complete registration
-
Once your phone number is verified by Meta, you may continue to click next until the pop-up window closes. The Twilio Console should then begin the last steps required to complete the registration. This process may take up to 2 minutes.
-
After 2 minutes, if the Twilio Console has not refreshed automatically, please refresh the page. Upon successful registration, your number appears in the WhatsApp Senders table on the WhatsApp tab, together with the WhatsApp Business Account ID and the Meta Business Manager ID linked to your Twilio account.
The table shows:
- WhatsApp number — the registered sender number.
- Business display name — the name your customers see in WhatsApp.
- Sender status — Online once the sender is ready to send and receive messages.
- Quality rating — the message quality rating assigned by Meta.
- Throughput — how many messages per second (MPS) the sender can send.
- Actions — the
Edit Senderlink.
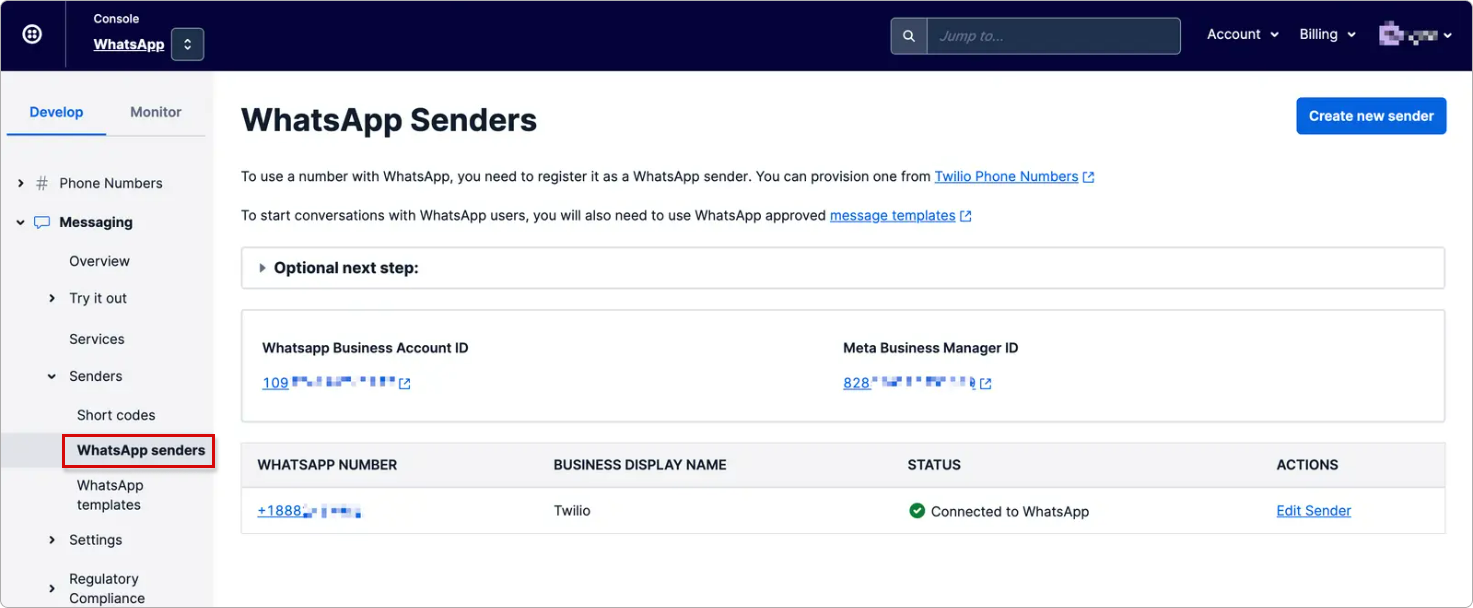
Click Edit Sender to attach the sender to a Messaging Service, set your inbound message webhooks, or update the rest of your WhatsApp Business profile including your profile picture. For the Splynx-specific settings, see Twilio Configuration.
You can now start messaging customers immediately. However, you will need to complete Meta Business Verification when you are ready to scale to production, request that your WhatsApp Sender be recognized as an Official Business Account (i.e. green checkmark), or want the WhatsApp Sender's display name to appear in the WhatsApp client instead of the phone number. See the instructions below on how to complete Meta Business Verification.
¶ Complete Meta Business Verification to increase limits
 The Meta Business Verification process to increase WhatsApp limits is not related to Meta's subscription product "Meta Verified". Meta Business Verification is currently free.
If you or someone in your company has already verified your Meta Business Portfolio previously, you will not need to complete this step again.
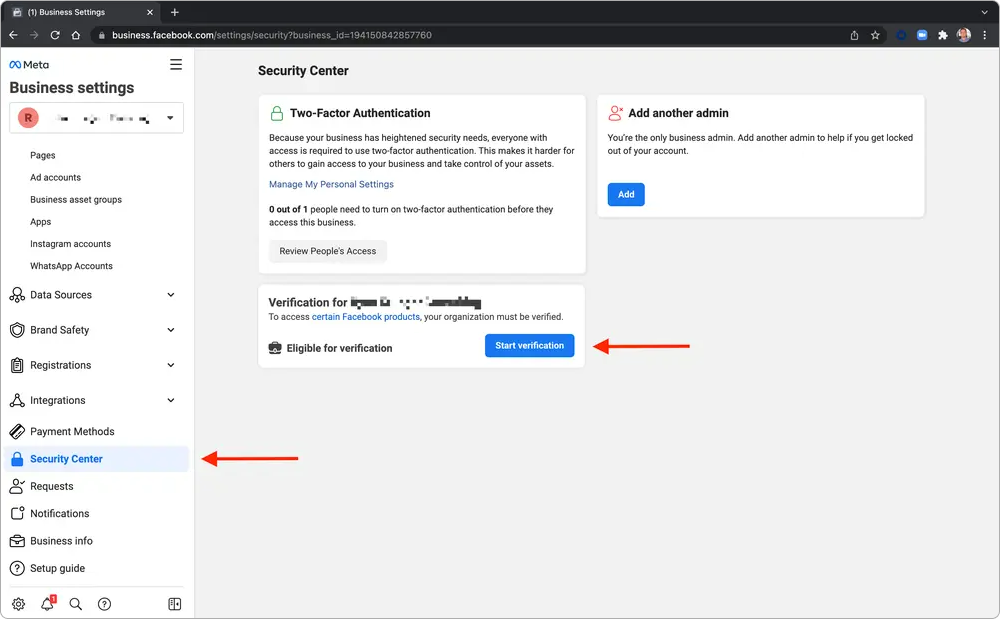
To check your Meta Business Portfolio's verification status or to start the process:
- Navigate to the Security Center within the Meta Business Portfolio that's listed on the WhatsApp Senders page in the Twilio Console.
-
If your Meta Business Portfolio is already verified, it will display when it was verified.
-
Click the
StartorContinuebutton under in the Verification section. If the button is unable to be clicked, make sure you have onboarded a WhatsApp Sender first.
You may be required to upload supporting documents to verify your business. See Meta's guide on uploading official documents to verify your business for more information.
The Meta Business Verification process can take anywhere from 5 to 20 business days, depending on your region and company type. If you have not heard back from Meta in more than 10 business days, open a support ticket.
¶ Onboarding additional numbers
To onboard additional numbers, repeat this process by clicking Create new sender on the WhatsApp tab again, while taking care to select the same Meta Business Portfolio account and WhatsApp Business Account. The WhatsApp Business Account ID and the Meta Business Manager ID currently linked to your Twilio account are shown above the WhatsApp Senders table in the Twilio Console.
Please note that until you complete Meta Business Verification, some numbers may stay in a pending status and cannot be used to send messages. After completing Meta Business Verification, you may need to delete the WhatsApp senders and go through the process again to onboard them completely.