¶ FAQ
Where can I find my Customer Portal?
URL for logging in to the Customer Portal: https://YOUR_DOMAIN_NAME/portal
If you choose the Portal as the default page under Config → Main → Preferences, Splynx can automatically redirect users to this page.
Additionally, you can configure the Customer Portal according to your preferences and company needs in Config → Main → Portal.
Why were the complex voice prefixes removed?
We opt for productivity by eliminating the complex prefixes.
Complex prefixes like {x} (one digit from 0 to 9), {.} (one or more any characters), {n} (one digit from 2 to 9) etc. should be changed to the new pattern:
- 260{!} Any phone number started from 260
Why were my invoices not sent to customers?
If the sending of emails is already configured correctly and working, the next step is to configure the sending of invoices. This can be done under Config → Finance → Notifications
To enable auto-sending and configure templates, days, and time, you need to go to the Invoices section.
I noticed that under the Billing section for each customer, there's a note that says 'Next block: Disabled in config.' Can you tell me how I can enable it?
Ensure that the "Billing Enabled" toggle is on. To do this, go to the billing settings of the specific client.
Additionally, make sure this toggle is also enabled in the global settings of the Finance module by going to Config → Finance → Settings.
If necessary, you can update this setting for all existing users by clicking the Update existing users button.
Is it possible for a ticket to be created automatically when a customer emails a certain email address? Or can tickets only be created manually?
Yes, the system allows you to create tickets automatically from incoming emails.
The following article provides guidance on configuring your Inboxes correctly: Inboxes
How is the SLA report calculated (Administration → Reports → Ticket reports)?
The SLA report displays the first response time for new tickets.
How is Monthly Revenue calculated (Finance → Dashboard)?
It shows the sum of all active services per day.
I manually created an invoice and filled in the service name. It was paid, but the customer was blocked. Why?
To enable the system to recognize the payment for a specific service, the following fields need to be filled in the transaction: Service ID and the period for which the service is being paid.
When creating an invoice manually, this data is not automatically filled in, which means the system cannot identify the service or the corresponding payment period. To ensure accurate processing, the invoice must be generated automatically by the system or through the Add document → Recurring invoice menu. In this case, the system will automatically locate and include the necessary service information, and prompt you to select the appropriate payment period:

Can you please advise on the proper way to add a phone number range, like the following: 612949798{00-99}? I'm receiving an invalid pattern error.
To include hundreds in your pattern, it should look like this: 61294979{800-899}.
We have a client who has 8 services with us. How can I label each service so that they know which one corresponds to each line? Additionally, when analyzing the statistics, how can we determine which service accounts for the data?
You can edit service descriptions to allow them to define the specific service.
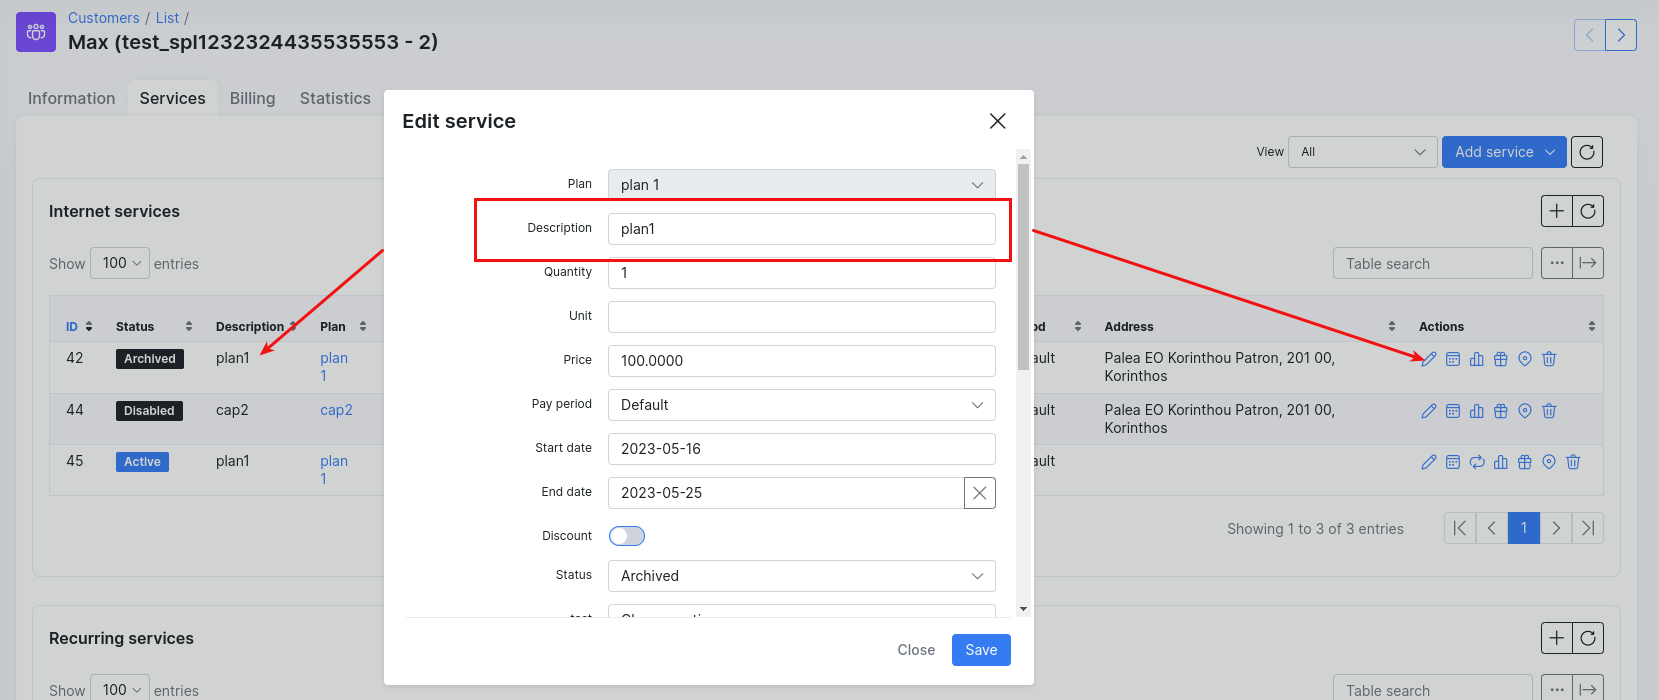
Please advise us on how to add multiple email addresses to the billing email.
You can add multiple addresses by using commas to separate them.
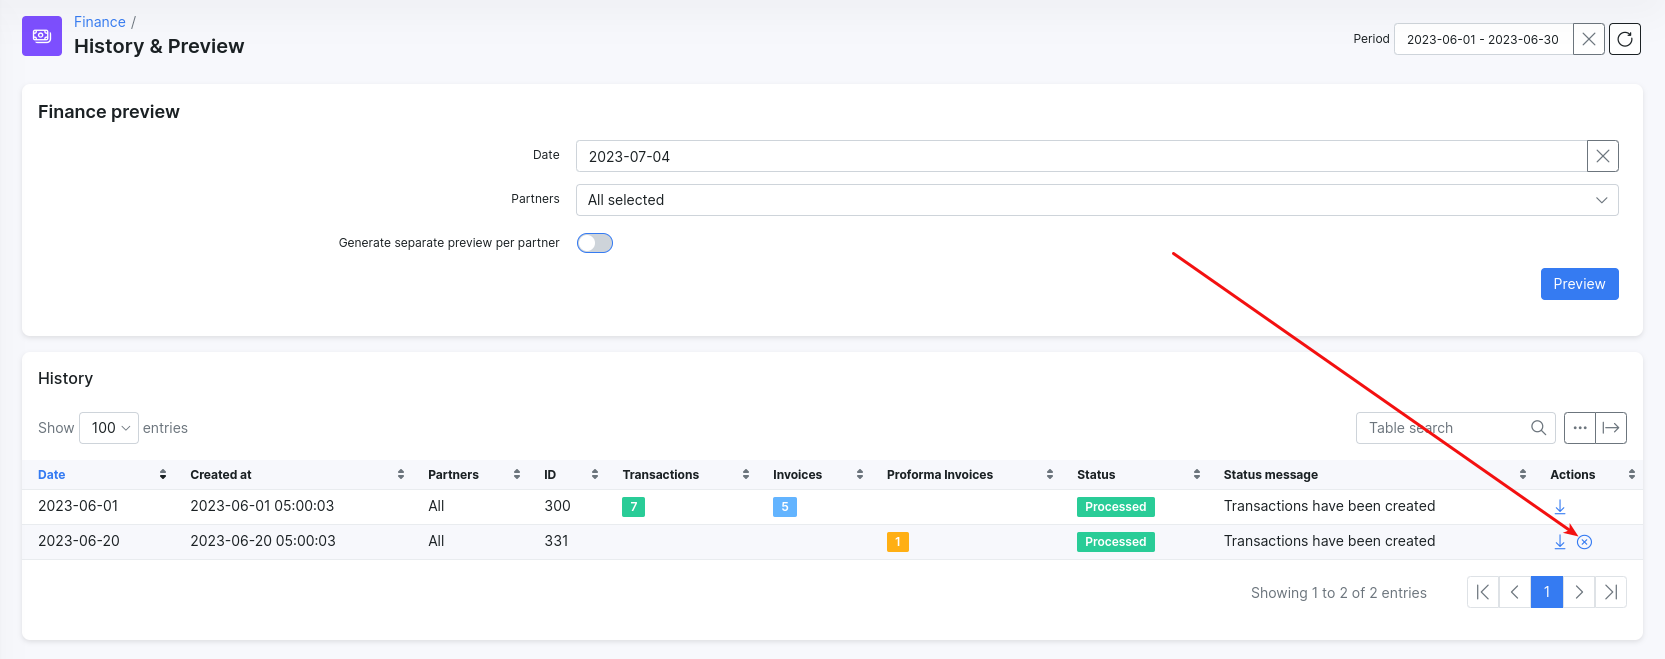
Is there a way to reset the history and financial preview section, allowing me to reset transactions while generating a transaction for a specific date?
You need to cancel the preview and generate it again. However, please note that if invoices have already been synced to your accounting software, they won't be deleted:
Why does the system log new tickets when price plans are updated/changed, and how can we prevent this from happening?
This feature is hard-coded into the system and cannot be disabled. A ticket is automatically created when the administrator creates or modifies a tariff plan in Splynx. When updating descriptions or prices for existing services, a warning will appear before saving the changes, informing you that a ticket will be created.
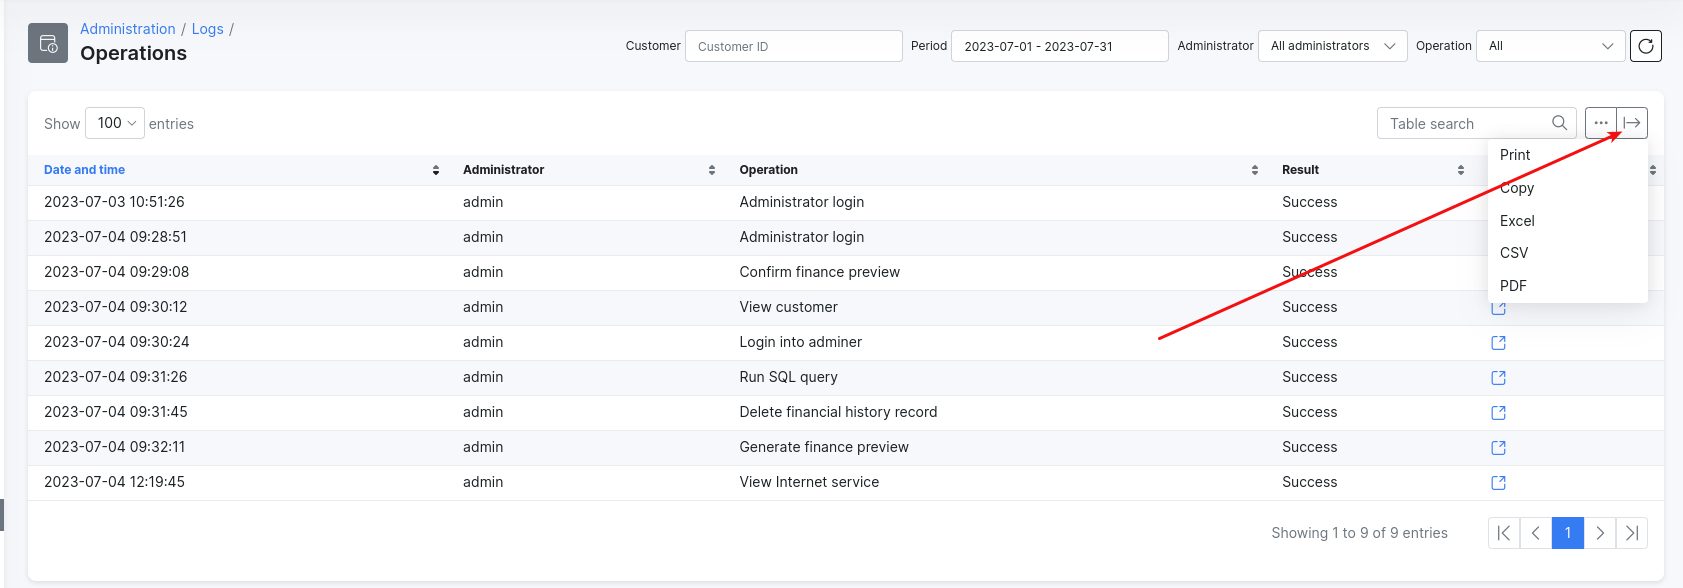
Could you please advise if there is an audit report or an activity report that verifies Splynx user activity?
Full logs of administrator operations can be viewed in Administration → Logs → Operations. You can also download the information from this report in the desired format:
We would like to customize the mobile app with our logos and branding, and preconfigure the URL.
Unfortunately, it is not possible to change the logo in the mobile application, and the provider URL is predefined in the app.
Where is the setting in Splynx that automatically switches the payment method to credit card when customer has added their credit card in their portal account?
Some of our payment modules have this option (but not all), for example, Stripe addon:

Can you confirm if the cloud backup is functioning properly? How can I access the backup?
Our customers have access only to local backups. If you need to check the status of remote backups or restore them, please create a ticket with our support team, and one of our engineers will provide you with the necessary information.
Could you please advise on how we can include the updated message from the ticket in the email notification to the customer? We would like them to be able to see the reply without requiring them to log into the Customer portal.
To display the message text added to the ticket, you can use this variable:
{{ ticketMessage.message | raw }}
I wish to do automated payment allocation. How can I do that within the system?
Automatic payment allocation in Splynx can be done in several ways:
1.Integration with supported payment systems - https://wiki.splynx.com/payment_systems
2.You can use accounting platforms such as Xero, Sageone or Quickbooks - where you can connect to your bank, receive payments and sync them to the Splynx:
https://wiki.splynx.com/addons_modules/xero
https://wiki.splynx.com/addons_modules/sageone
https://wiki.splynx.com/addons_modules/quickbooks
3.You can upload bank statements in .csv format and the system will allocate payments to the customers by reference, please refer to our documentation for detailed instructions - https://wiki.splynx.com/finance/payment_statement_processing
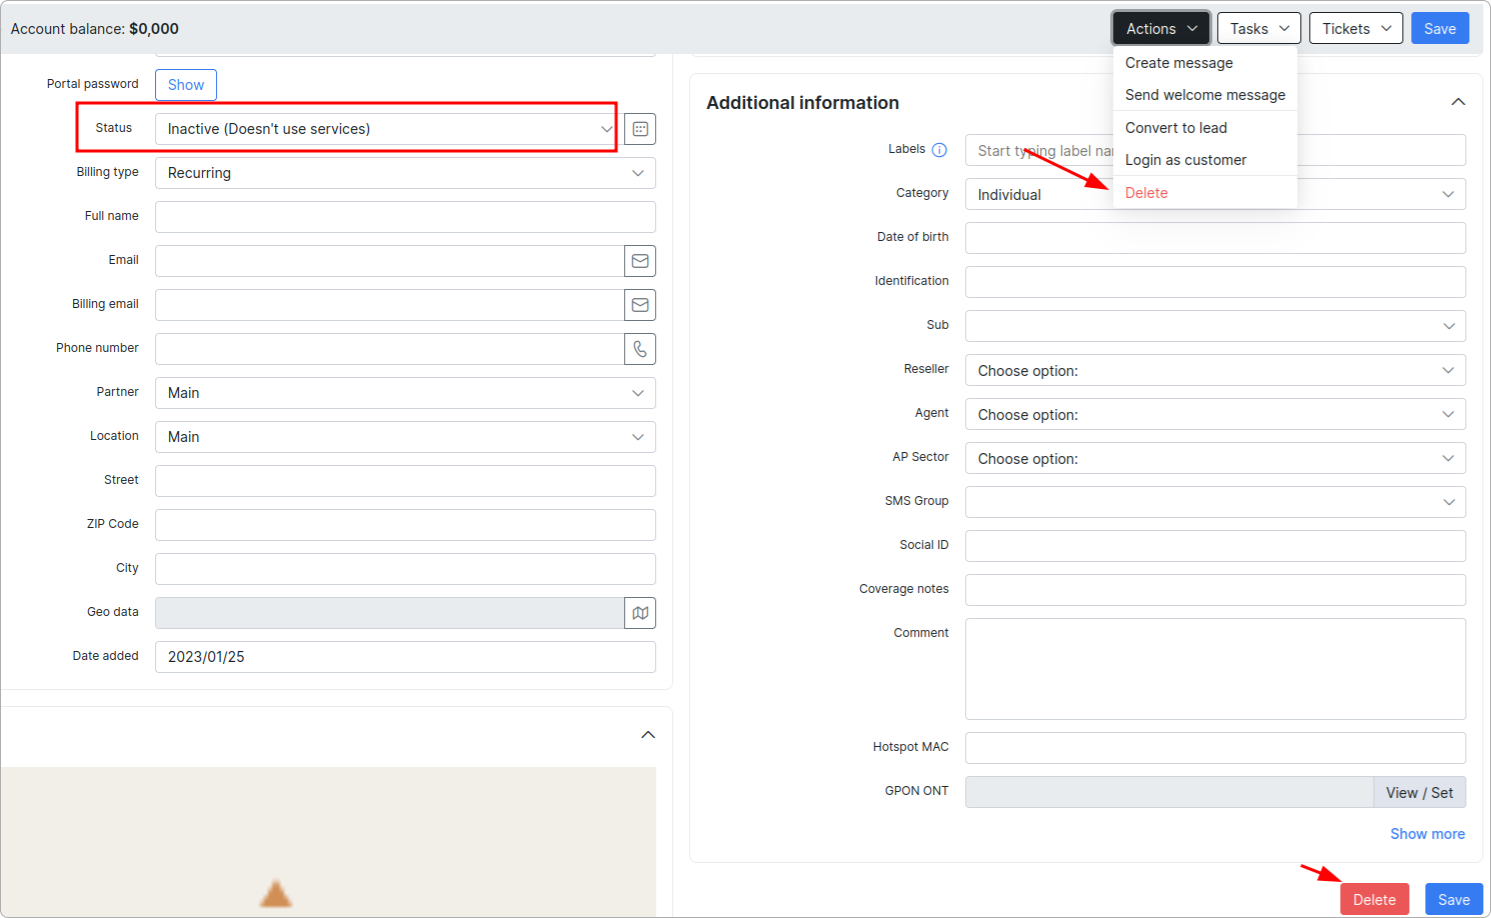
How can I delete a customer record?
To delete a specific customer, change their status to 'Inactive':
Is there a way to send notifications to a group of admin staff when a new ticket is generated on Splynx? Please note that this notification should be sent before the ticket is assigned.
Yes, this is possible. Please refer to our documentation article for an example of this setup: https://wiki.splynx.com/configuration/support/tickets#do-not-assign-ticket-to-administrator-but-notify
I am experiencing an issue with reloading the license. What should I do?
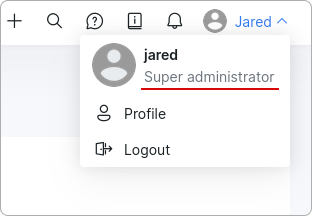
To solve this problem, you need to be logged into the system as a 'Super Administrator'; otherwise, you will be unable to reload your license.
If you are a 'Super Administrator,' you can press the Reload button as shown in the screenshot:
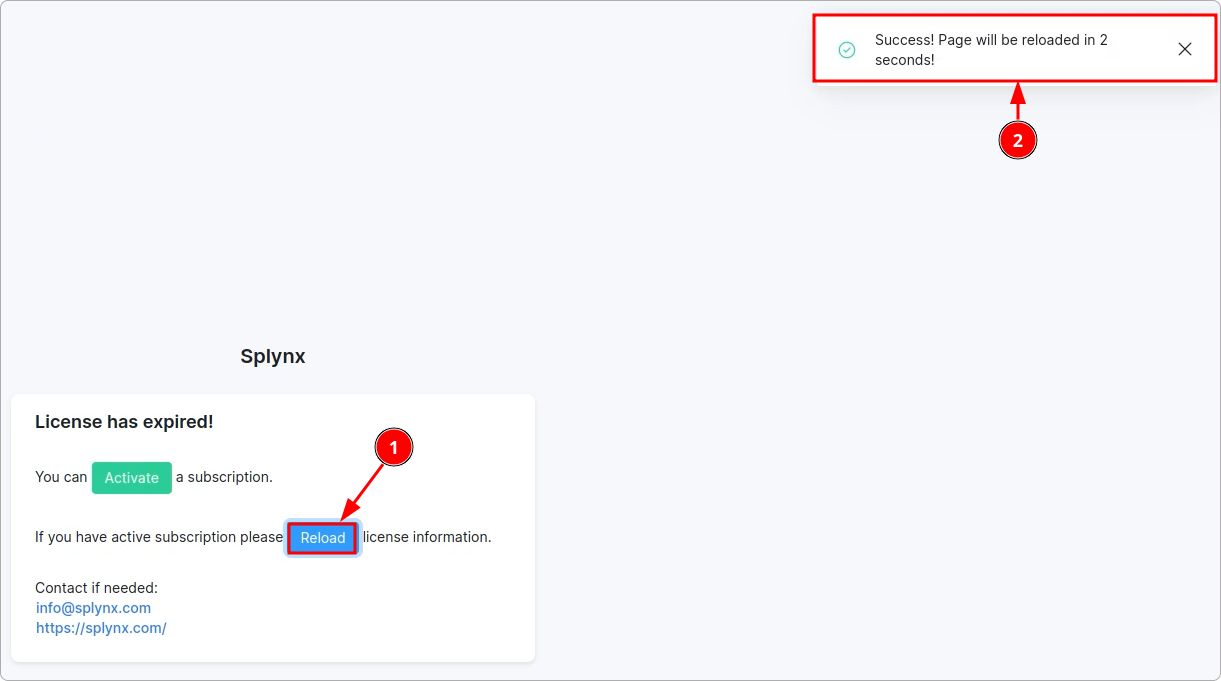
If a customer was not authorized as a 'Super Administrator,' they will not be able to reload their license.
In version 4.1, all administrators are expected to have the ability to reload the license, so step 1 will not be relevant.
Is it possible to have an additional field that serves as a clickable link?
Unfortunately, you can't create an additional field with a clickable link; you can only paste a URL.
I upgraded my license, but I still see that I've reached the maximum customer count. What should I do?
If you're experiencing difficulties, perform a manual license reload in Administration → License:
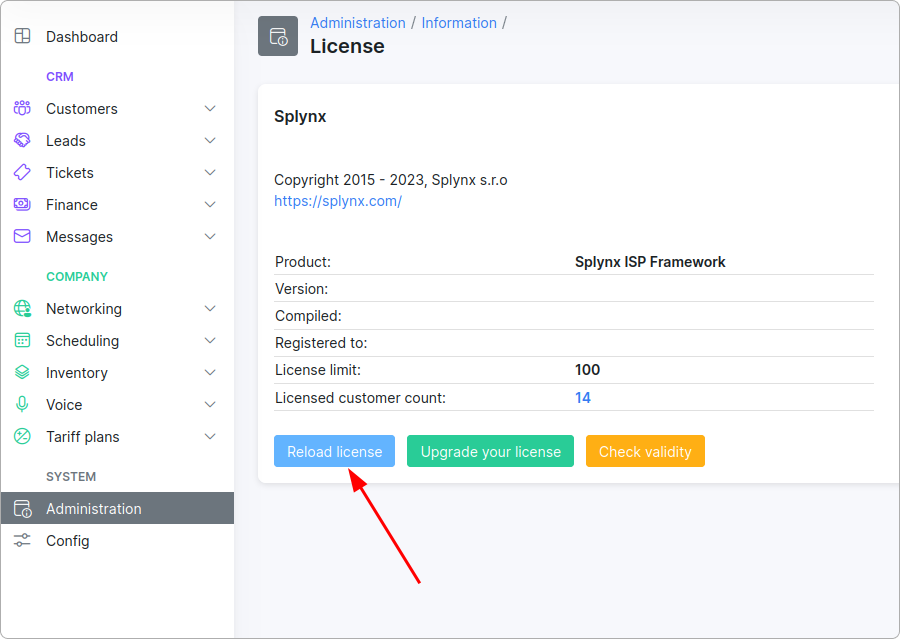
If the issue persists, please initiate a support ticket.
I have a customer with five different services. Is it possible to add five different sets of credentials for logging into the Customer portal so they can review only specific services?
The system does not support multi-accounting for a customer. To achieve this, create separate customer accounts with the required services.
We changed the billing type for the customer, and they were charged again for the same period. Why is this happening?
After changing the billing type, the system deactivates current services and creates new ones. This is the only feasible method to initiate a new billing process without encountering issues. We recommend changing the billing type at the end of the current billing period or create a credit note for balance correction.
We want to import calls and apply a 40% increase to their sales price. How can we do this?
You need to navigate to the voice tariff pricing and set the Buy price increase option to 40%:

We're having an issue with the finance preview. An error is being displayed: 'Preview for partner without results!' Can you please help?
This is not an error; it indicates that there are no services to bill on the date of preview generation.
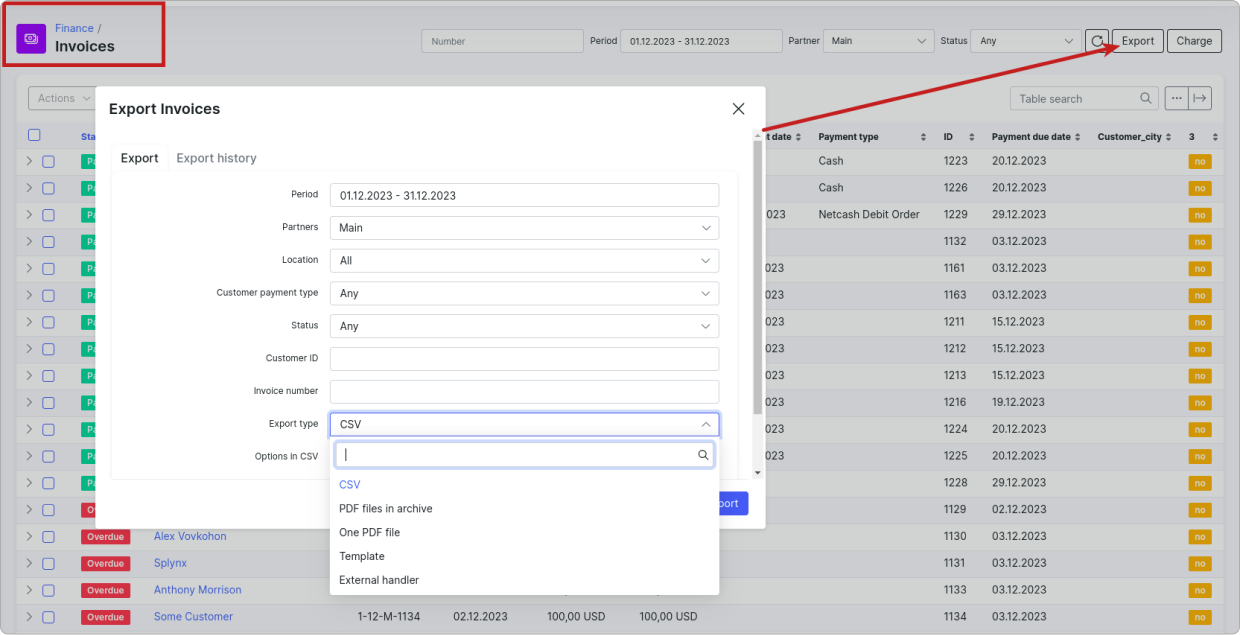
How can we export our invoices?
You can utilize our export tool located in the Finance → Invoices section:
I would like to clean up the accounting and transaction categories under the 'Config' tab. However, I've noticed that I do not have the rights to do so. What should I do?
Only the Super Administrator has the necessary permissions to perform this action. For further details, please refer to our documentation on Roles and Permissions.
Where can I check for errors in CDR processing?
You can find it in Voice → Processing → CDR errors.
When attempting to access the ACS UI, I am receiving a "403 Forbidden" error message. What could be causing this issue?
To ensure seamless access to your Splynx instance's UI, make sure that the IP address you use to visit the instance is specified in the UI Allow List under Config → TR-069:
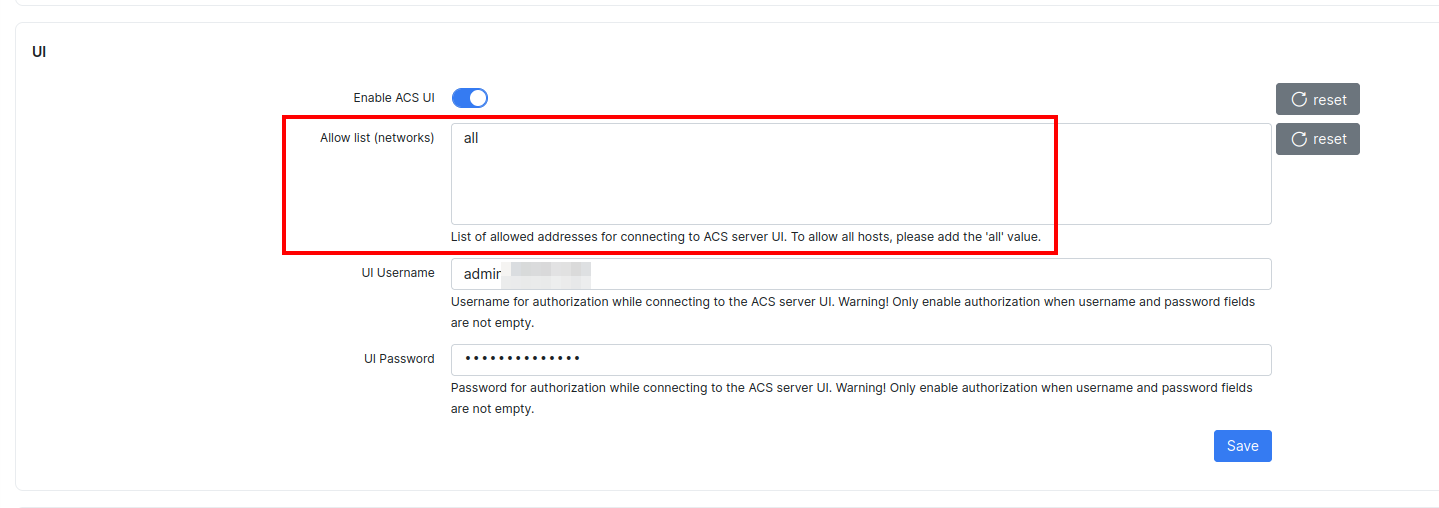
After receiving such an error, you can check the following logfile via CLI to quickly determine from which IP address you were trying to visit the UI: /var/www/splynx/logs/nginx/genieacs-ui-error.log
How can I debug issues with provisioning or specific device ACS processing?
The main and most informative log on ACS processing is located at /var/www/splynx/logs/nginx/genieacs/genieacs-cmwp-access.log. You can also access this log via the Splynx admin web panel by navigating to Administration → Logs → genieacs/genieacs-cwmp-access.
What is the recommended value for the "Periodic Inform Interval"?
In general, we suggest not using values less than 300 seconds. However, this also depends on the number of devices connected to the ACS server. Having a large number of devices and setting the refresh interval too low may increase the CPU load on your Splynx server drastically.
When connecting a device to an ACS server using CWMP, is it preferable to use an HTTP or HTTPS URL?
HTTP connection will work more quickly, but the data sent and received by the device will not be encrypted. On the other hand, HTTPS data is encrypted, but it will work more slowly, and some devices may fail to connect due to their inability to verify the validity of your SSL certificate.
For CWMP connections established over a secure VPN tunnel or private network, it is best to use the HTTP protocol. However, when data is sent over the Internet, it is recommended to use HTTPS.
How can I provision a device after it has been reset?
To provision a device after it has been reset, you need to ensure two things:
- The device must be capable of establishing a network connection to the ACS server;
- The device must have TR-069 client settings configured to initiate a CWMP connection and enable provisioning.
When it comes to connecting to an ACS server, many home routers have their DHCP client enabled on the WAN interface by default after a configuration reset.
As for TR-069 client settings, it depends on each specific vendor whether you can have these settings pre-set in firmware or if there is an ability to set these settings over the network.
Does the Splynx ACS server support TR-098 and TR-181 data models, or is it limited to TR-069 only?
TR-098 and TR-181 are both additions to the TR-069 data model and it should be possible to manage devices with these specifications by using Splynx ACS server.
Can I use a blank username/password to connect the CPE to the ACS server, and is there any risk in doing so?
Of course, you can leave the username/password fields empty in the Config → Network → TR-069 (ACS) menu, and devices will be able to connect to the ACS service without providing any login credentials.
To ensure that only certain devices can connect to your ACS server - you can configure connection allow list and/or firewall for CWMP ports on the server.
I have received a notification on my dashboard that ACS services are not working, how do I resolve this?
First step would be to re-enable the services in Config → Networking → TR-069 (ACS) menu and waiting for about 5 minutes for services to restart gracefully. Detailed information regarding ACS services can be found in their logfiles (Administration → Logs → Files):
genieacs/genieacs-cwmp - CWMP service logs for HTTP connections
genieacs/genieacs-cwmp-ssl - CWMP service logs for HTTPS connections
genieacs/genieacs-fs - File sending service logs for HTTP connections
genieacs/genieacs-fs-ssl - File sending service for HTTP connections
genieacs/genieacs-nbi - ACS API service logs (used to communicate with Splynx)
genieacs/genieacs-ui - ACS UI service logs
If you are having trouble resolving this issue - please submit a ticket by writing to support@splynx.com.
Does Splynx use reverse proxy for ACS connections?
Starting from Splynx 4.1 we only use Nginx as reverse proxy for GenieACS UI service to ensure additional security and logging. For CWMP & FS services there is no proxying involved to ensure the best operability and performance.How can I download the most complete list of attributes and its values that can be used by my device?
When a device is registered in Splynx, you can download a CSV file from the GenieACS UI device page, which contains a complete list of device attributes reported, along with their corresponding values and types, by clicking the "Download" button: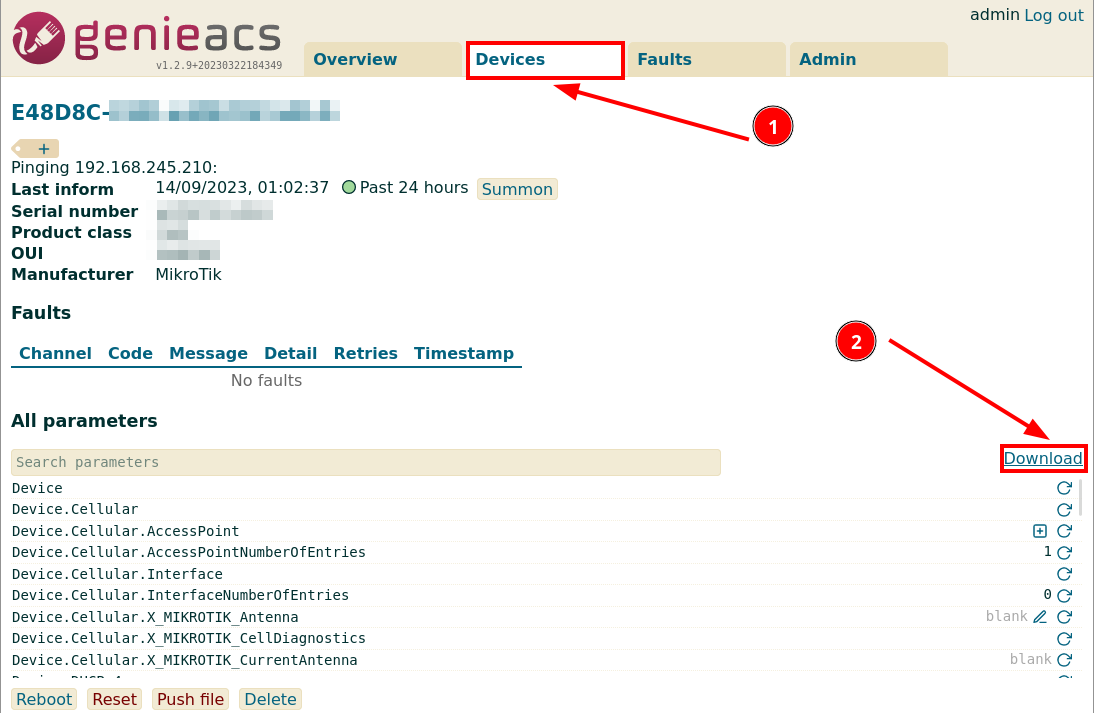
Does restarting Radius lead to disconnect of active connections of my customers?
Restarting Radius services takes up to 15 seconds on average and will not cause your already authorised customers to disconnect. Only devices attempting to authorise will not be able to do so while Radius services are restarting and unavailable.How can I ensure that customers can authorize in case when Splynx Radius is unavailable?
- You can setup a separate server as Splynx Radius failover with ease, please follow this article for more info: Radius failover.
- You can use MikroTik API instead of Radius for Splynx to add/manage local authorization parameters such as DHCP leases/PPP secrets/Hotspot users - such local entries will be stored on router and your customers will be able to authorize even when Splynx is offline, please check following article for more info: MikroTik Local auth via API.
Which vendor attributes are supported for Radius AAA in Splynx?
You should be able to use most of the available vendor attributes since Splynx utilizes freeradius as Radius server that comes with many attribute dictionaries for most common device manufacturers.If you need help installing additional attribute dictionary on your Splynx instance for a specific device - kindly file a ticket by sending email to support@splynx.com.
In which scenarios Splynx Radius can disconnect an online customer?
Splynx can send Packet of Disconnect (PoD) to disconnect customer that is authorized and accounted via Radius when:- customer status changes (
Active → Blockedand vice versa, can be configured in Config → Radius) - customer service tariff plan or other parameters (status, service login/pass, IP etc) change
- FUP/CAP rule is applied (can be configured in Config → Radius)
- customer is manually disconnected via admin panel by using "Disconnect" button in customer online list or in customers profile services menu
Can I use other types of traffic accounting in combination with Radius authorization?
Yes, you can use MikroTik API or NetFlow accounting in combination with Radius authorization/accounting on the same NAS device added as Router in Splynx.For more info, please follow these articles: Routers Settings, NetFlow accounting.
Where can I find Splynx API documentation?
Splynx API documentation is available via the link https://splynx.docs.apiary.io/#
How can I create an add-on via API?
You can find the main steps via the link https://bitbucket.org/splynx/splynx-addon-howto/src/master/
In addition, there are links to some public add-ons that can serve as examples for you.
How can I use Postman for API calls?
You can find the documentation via the link https://wiki.splynx.com/administration/information/api_documentation
There are detailed Authentication examples and some base API calls.