¶ Email config
- Overview
- Email settings
- Outgoing method
- Outgoing mailboxes
- Email deliverability (SPF, DKIM, DMARC)
- Table data management
¶ Overview
To configure the email sending, navigate to Config → Main → Email:
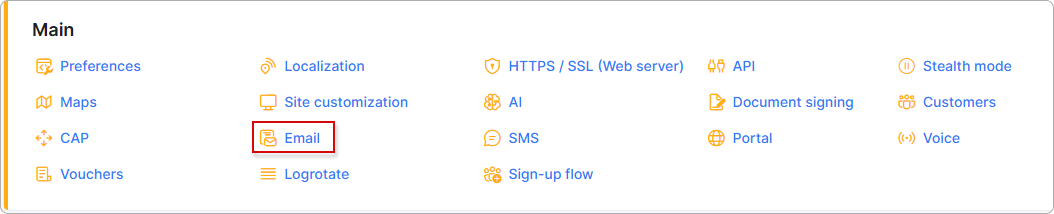
The email configuration page consists of three sections:
- Email settings - configure general email parameters such as the admin email address, sending limits, and email expiration.
- Outgoing method - set up and manage the transport methods used to send emails (SMTP, OAuth Google, or OAuth Office 365).
- Outgoing mailboxes - create mailboxes that define the sender identity, link them to an outgoing method, and assign them to specific categories or partners.
Incoming email (IMAP) is configured separately on Config → Helpdesk → Inboxes. Outgoing mailboxes on this page can be paired with an inbox of the same address so that replies on a ticket go out through the matching alias.
¶ Email settings
In this section, you can set the admin email address, redirect all outgoing emails to a specific address for testing, configure the amount of days before the email expiration, limit the number of emails sent per hour, and force SMTP connections to use IPv4.
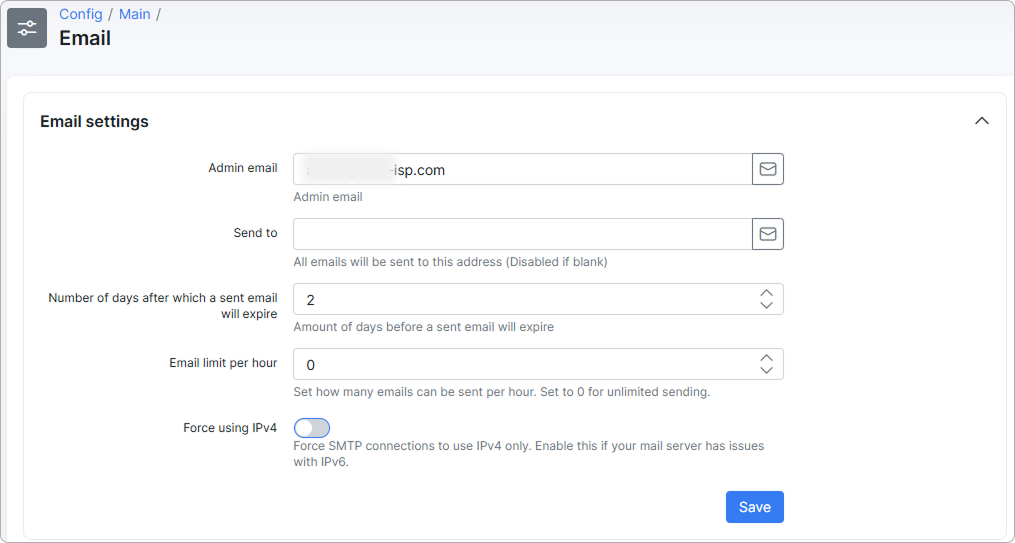
- Admin email - email address of the administrator.
- Send to - if specified, all emails will ONLY be sent to this address (disabled if blank).
- Number of days after which a sent email will expire - specify the number of days before a sent email will expire. The server will try to send emails for this number of days; if failed, they will be skipped.
- Email limit per hour - set how many emails can be sent per hour. Set to 0 for unlimited sending.
- Force using IPv4 - force SMTP connections to use IPv4 only. Enable this if your mail server has issues with IPv6.
Click the Save button to apply changes.
Email logs can be found under
Administration → Logs → Emailor underMessages → Mass sending → History.
¶ Outgoing method
The Outgoing method section displays all configured email sending methods in a table.
The table shows the following columns:
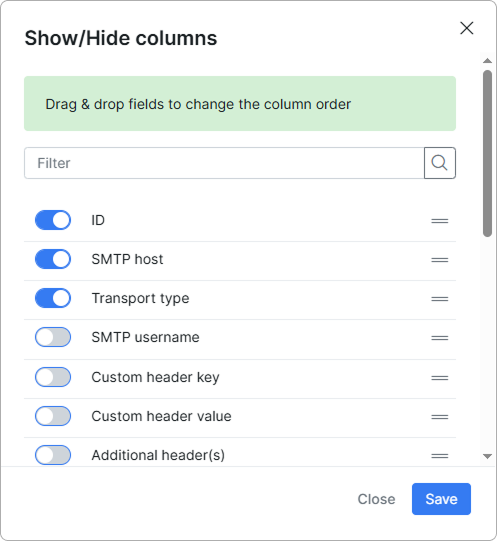
- ID - internal identifier of the method.
- SMTP host - host name for SMTP transport; empty for OAuth Google and OAuth Office 365 methods.
- Transport type - one of SMTP, OAuth Google, OAuth Office 365.
- Actions - edit
 or delete
  the method.
To add a new outgoing method, click the + button in the top-right corner of the table:
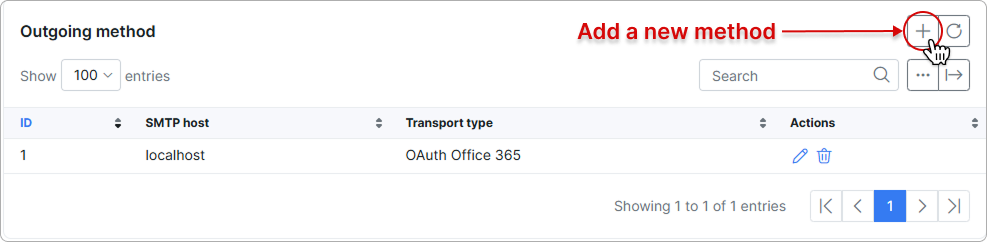
You will be redirected to a new page where you need to configure the new method according to your needs.
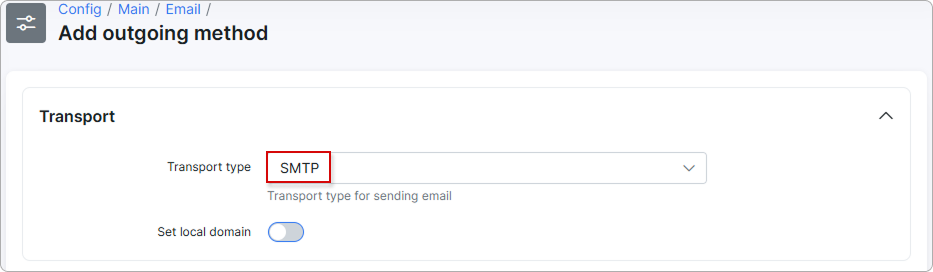
First select the Transport type:
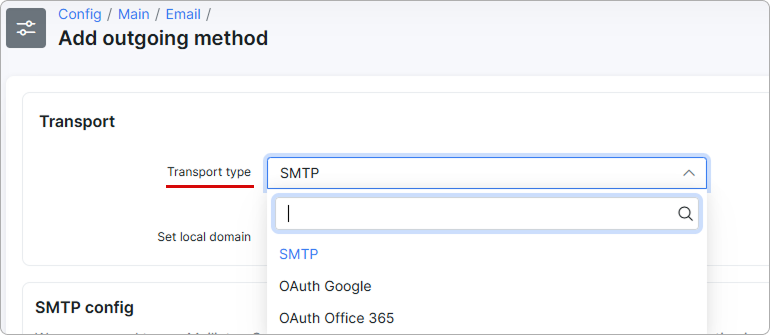
Available options are:
- SMTP - standard SMTP protocol.
- OAuth Google - using Google API for authentication.
- OAuth Office 365 - using Microsoft Office 365 OAuth for authentication.
Each transport type also has a Set local domain toggle to set the local domain.
¶ SMTP
We recommend to use Mailjet or SparkPost for your SMTP configuration.
IMAP configuration is managed on Config → Helpdesk → Inboxes.
When SMTP is selected as the transport type, the SMTP config section becomes available with the following settings:
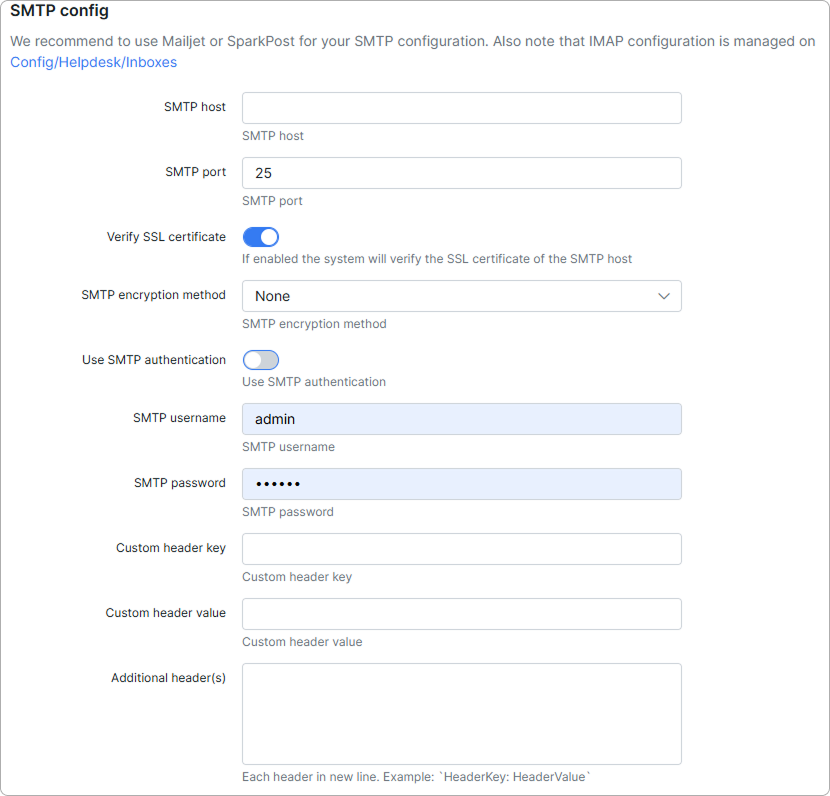
- SMTP host - specify the SMTP server name.
- SMTP port - specify the SMTP port (default: 25).
- Verify SSL certificate - if enabled, the system will verify the SSL certificate of the SMTP host.
- SMTP encryption method - select the SMTP encryption method (None, SSL, TLS).
- Use SMTP authentication - enables/disables SMTP authentication.
- SMTP username - your username for sending emails.
- SMTP password - your email account password or app-specific password.
Custom email headers are no longer set on the outgoing method. Add them to each outgoing mailbox in the Custom headers field instead — see Outgoing mailboxes.
If you need a third-party email delivery service, some popular options include:
¶ OAuth Google
When OAuth Google is selected as the transport type, the OAuth config section will appear with the following settings:
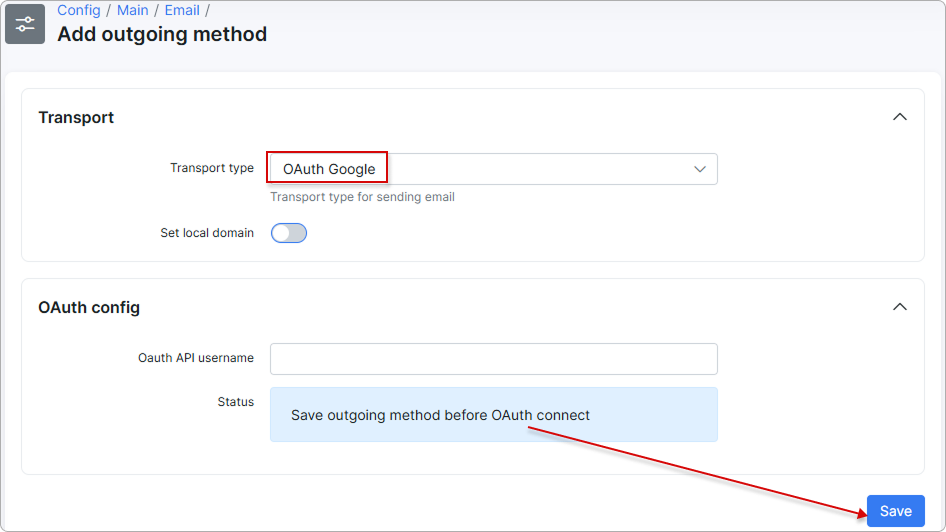
Google app credentials (Client ID and Client secret) must be configured in Config → Main → Preferences before you can connect via OAuth. If you rotate or re-create your Google application, these credentials also need to be updated there — see Google app credentials.
- OAuth API username - enter the Google email account username.
- Status - displays the current connection status. You need to save the outgoing method first before connecting via OAuth.
Save outgoing method before OAuth connect
After saving, click the Connect button to authenticate with your Google account:
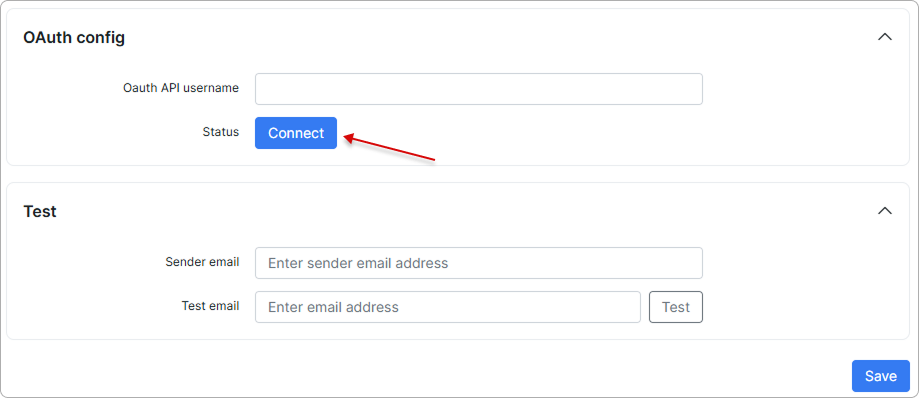
Once connected, you can verify in the Test section that the email sending works correctly:
- Sender email - enter the sender email address to use for the test.
- Test email - enter the recipient email address and click the
Testbutton to send a test email.
¶ OAuth Office 365
When OAuth Office 365 is selected as the transport type, the OAuth config section will appear with the following settings:
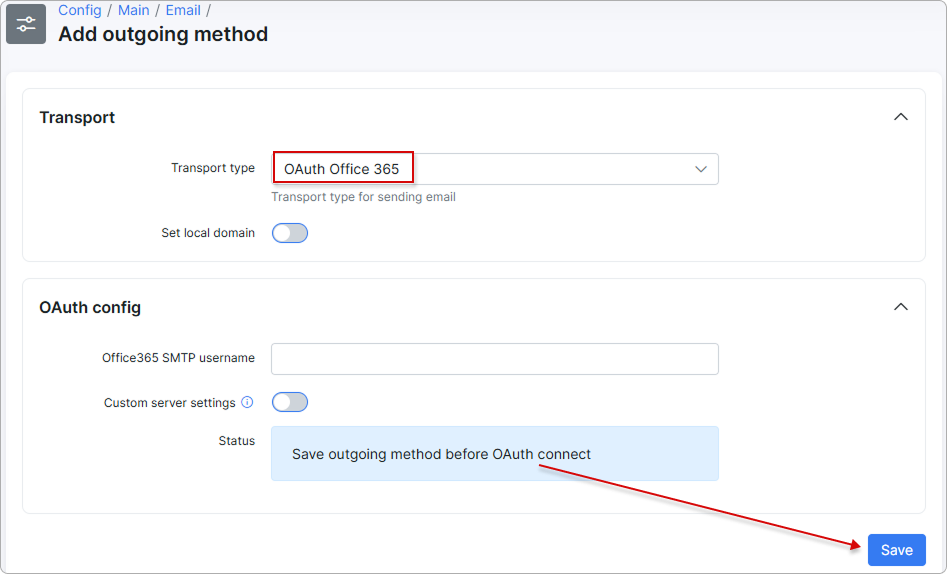
Save outgoing method before OAuth connect
- Office365 SMTP username - enter the Office 365 email account.
- Custom server settings - enable this option to configure custom host, port, and encryption settings. This is useful if you're connecting to your own email servers instead of Microsoft's default servers.
When Custom server settings is enabled, additional fields appear:
- Office365 SMTP host - SMTP server address (default: smtp.office365.com);
- Office365 SMTP port - SMTP port (default: 587);
- Office365 Encryption method - choose the encryption method (TLS, SSL, or None);
- Verify SSL certificate (Office365) - if enabled, the system will verify the SSL certificate of the SMTP host.
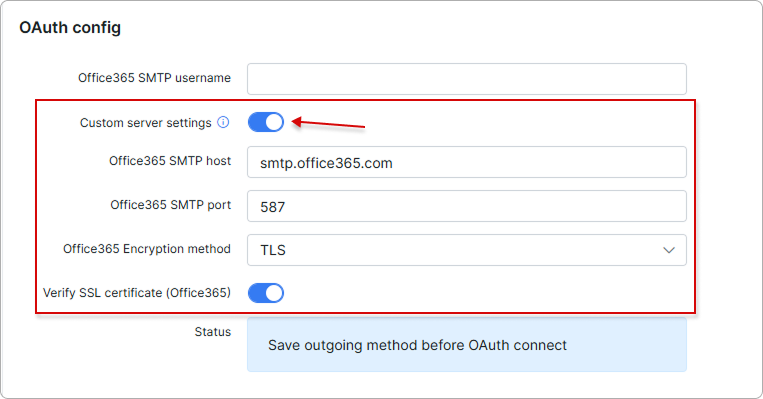
- Status - displays the current connection status. You need to save the outgoing method first before connecting via OAuth.
After saving, click the Connect button to authenticate with your Office 365 account. If the connection is successful, you will see a "Connected" status.

Once connected, you can verify in the Test section that the email sending works correctly:
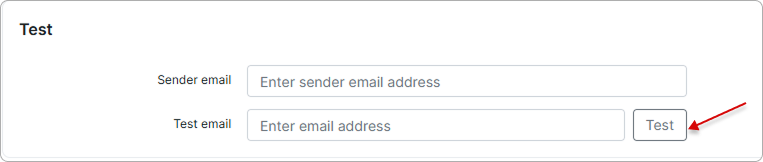
- Sender email - enter the sender email address to use for the test.
- Test email - enter the recipient email address and click the
Testbutton to send a test email.
¶ Outgoing mailboxes
A single Default mailbox is created automatically on a fresh installation. It cannot be deleted — only edited — and acts as the fallback sender for every category until you add and enable category-specific mailboxes (Sales, Support, Finance, etc.).
The Outgoing mailboxes section allows you to configure separate mailboxes for sending emails.
The table shows the following columns:
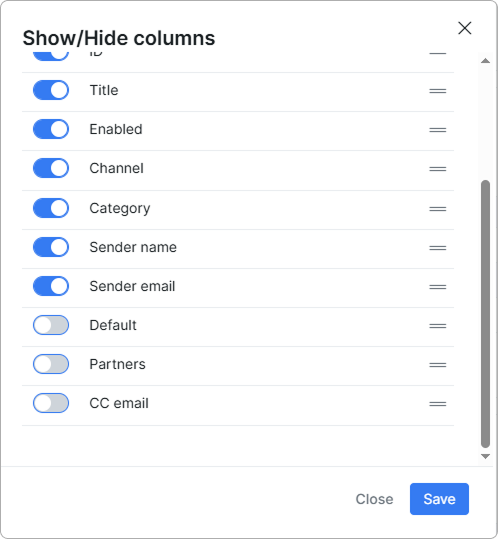
- ID - internal identifier of the mailbox.
- Title - display name of the mailbox.
- Enabled - shows whether the mailbox is active. The pre-created Default mailbox carries a
Defaultbadge and cannot be deleted. - Channel - the outgoing method (SMTP, OAuth Google, OAuth Office 365) the mailbox sends through.
- Category - which section's notifications the mailbox handles (Default, Sales, Support, Finance).
- Sender name - name shown to recipients.
- Sender email - address shown to recipients.
- Actions - edit the mailbox (the Default mailbox has no delete button).
Each mailbox can be linked to a specific outgoing method (channel) and category. To add a new outgoing mailbox, click the + button in the top-right corner of the table:
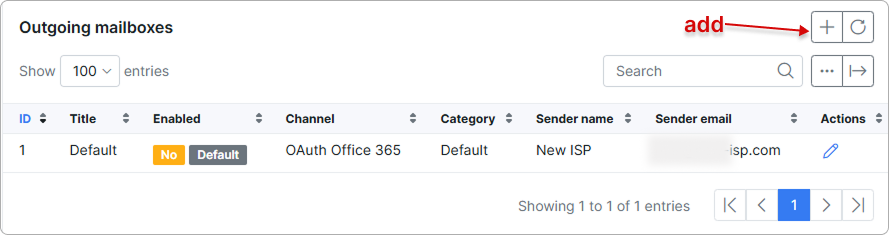
A new window will appear where you need to configure the outgoing mailbox:
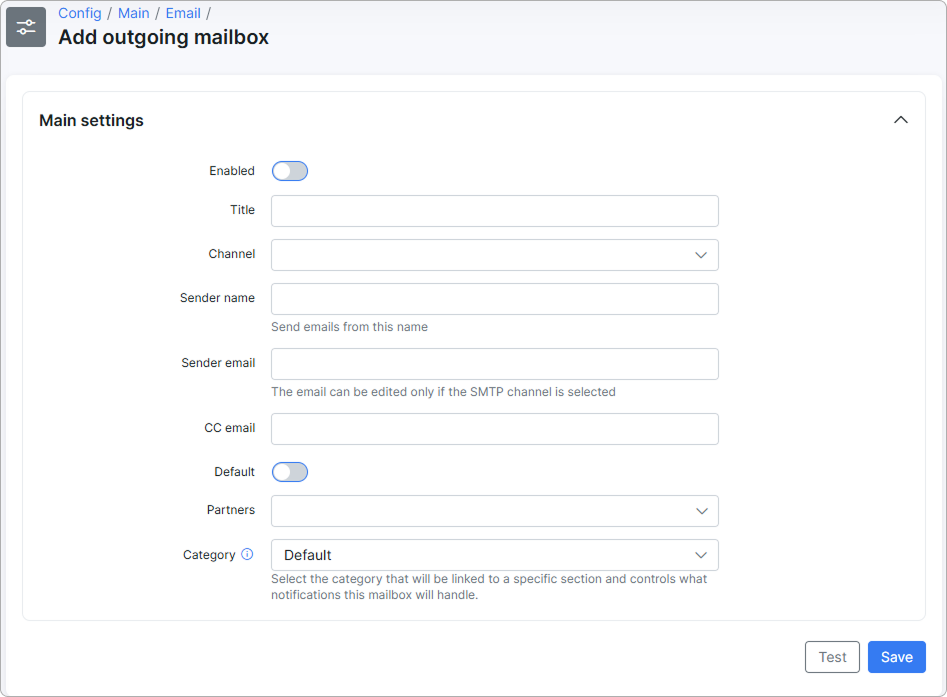
- Enabled - enables/disables the mailbox.
- Title - name of the mailbox.
- Channel - select the outgoing method (channel) to use for sending emails.
- Sender name - the name that will appear as the sender of emails.
- Sender email - the email address that will appear as the sender. The email can be edited only if the SMTP channel is selected.
- CC email - if specified, a copy of all emails sent from this mailbox will be sent to this address.
- Custom headers - additional headers added to every email sent from this mailbox, one header per line in the
HeaderKey: HeaderValueformat. For example,Reply-To: support@example.comsends customer replies tosupport@example.cominstead of the sender address.- Address headers, such as
Reply-To, take an email address only, without a display name. - The headers apply both when the mailbox is selected automatically by category and partner and when an administrator selects it manually as the sender. Emails sent through an administrator's personal SMTP settings also use them.
- If a line does not match the
HeaderKey: HeaderValueformat, Splynx shows a validation error when you save the mailbox.
- Address headers, such as
- Default - set this mailbox as the default.
- Partners - associate this mailbox with specific partners.
- Category - select the category that will be linked to a specific section and controls what notifications this mailbox will handle.
Each type is linked to a specific section: Default (General, Add-ons, Inventory, Monitoring, Scheduling), Sales (Leads), Support (Tickets), Finance (Billing)
Click Test to send a test email from this mailbox, or Save to apply changes.
¶ Email deliverability (SPF, DKIM, DMARC)
Splynx automatically adds List-Unsubscribe and List-Unsubscribe-Post headers (RFC 2369 + RFC 8058) to outgoing customer emails so mailbox providers can show a native "Unsubscribe" button next to your sender name. For the button to actually appear in Gmail or Yahoo Mail, the sending domain must pass SPF, DKIM and DMARC authentication — this is configured on your own DNS, not inside Splynx.
From February 2026, Gmail and Yahoo require bulk senders (more than 5,000 emails per day to a single Gmail address) to support a one-click unsubscribe flow and authenticate with SPF, DKIM and DMARC. Without these DNS records, bulk emails risk being marked as spam or blocked, even when Splynx sends valid
List-Unsubscribeheaders.
¶ Prerequisites
- The Splynx instance URL must use
https://. If it does not, the one-click unsubscribe headers are skipped on outgoing emails and the attempt is recorded in the Email log. - SPF, DKIM and DMARC must be published on the DNS of the domain used in the Sender email of each outgoing mailbox.
¶ SPF
SPF (Sender Policy Framework) is a TXT record that lists the mail servers allowed to send email from your domain.
Add a single SPF TXT record to your domain's DNS. The exact value depends on your SMTP provider — check their setup guide. A typical record looks like:
v=spf1 include:_spf.<your-provider>.com -all
Publish only one SPF record per domain. Multiple SPF records on the same domain cause authentication to fail.
¶ DKIM
DKIM (DomainKeys Identified Mail) signs each outgoing message with a private key and publishes the matching public key in DNS, so receiving servers can verify the message was not modified in transit.
DKIM keys are generated by your SMTP provider (Mailjet, SparkPost, SendGrid, Google Workspace, Microsoft 365, etc.). Follow your provider's documentation to:
- Generate a DKIM key pair in the provider's dashboard.
- Publish the provided TXT record on your domain's DNS (selector format:
<selector>._domainkey.<your-domain>). - Activate DKIM signing in the provider.
¶ DMARC
DMARC (Domain-based Message Authentication, Reporting and Conformance) tells receiving servers what to do with messages that fail SPF or DKIM checks.
Add a TXT record at _dmarc.<your-domain>. A minimal starter policy:
v=DMARC1; p=none; rua=mailto:dmarc-reports@<your-domain>
Move from p=none to p=quarantine or p=reject once SPF and DKIM are stable and you have reviewed the aggregate reports.
DMARC requires either SPF or DKIM to be aligned with the From-header domain. Make sure the domain in your Sender email matches the domain you authenticated with SPF/DKIM.
¶ Verifying the setup
After publishing the DNS records, send a test email to a Gmail account and:
- Open the message in Gmail → click the three-dot menu → Show original.
- Confirm the headers show
SPF: PASS,DKIM: PASS,DMARC: PASS. - Confirm the
List-UnsubscribeandList-Unsubscribe-Postheaders are present.
For an end-to-end score, send a test message to mail-tester.com — it reports SPF, DKIM, DMARC results together with overall spam-risk score.
DNS setup is the responsibility of each Splynx administrator (per sending domain) and cannot be configured centrally inside Splynx. If your domain is hosted by a managed DNS provider, add the records there; if you run your own DNS, add them to your zone file.
¶ Table data management
For Outgoing method and Outgoing mailboxes tables, you can arrange column order, disable/enable them, and export data from the table.
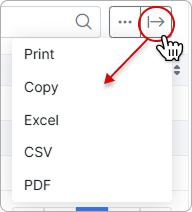
Click the arrow button to export data with the following options (Print, Copy, Excel, CSV, PDF):
Click the breadcrumbs button  to arrange the column order and enable/disable columns for each table.
Outgoing method
Outgoing mailboxes
For more information, please read the following articles:
Inboxes
My Profile (Email)
