¶ Payrix
- Overview
- Installation
- Configuration
- Direct debit request agreement
- Invoice payment
- Charge invoices and balances
- Payment refunds
- Log files
- Direct payments
- BPay Integration
¶ Overview
Payrix (formerly Integrapay) is a Splynx add-on which allows customers to pay for invoices via the payment gateway - https://www.payrix.com/au/.
The add-on can work with various credit cards and bank accounts, if cards or bank account are saved in customer profiles, the add-on allows you to charge all customers using Direct debit orders.
¶ Installation
The add-on can be installed in two methods: via the CLI or Web UI of you server.
To install the Splynx-Payrix add-on via CLI, the following commands can be used:
apt-get update
apt-get install splynx-payrix
To install it via the Web UI:
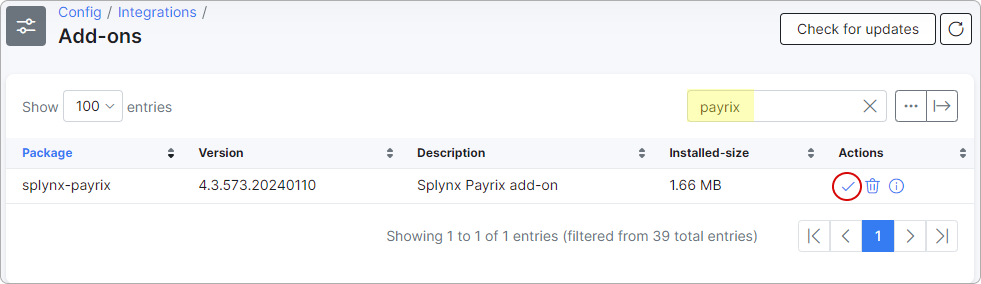
Navigate to Config → Integrations → Add-ons:

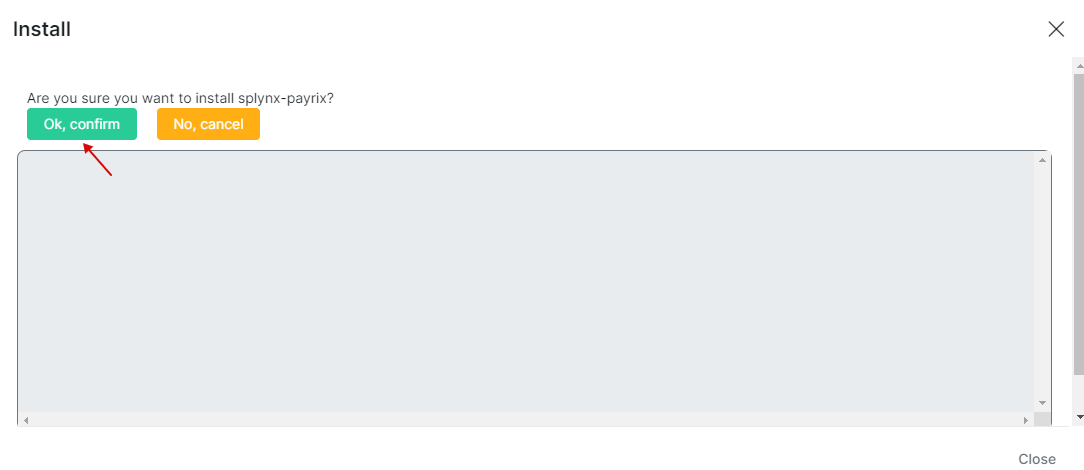
Locate or search for the splynx-payrix add-on and click on the Install icon in the Actions column, you will be presented with a window to confirm or cancel the installation, click on the OK, confirm button to begin the installation process.
¶ Configuration
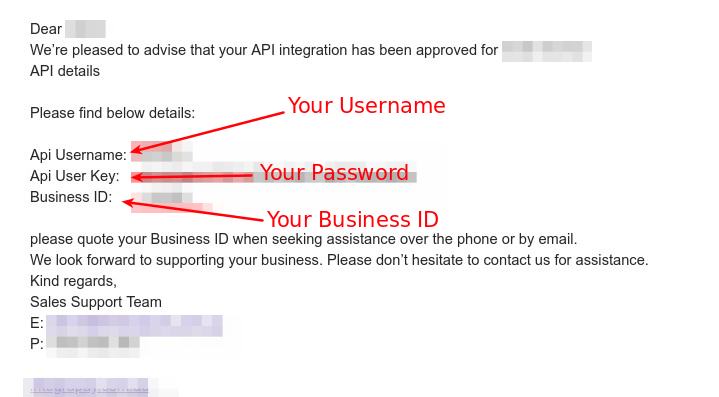
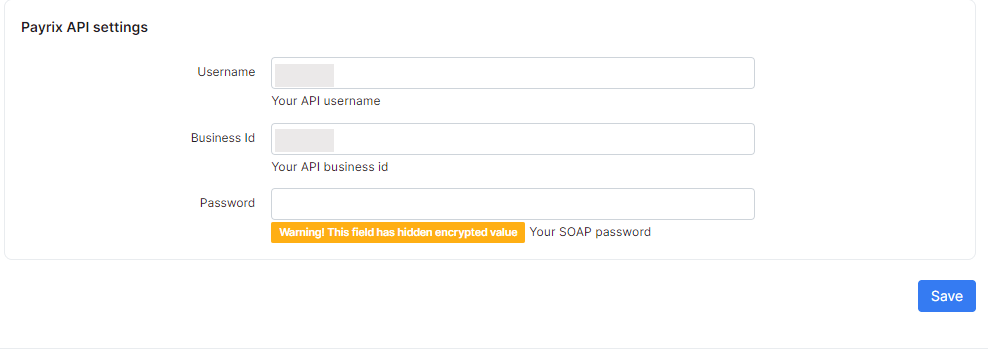
The first step is to register an account on https://www.payrix.com/au/. After registering, Payrix will send you an email with your credentials, where Bussines ID is your Username and Api User Key is your Password :
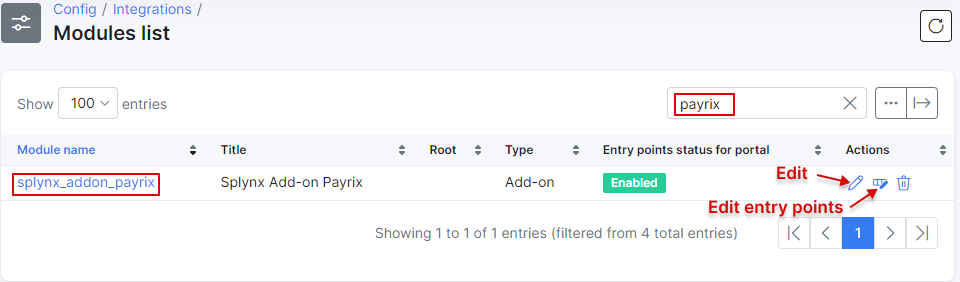
Then, you need to set your Username, Business ID and Password in Payrix API settings section of add-on config page. Navigate to Config → Integrations → Modules list and locate or search for the splynx_addon_payrix add-on module and click on the  (Edit) icon in the Actions column, enter your credentials in the related fields.

Main information and API settings:
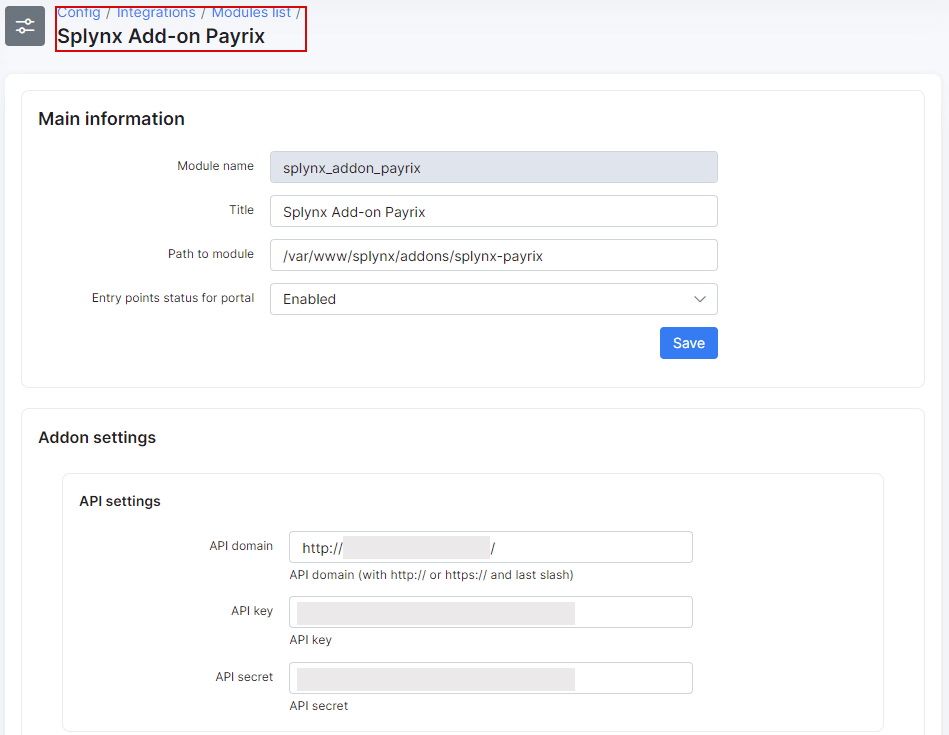
-
API domain - api domain should be the same as Splynx URL. The forward slash
/is required at the end; -
API key, API secret - auto generated default values. Don't change it unless it is absolutely necessary.
Billing settings:
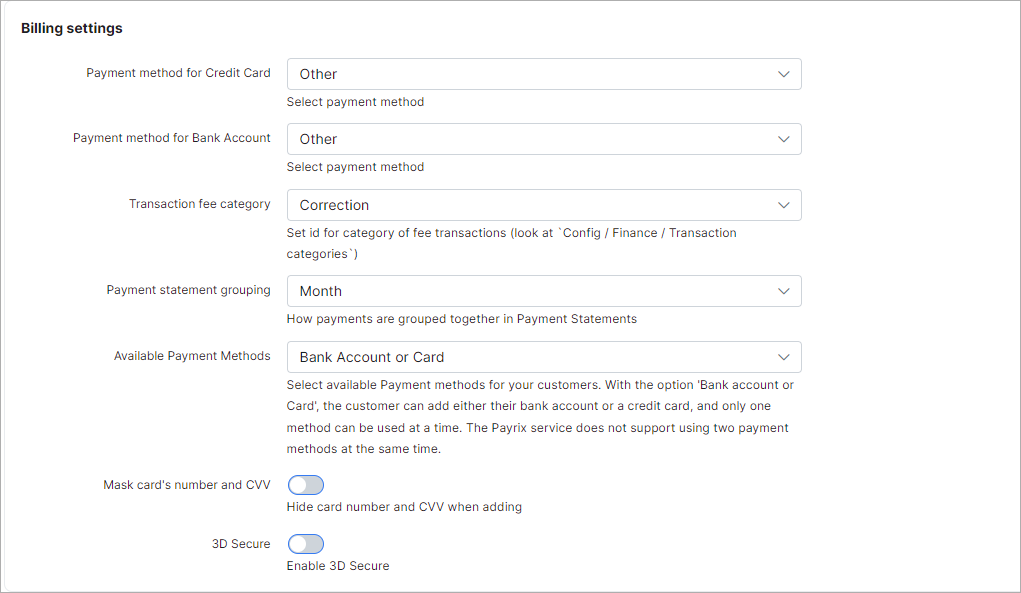
- Payment method for Credit Card / Bank Account - when a customer pays using this add-on, the payment will be allocated as this payment type;
- Transaction fee category - transaction category of the fee transactions;
- Payment statement grouping - choose how to group payment statements (
Finance → Payment Statements → History) monthly or daily; - Available Payment Methods - choose a payment method that the customer can add on Portal. Pay attention, Payrix service does not support using two payment methods at the same time. If 'Bank account or Card' option is selected, a customer can add either their bank account or a credit card and use only one method at a time;
- Mask card's number and CVV - hide card number and CVV code when adding on the Portal;
- 3D Secure - enable this option for 3D Secure verification.
Add-on settings:
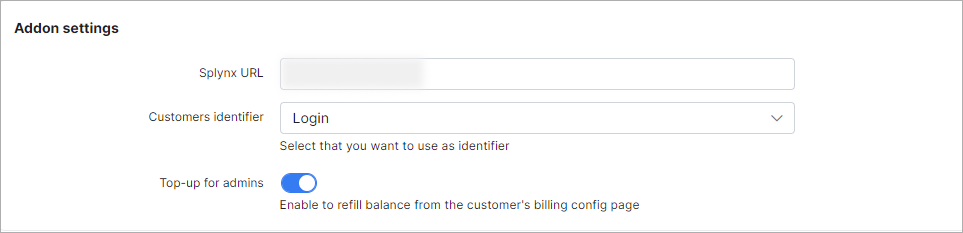
- Splynx URL - your Splynx URL address without the forward slash
/sign at the end; - Customers identifier - select what to use as identifier of customer on Payrix service side;
- Top-up for admins - enable/disable the form to refill the customer account balance on their billing configuration page (only for administrators in Splynx, see the example below).
Example
Navigate to customer billing configuration page (Billing → Billing config) and in Payment accounts section click on Refill balance icon near Payrix item.
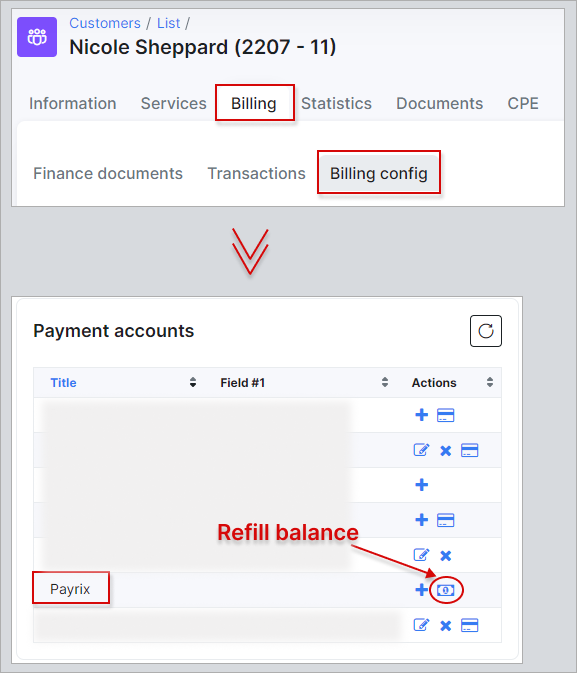
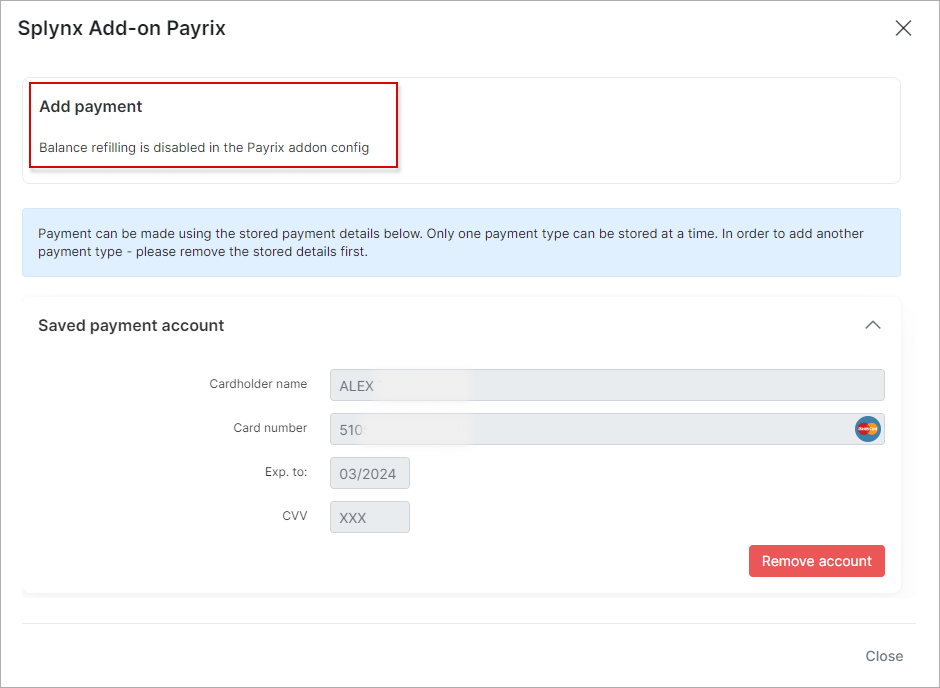
If the payment credentials are not added by the customer, the administrator can add them from this form. Pay attention, only one payment method can be used.
If the payment credentials are added by customer, e.g. credit card but Top-up for admins option is disabled on add-on configuration page, the administrator will see the next message:
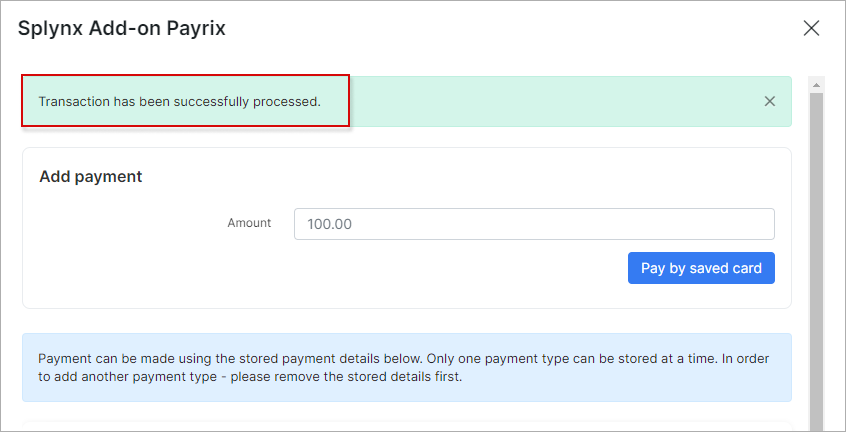
If the option Top-up for admins is enabled on add-on configuration page, the administrator can top up the customer's balance, the saved payment method will be used.
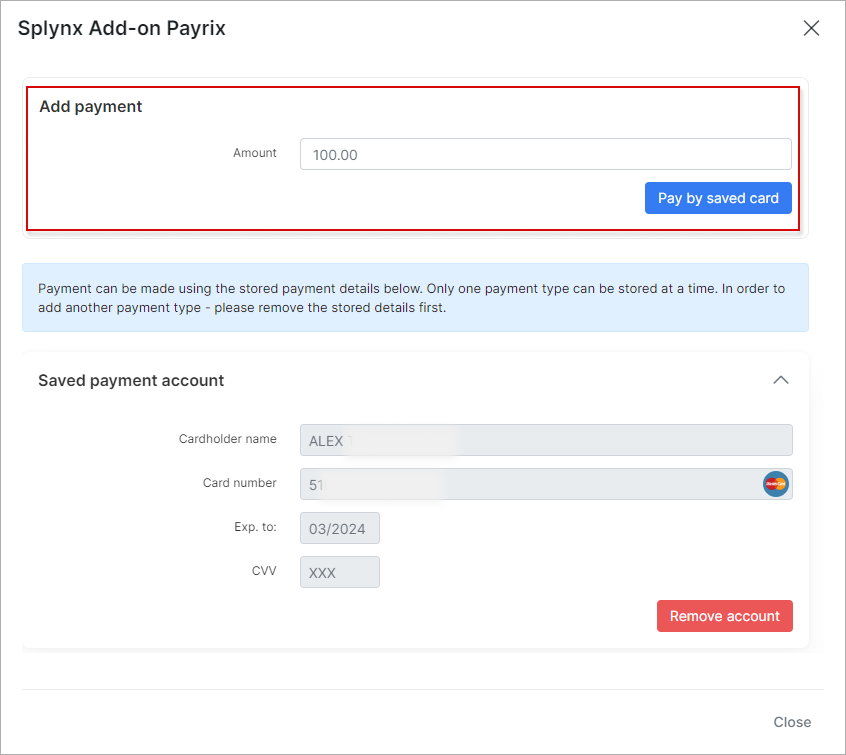
Moreover, when the credit card or bank account is added by customer as a payment method, the administrator can remove them using the top-up form on the customer's billing configuration page.
Fee settings:
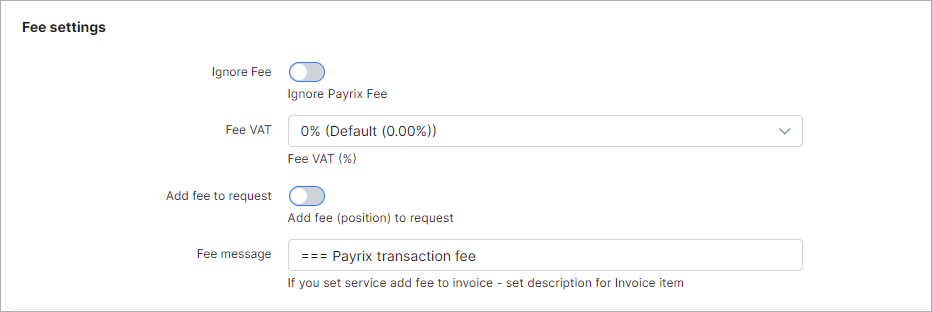
- Ignore Fee - ignore Payrix fee;
- Fee VAT - service fee VAT percent;
- Add fee to request - add fee (position) to request;
- Fee message - if
Add fee to requestoption is enabled, the current message will be added as description for fee item in invoice;
Email settings:
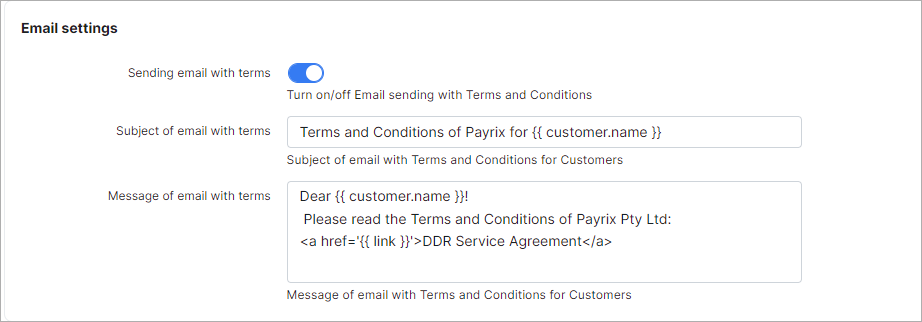
- Sending email with terms - enable/disable the email sending with terms and conditions of the service to customers;
- Subject of email with terms - subject of the email with terms and conditions of the service;
- Message of email with terms - message of the email with terms and conditions of the service;
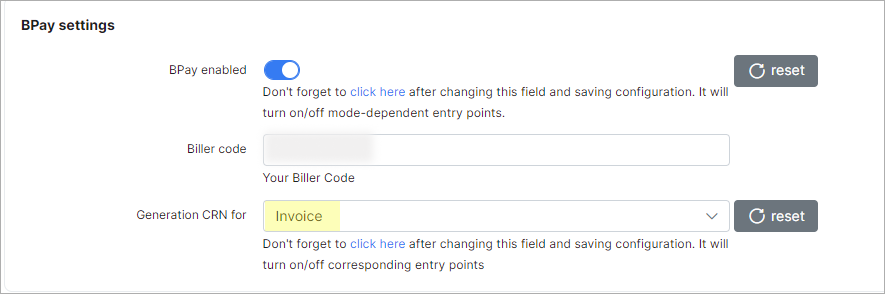
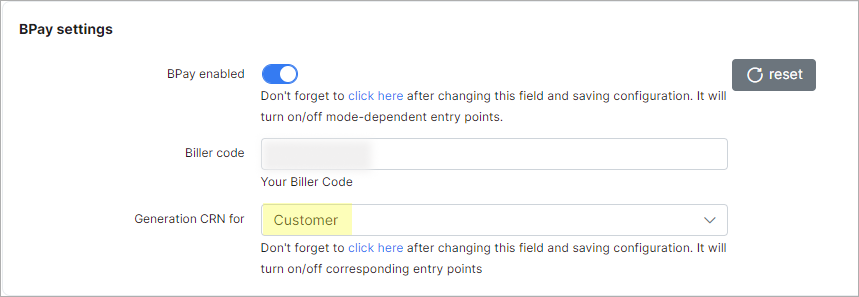
BPay settings:
Starting from Splynx v4.1, we have added BPay to be integrated within Splynx for Payrix payments.
For more information, please read the BPay Integration section.
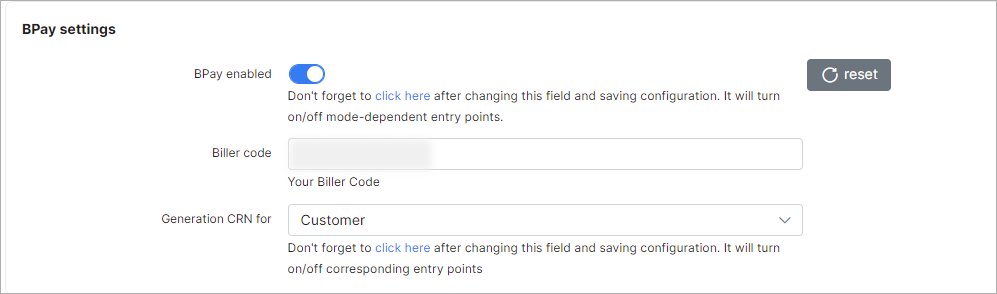
- BPay enabled - enable/disable the BPay integration;
- Biller code - enter your unique BPay Biller code;
- Generation CRN for - choose whether CRN will be generated for Customer or Invoice.
Payrix API settings:
The configuration of add-on Entry points can be found in Config → Integrations → Modules list, near the splynx_addon_payrix module item in Actions column, click on the  (Edit entry points) icon.
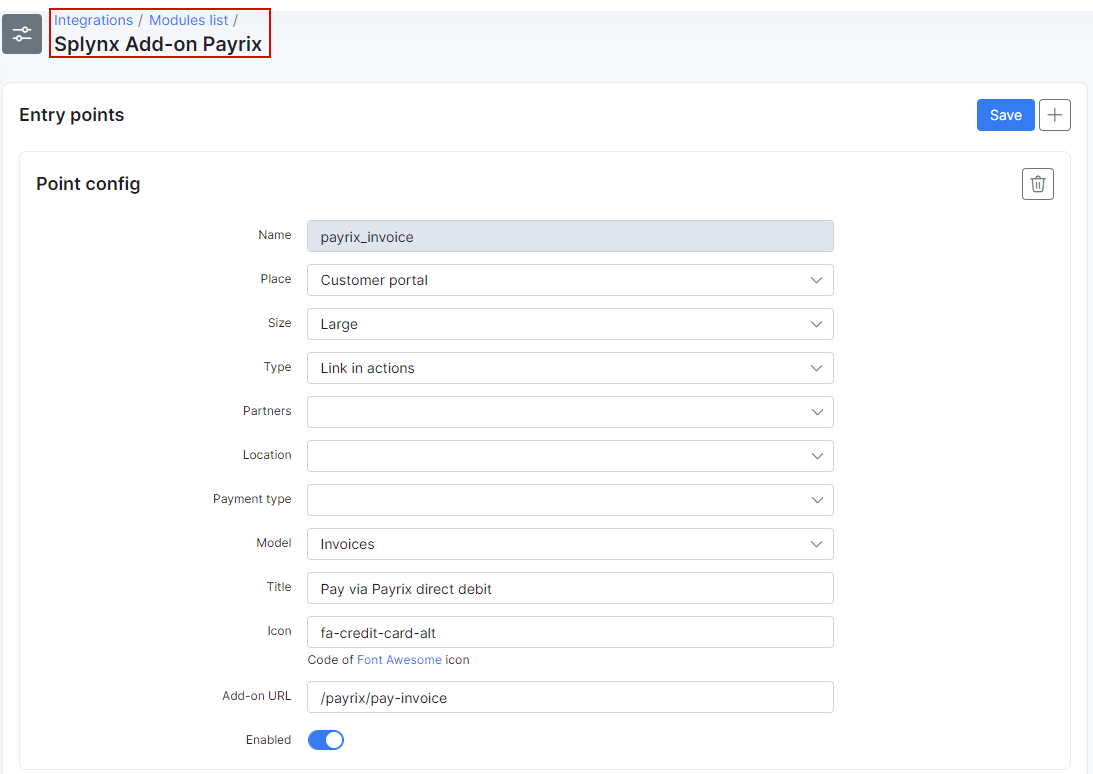
More information about Modules list can be found here.
¶ Direct debit request agreement
After accepting the DDR agreement and saving the payment credentials, the customer will receive an email notification containing two attachments: the Payrix service agreement and the Debit Order Request form with additional details.
¶ Invoice payment
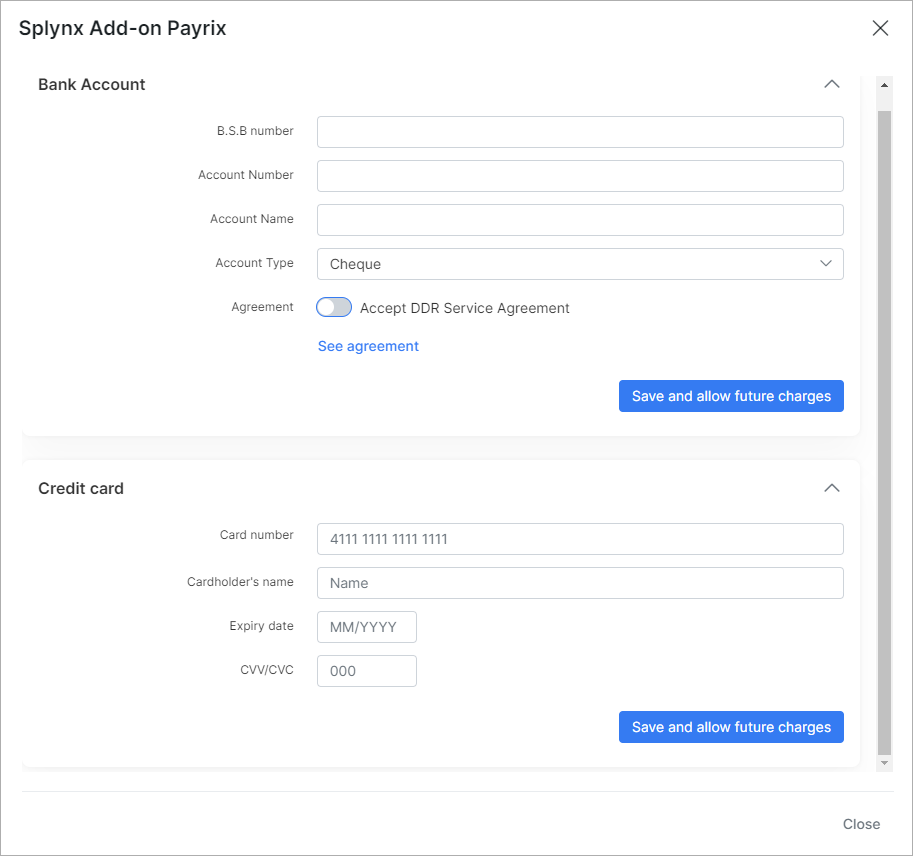
Before making any payment it's required to add the bank account or the credit card, depends on what option customers would like to use to pay.
Also, it's necessary to enable the related entry points for Payrix add-on in Config → Integrations → Modules list.
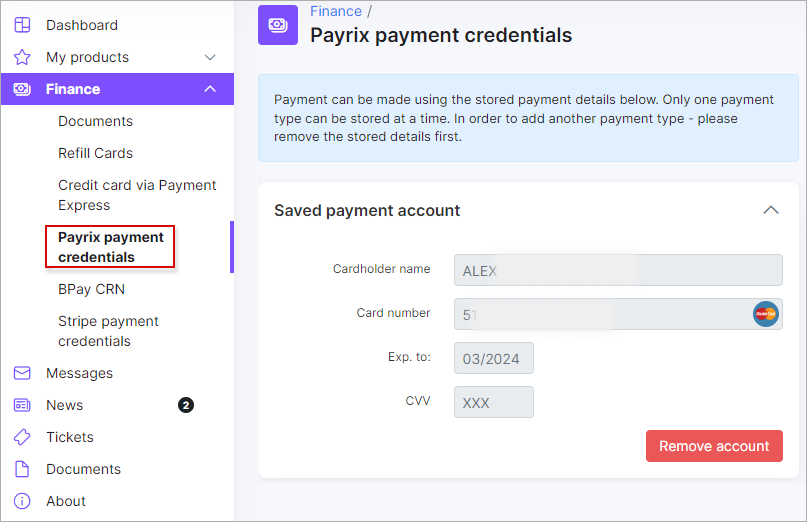
After that a customer can login on the Customer portal, navigate to Finance → Payrix payment credentials and type the required credentials.

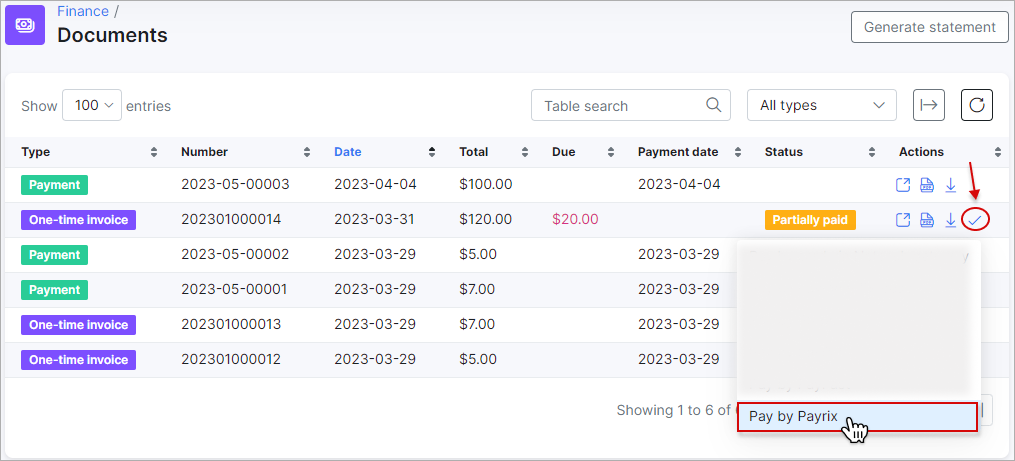
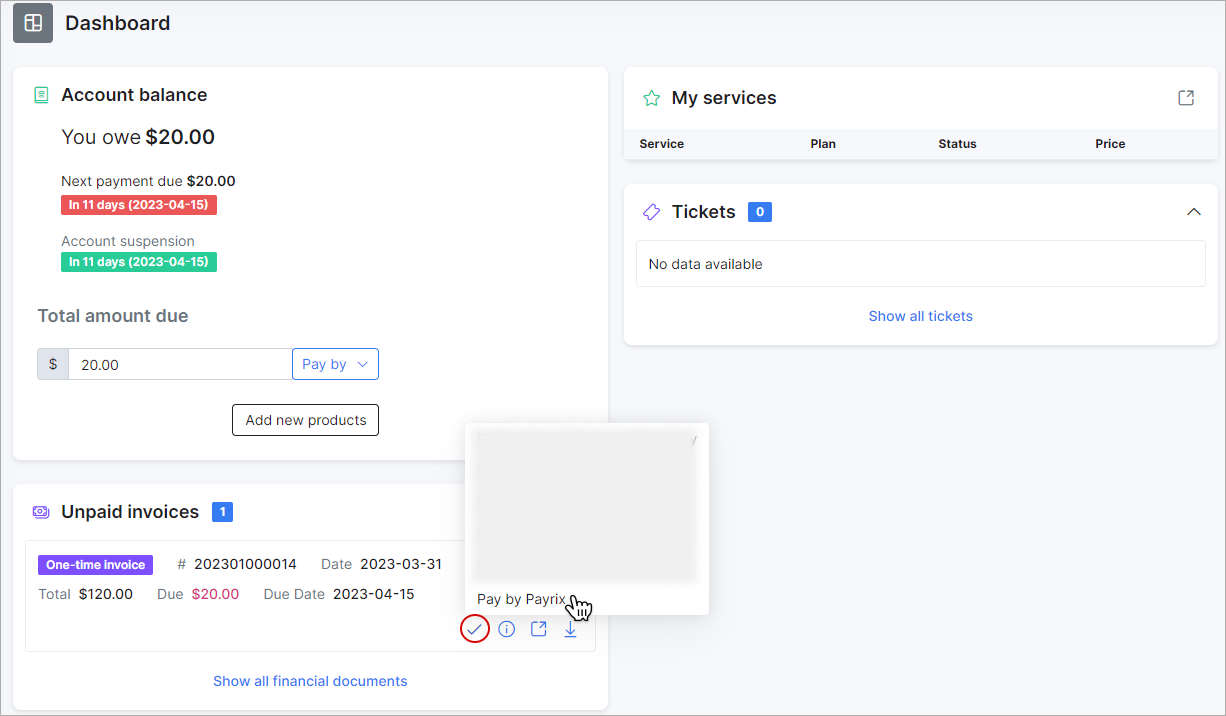
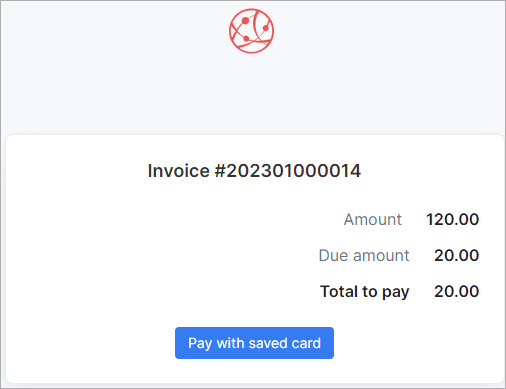
Once the configuration has been completed, customers can pay their invoices on the Customer portal in two ways:
- With the Pay by icon in
Finance → Invoices:
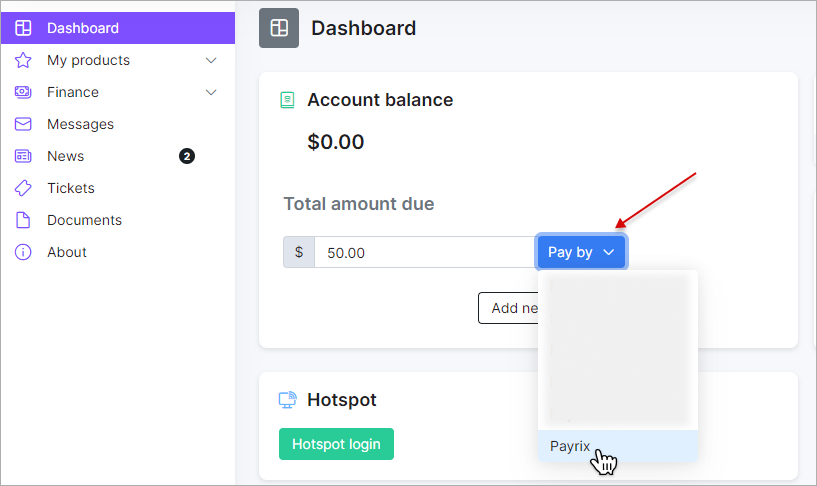
- With the Pay by icon under the Unpaid invoices section on the Dashboard:
IMPORTANT: the Service Fee value cannot be set on add-on config page, as a result, will be shown only the Total to pay amount.
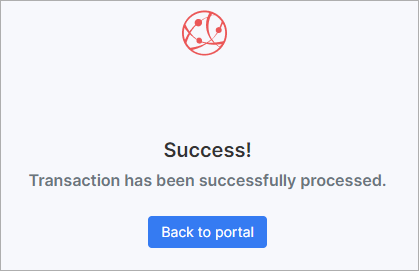
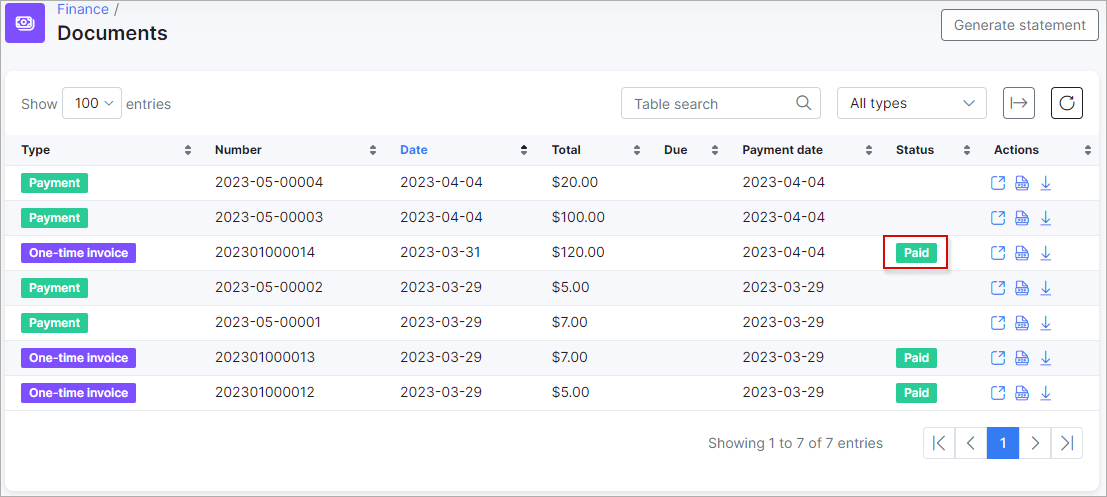
If everything goes well, a customer will see the status of the invoice marked as Paid.
Customers can also refill their balances on the Dashboard:

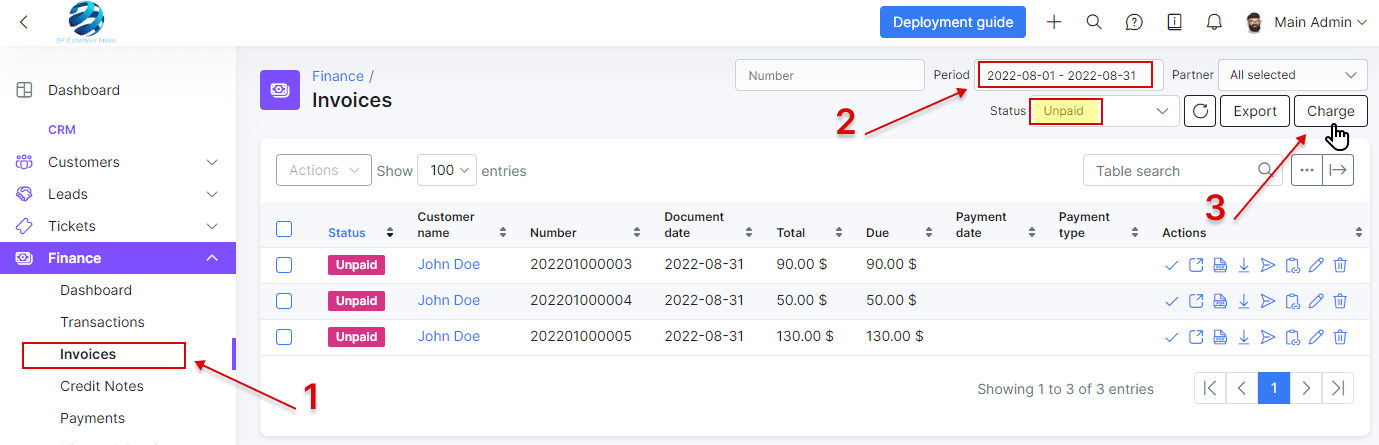
¶ Charge invoices and balances
An administrator can charge all customers using one button. Navigate to Finance → Invoices, set the period and click the Charge button as depicted below:
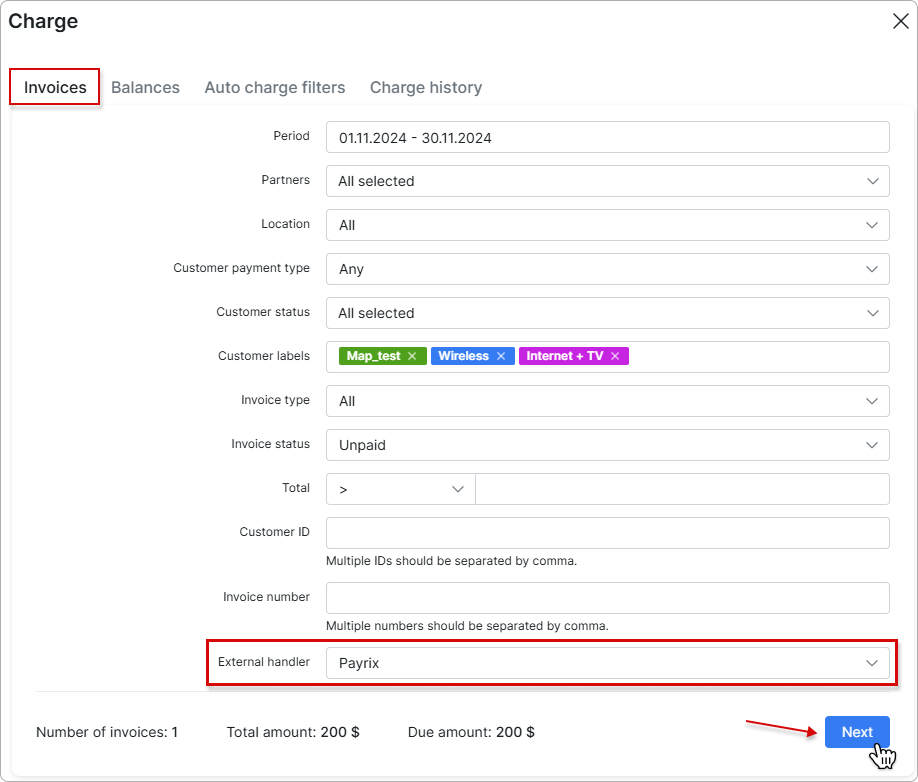
¶ Charge invoices
To charge invoices, select Payrix as the External handler in the Invoices tab, and then click the Next button:
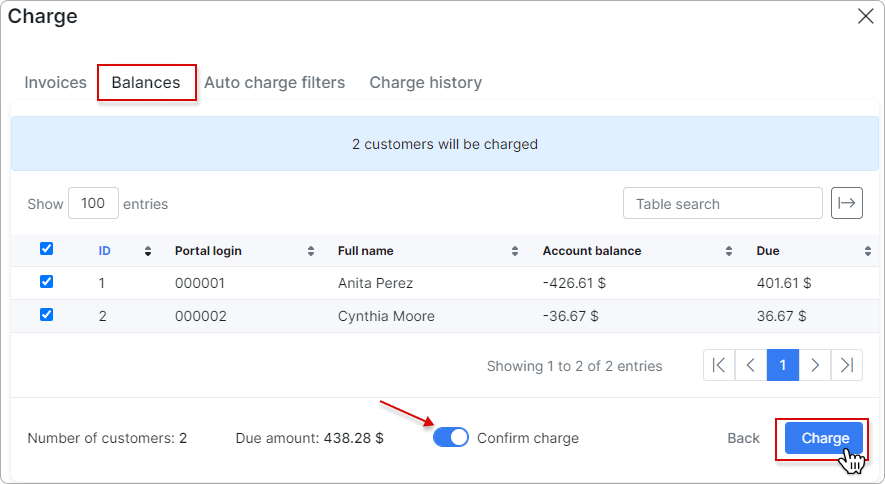
In the new window, toggle the Confirm charge switch to enable it, and then click the Charge button to complete the charging process:

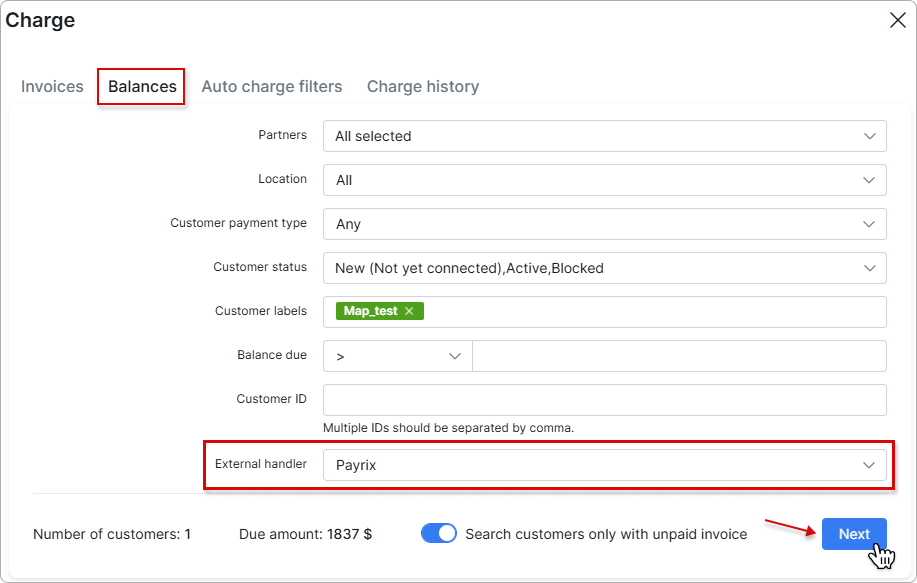
¶ Charge balances
To charge balances, select Payrix as the External handler in the Balances tab, and then click the Next button:
In the new window, toggle the Confirm charge switch to enable it, and then click the Charge button to complete the charging process:
The Charge history tab contains the charge history of all charges you have made, sometimes it is very helpful when there are finance issues.
To learn more details about how to charge invoices and balances, please read Invoices

¶ Payment refunds
You can refund Payrix payments by clicking the Refund button:
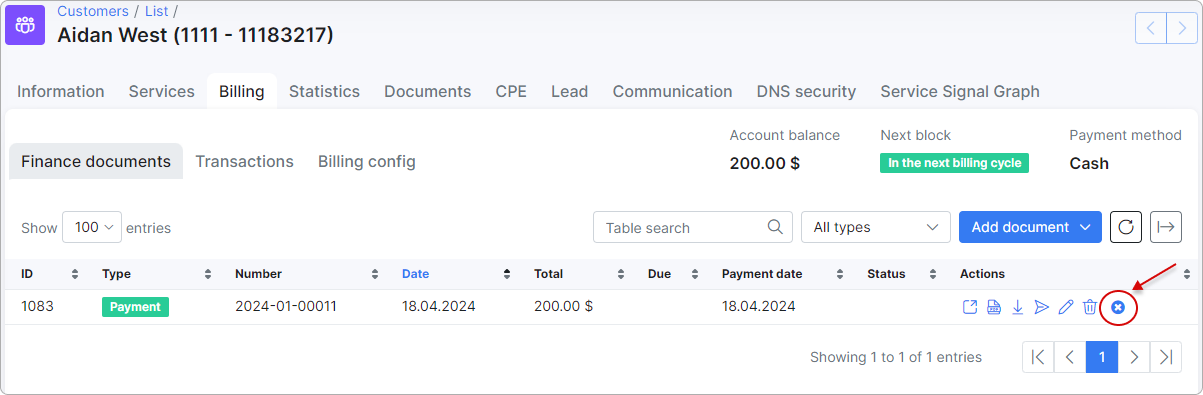
Next, click on Refund in the new window. A credit note will then be generated for the refunded amount, and the refund will be processed immediately.

 If the payment has already been refunded, you will receive a warning message.
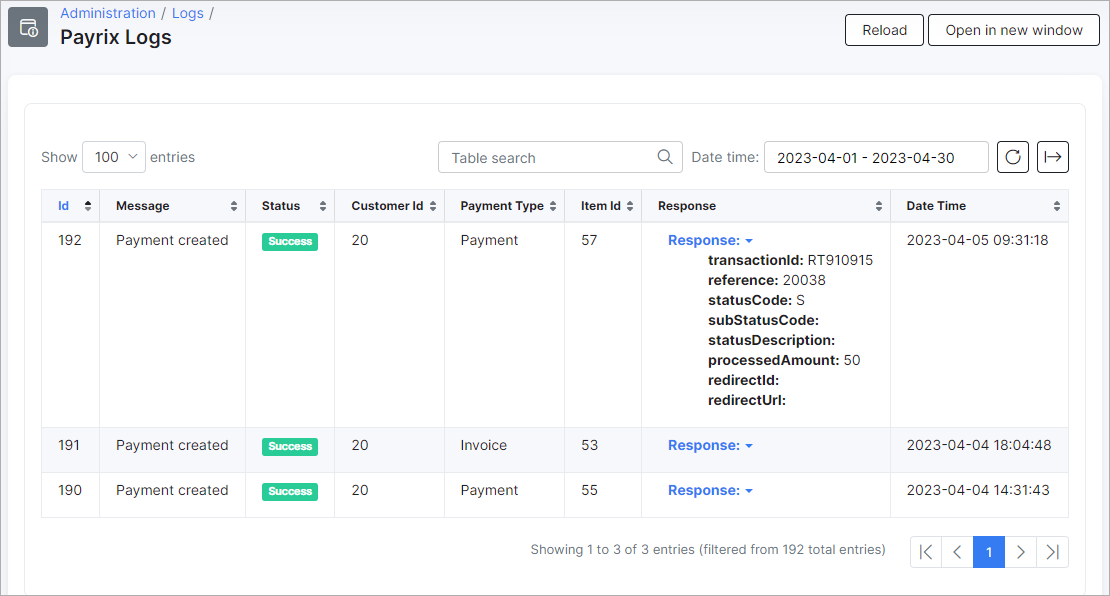
¶ Log files
Payrix add-on logs can be found in Administration → Logs:

In Payrix Logs the different records can be viewed as well as its response details etc.
¶ Direct payments
Using the payments links is the simplest way to accept payments made with credit card or bank account. This feature is available in the Payrix add-on to pay Invoices and Proforma Invoices. This provides convenience and simplicity for your customers, so the amount of on-time payments will increase. For example, you can add a payment link to the e-mail with the (proforma) invoice. As a result, the customer can make payment quickly by clicking onto such link instead of logging in to their Portal page. In case the customer has saved the payment credentials on the Portal, they do not need to add further details when using the direct payment link in the future. If the credit card in not linked on the Portal, the payment details need to be entered each time the payment link is used.
To create a direct payment link, please use the patterns below:
To pay the Invoice:
by invoice ID
https://<splynx_domain_address>/payrix/direct-pay-invoice-by-id?item_id=<Invoice_id>
by invoice number
https://<splynx_domain_address>/payrix/direct-pay-invoice?item_id=<Invoice_number>
To pay the Proforma Invoice:
by proforma invoice ID
https://<splynx_domain_address>/payrix/direct-pay-proforma-by-id?item_id=<proforma_id>
by proforma invoice number
https://<splynx_domain_address>/payrix/direct-pay-proforma?item_id=<proforma_number>
¶ BPay Integration
BPay is an electronic bill payment system in Australia that allows payments to be made through online or phone banking services. Customers have to register as BPay billers with their respective banks, which are part of the BPay operating company. All BPay transactions have a unique CRN (Customer Reference Number), which can be used to identify the customer who made the payment and the related invoice.
¶ Process
-
ISP sends an invoice to the customer, which displays a BPay logo, a unique BPay Biller Code, and a Customer Reference Number (CRN).
-
The customer logs in to their internet banking account and follows the prompts to make a BPay payment.
-
The customer is prompted to provide the payment details, including the Biller Code, the reference number from the invoice (customer CRN), and the amount they wish to pay. The customer's bank then validates the payment in real-time by transferring the payment information to Payrix via BPay, and the system issues a receipt.
![]()
- Funds are deposited into the corporate account.
¶ CRN generation for Invoice
In this mode, a unique BPay CRN is generated for each invoice.
- To enable BPay, go to
Config → Integrations → Modules list → Edit (Config) icon, and enable the BPay enabled toggle. For the Generation CRN for field under BPay settings, select Invoice. Finally, click theclick herelink below to enable the necessary entry points.
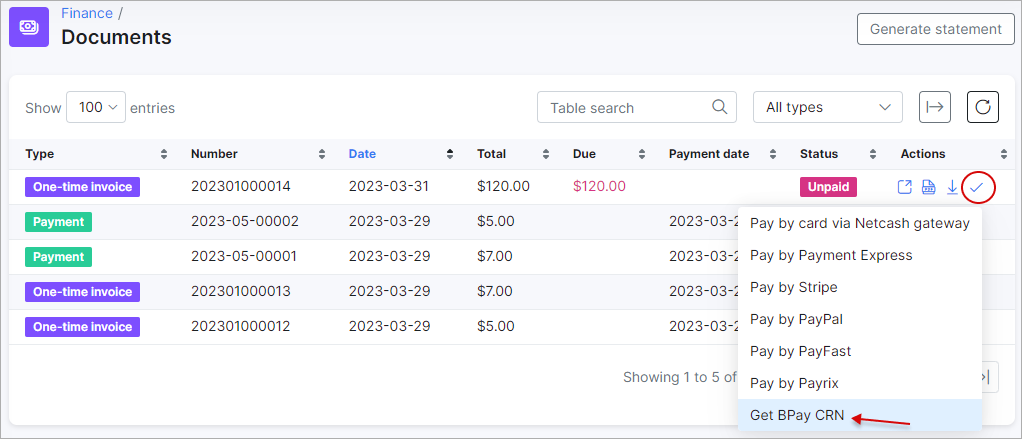
- Then, in the Customer portal, go to the
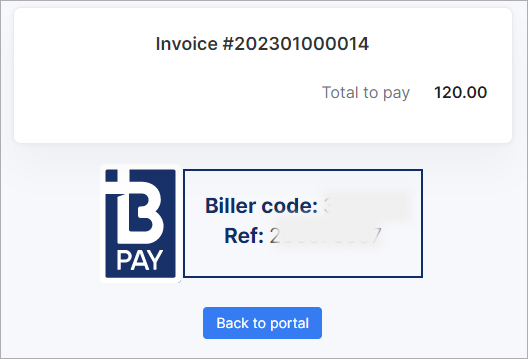
Finance → Documentssection (or the Unpaid invoices section on the Dashboard). Click thePay → Get BPay CRNbutton next to the unpaid (proforma) invoice. A new window will appear showing the (proforma) invoice ID number, the total amount to be paid, and the BPay Biller code along with the generated CRN (Ref).
You can also generate a CRN on the PDF file of the (proforma) invoice.
But previously, you need to add the following code in Config → System → Templates as on the example:
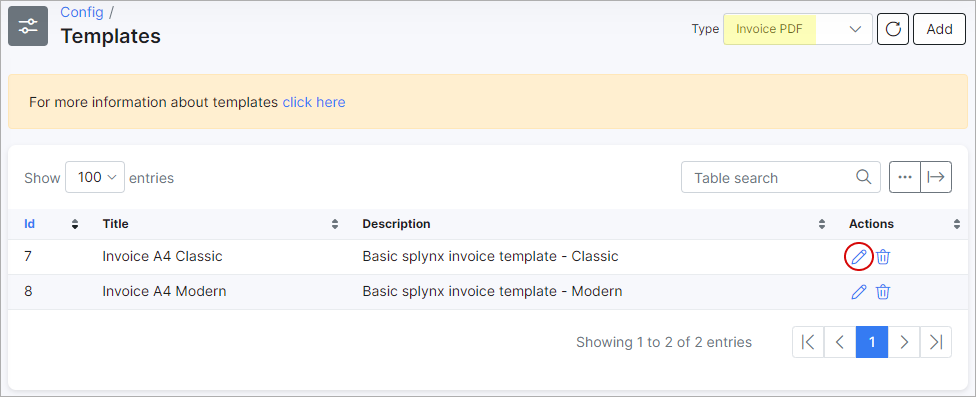
Choose the type Invoice PDF or Proforma Invoice PDF to edit the template.
Check the template you currently use for (proforma) invoices in Config → System → Company information
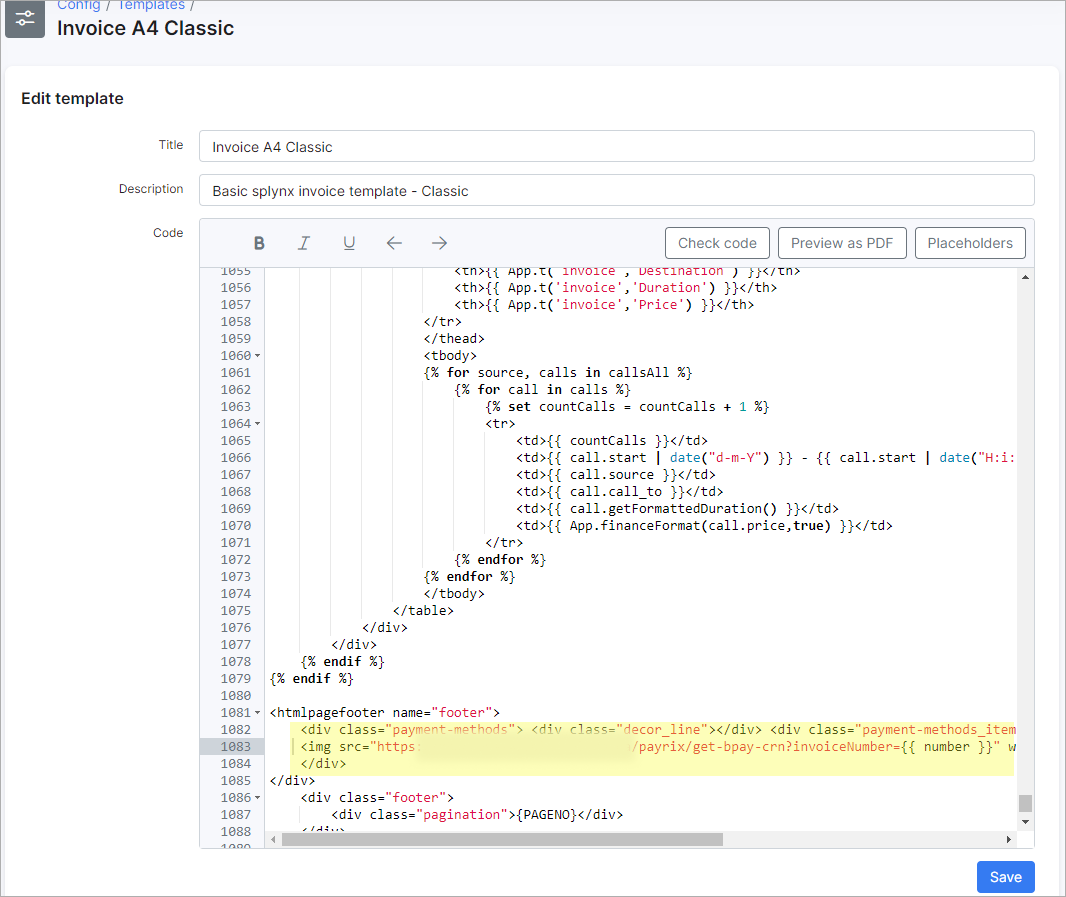
<div class="payment-methods"> <div class="decor_line"></div> <div class="payment-methods_item"> <img src="<your_domain>/payrix/get-bpay-crn?invoiceNumber={{ number }}" width="150" height="43"></div></div>
Add styles to the template:
.payment-methods { padding: 0 20px 0; } .payment-methods_item { margin: 10px 0; }
Change the line with the img tag as follows where <your_domain>should be replaced with your Splynx domain:
- for Invoice PDF template:
<img src="<your_domain>/payrix/get-bpay-crn?invoiceNumber={{ number }}" width="150" height="43">
- for Proforma Invoice PDF template:
<img src="<your_domain>/payrix/get-bpay-crn?invoiceNumber={{ number }}&isProforma=1" width="150" height="43">
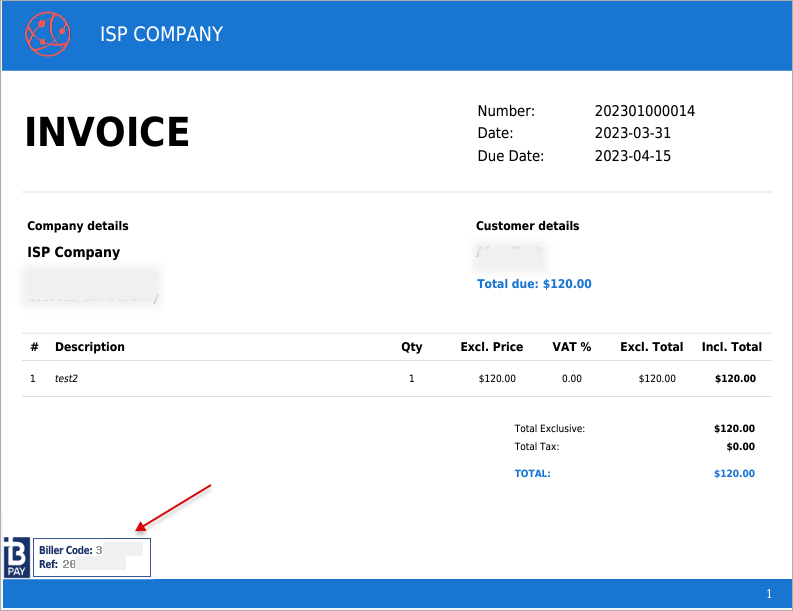
After adding the code to the template, navigate to the Finance → Documents section on the Customer portal. Next, click on the View PDF icon beside the (proforma) invoice that needs to be paid. The BPay Biller code and generated CRN (Ref) should then be visible in the opened PDF file:
![]()
¶ CRN generation for Customer
In this mode, a BPay CRN is generated for each customer, which remains the same for all of their invoices.
- To enable BPay, go to
Config → Integrations → Modules list → Edit (Config) icon, and enable the BPay enabled toggle. For the Generation CRN for field under BPay settings, select Customer. Finally, click theclick herelink below to enable the necessary entry points.
2.Then, go to the Customer portal and navigate to the Finance → BPay CRN section. Here, you will be able to see the Biller code and the generated CRN (Ref) for this customer:

¶ PDF templates
As previously mentioned, you can also view the generated customer's CRN on the PDF file of the (proforma) invoice.
See the section above how to insert the necessary code to the (proforma) invoice template.
Change the line with the img tag as follows where <your_domain>should be replaced with your Splynx domain:
- for Invoice PDF template:
<img src="<your_domain>/payrix/get-bpay-crn-customer?customerId={{ customer.id }}" width="150" height="43">
- for Proforma Invoice PDF template:
<img src="<your_domain>/payrix/get-bpay-crn-customer?customerId={{ customer.id }}&isProforma=1" width="150" height="43">