¶ MPSK onboarding add-on
- Overview
- Prerequisites
- Installation
- Creating and managing units
- Self-registration flow
- Related pages
¶ Overview
The MPSK onboarding add-on extends Multiple PSK with self-service sign-up. You generate a batch of Wi-Fi units in advance and hand each resident a printed card with a QR code. The resident scans it, picks a tariff plan and pays by card, and Splynx creates the customer and their services automatically.
The add-on is built for multi-dwelling units — apartment blocks, student residences, hotels — where every unit needs its own Wi-Fi credentials and its own VLAN.
¶ Prerequisites
Configure the following before you create your first generation:
- Enable Multiple PSK in the RADIUS advanced configuration and create at least one SSID — see Multiple PSK.
- Install and configure the Stripe add-on. Stripe is currently the only payment gateway the onboarding flow supports.
- Configure email sending from Splynx, so residents receive their welcome email with credentials.
- Create the internet tariff plans you want to offer residents, including a separate plan for guest access if you plan to use it.
¶ Installation
The add-on can be installed in two ways: through the Splynx Web UI or from the command line on the Splynx server.
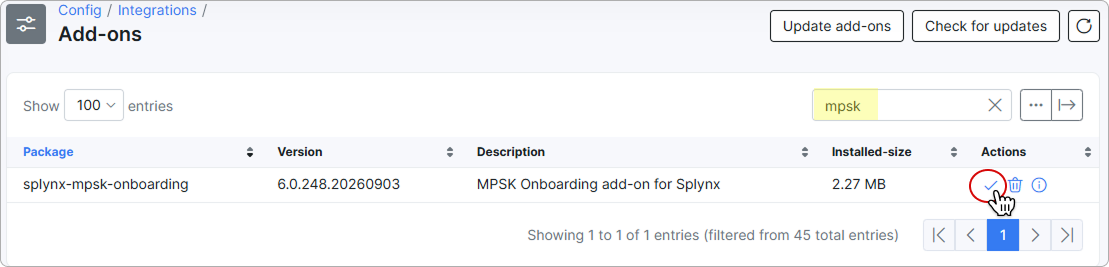
To install the add-on from the Web UI, navigate to Config → Integrations → Add-ons, type mpsk-onboarding in the search field, then click the Install icon in the Actions column next to splynx-mpsk-onboarding:
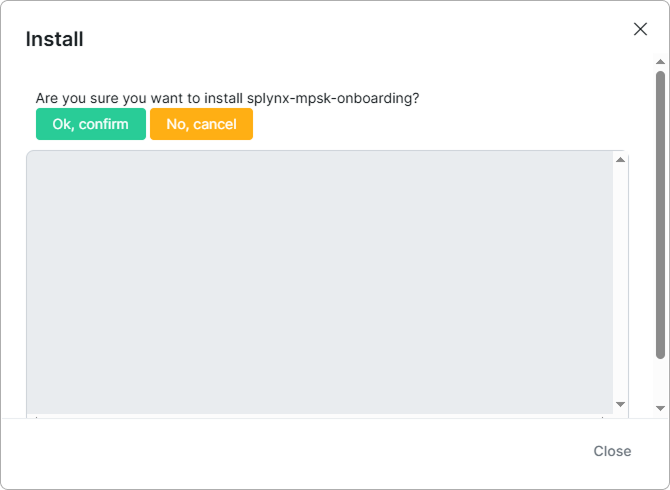
Confirm the installation by clicking the Ok, confirm button in the dialog:
To install the add-on via CLI on the Splynx server, run:
apt-get update
apt-get install splynx-mpsk-onboarding
¶ Onboarding settings
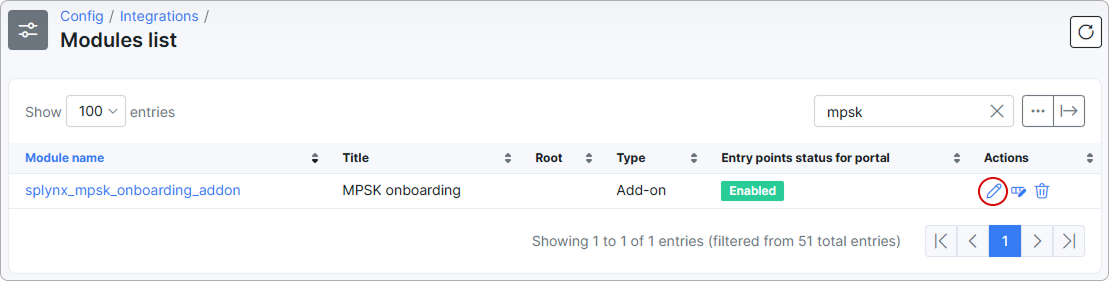
After installation, the add-on appears in Config → Integrations → Modules list as splynx_mpsk_onboarding_addon with the title MPSK onboarding and the Enabled entry-point status. To proceed, click the Edit icon in the Actions column:
Settings are stored per partner. Use the Partner selector in the top right corner of the section to switch between partners:
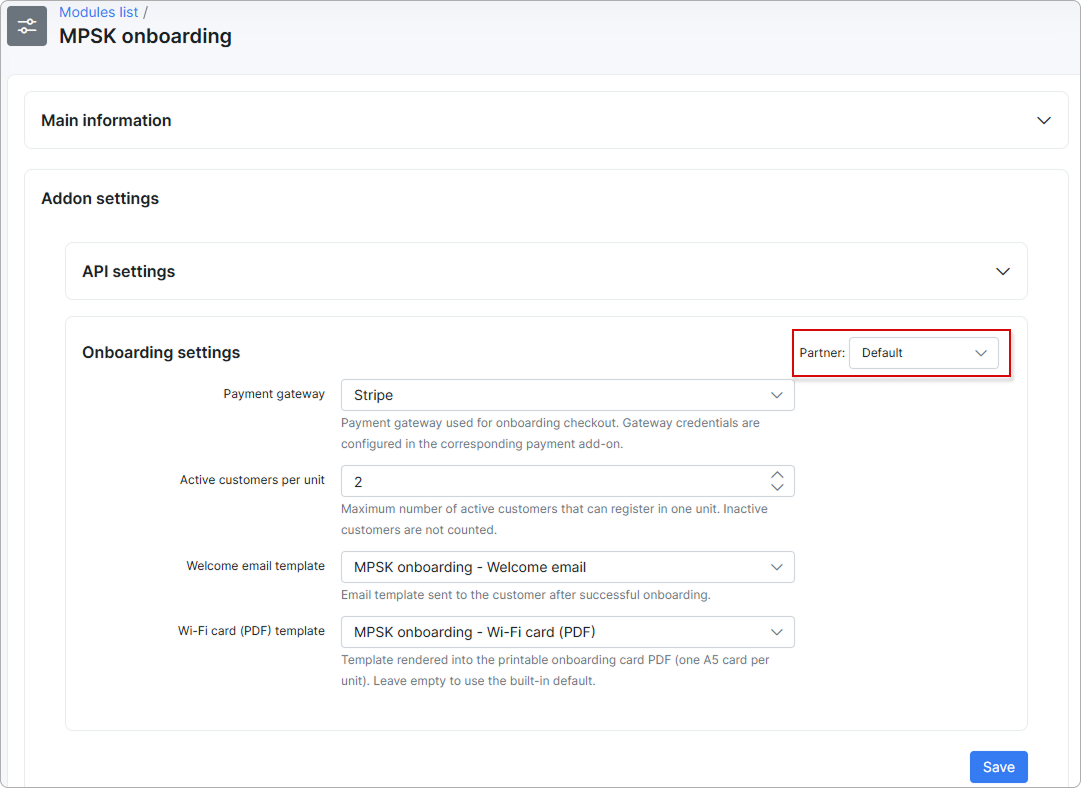
- Payment gateway — the gateway used for the onboarding checkout. Stripe is currently the only supported option. Configure the gateway credentials in the corresponding payment add-on, not here.
- Active customers per unit — the maximum number of active customers that can register in one unit. The default is
2. Inactive customers are not counted, so a unit frees up a slot as soon as a customer created through onboarding becomes inactive. - Welcome email template — the email template sent to the customer after successful onboarding. The add-on ships with the MPSK onboarding - Welcome email template.
- Wi-Fi card (PDF) template — the template rendered into the printable onboarding card PDF, one A5 card per unit. The add-on ships with the MPSK onboarding - Wi-Fi card (PDF) template. Leave the field empty to use the built-in default.
Click Save to apply the settings.
Both templates are editable under Config → System → Templates, so you can adapt the welcome email and the printed card to your branding.
¶ Creating and managing units
After installation, the add-on adds a MPSK onboarding page under Config → Networking:

The page has three tabs:
- Units — every individual Wi-Fi unit, across all generations.
- Generations — the batches you create, and the
Bulk setupaction that creates them. - Import — creates a generation from a list of units in a file.
¶ Units
The Units tab lists every unit across all generations. Use the Generation dropdown above the table to show only the units of one generation, or the search field to find a unit by name:
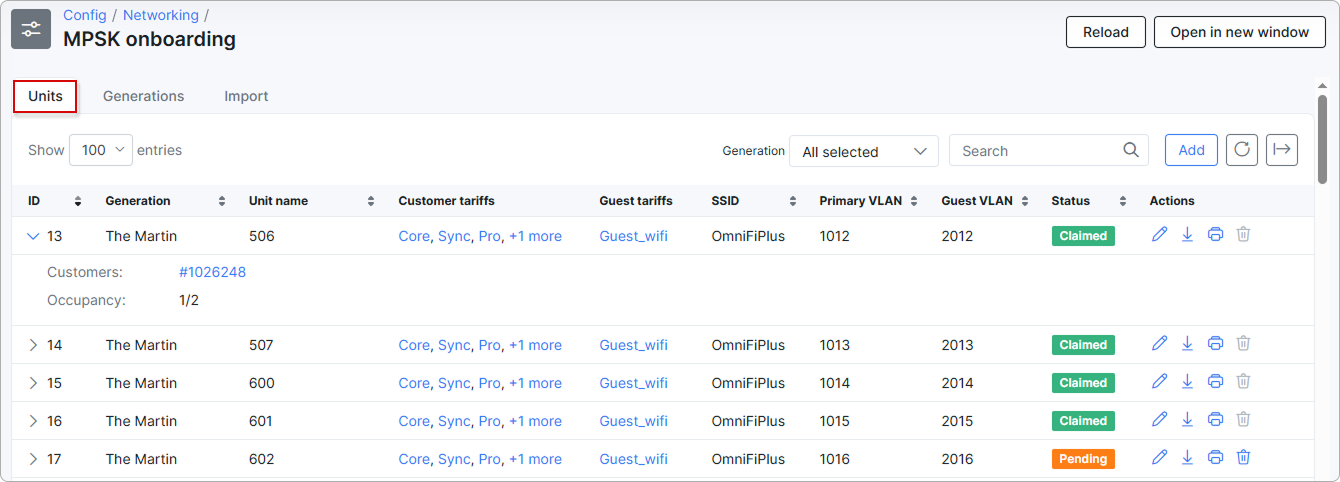
| Column | Description |
|---|---|
| ID | The unit number |
| Generation | The batch the unit belongs to |
| Unit name | The name generated from the unit name format, for example an apartment number |
| Customer tariffs | The plans offered to the resident. Only the first few are listed, with a +N more link for the rest |
| Guest tariffs | The plan used for the guest service |
| SSID | The Wi-Fi network the unit is linked to |
| Primary VLAN | The VLAN ID of the main service |
| Guest VLAN | The VLAN ID of the guest service |
| Status | Pending — nobody has signed up for the unit yet. Claimed — at least one resident has completed sign-up |
| Customers | Links to the customers created from the unit |
| Occupancy | How many slots in the unit are taken, against the Active customers per unit setting — for example 1/2 |
Use the icons in the Actions column to edit a unit, download its Wi-Fi card as a PDF, print the card, or delete the unit. Export the whole table with the arrow button above it.
A unit that a resident has already claimed cannot be deleted.
To add a single unit to an existing generation without running a new batch, click the Add button in the top-right corner of the Units table:
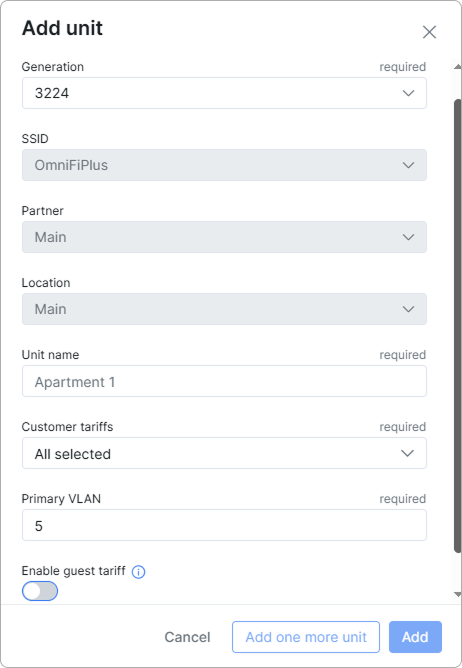
- Generation — the generation the unit belongs to.
SSID, Partner and Location stay locked until you select it, and are then filled in from the generation.
- Unit name — the name of the unit, for example
Apartment 1. - Customer tariffs — the plans offered to the resident of this unit.
- Primary VLAN — the VLAN ID assigned to the unit.
- Enable guest tariff — a toggle, off by default. When enabled, a guest service is created automatically for the customer alongside the main one. Fill in the guest tariff plan and guest VLAN that appear below the toggle.
Click Add to save and close, or Add one more unit to save and keep the window open for the next one.
¶ Generations
A generation is a batch of units created in one go from a single set of parameters. Each unit in the batch gets its own name and its own VLAN.
The Generations tab lists the batches you have created:
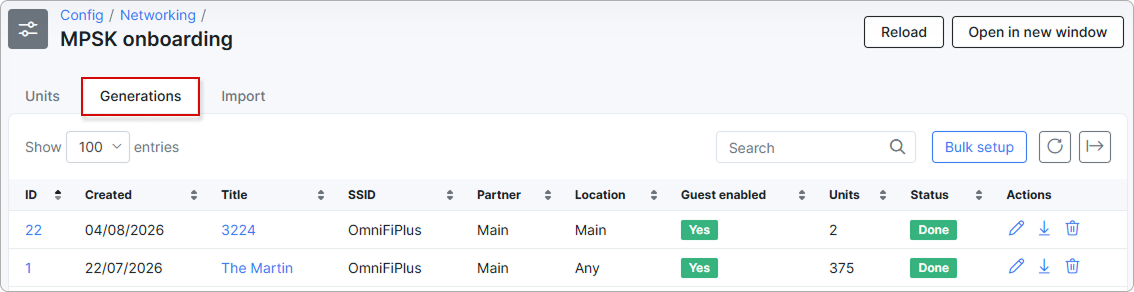
| Column | Description |
|---|---|
| ID | The generation number |
| Created | The date the generation was created |
| Title | The title you gave the batch — click it to open its units |
| SSID | The Wi-Fi network the units are linked to |
| Partner | The partner the generated customers belong to |
| Location | The location assigned to the generated customers, or Any |
| Guest enabled | Yes when the batch was created with a guest tariff |
| Units | How many units the batch contains |
| Status | Done when every unit was created successfully |
Use the icons in the Actions column to edit a generation, download its units as a PDF, or delete it.
To create a batch, click Bulk setup and fill in the form:
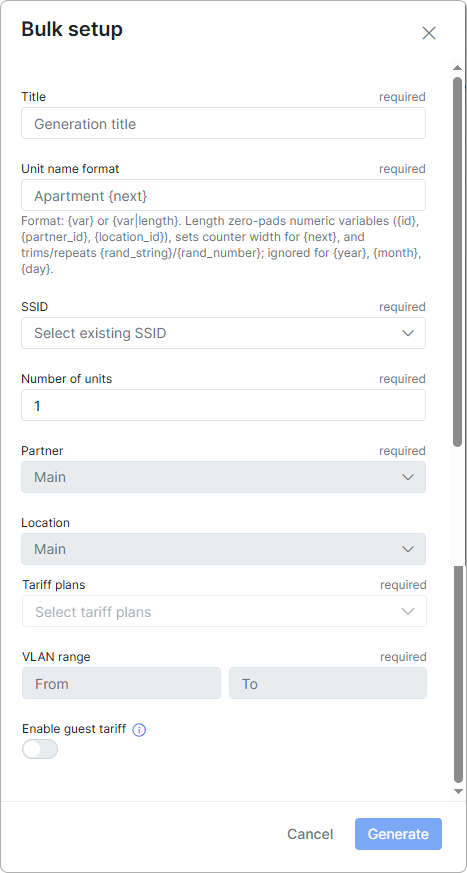
- Title — a name describing what the generation is for, for example the building or the floor.
- Unit name format — a naming pattern for the units, for example
Apartment {next}. The unit name is what the resident sees when they scan the QR code, and it is written into the customer profile, so use something they recognize. - SSID — select one of the SSIDs configured in Multiple PSK. The remaining fields stay locked until you select it.
- Number of units — how many units to create.
1by default. - Partner — the partner the generated customers belong to.
- Location — the location assigned to the generated customers.
- Tariff plans — the internet plans offered to the resident. Select as many as you want; the resident picks one of them during sign-up.
- VLAN range — the From and To VLAN IDs the units draw from. Splynx fills the range in from the number of units and assigns each unit a free VLAN.
- Enable guest tariff — a checkbox, cleared by default. Select it to give each resident a second, guest service alongside the main one. Two more fields appear:
- Guest tariff — a single plan for the guest service.
- Guest VLAN range — a second From and To range for the guest services.
Click Generate to create the units, or Cancel to discard the form. Generate stays inactive until every required field is filled.
VLAN ranges may not overlap. The guest range must not overlap the main range, and neither range may overlap a range already used by another generation.
Supported variables in the unit name format (learn more)
Write a variable as {var}, or as {var|length} to control its length. The length zero-pads the numeric variables {id}, {partner_id} and {location_id}, sets the counter width for {next}, and trims or repeats {rand_string} and {rand_number}. It is ignored for {year}, {month} and {day}.
Supported variables:
{id} – unique identifier of the unit.
{partner_id} – ID of the selected partner.
{location_id} – ID of the selected location.
{rand_string} – random alphanumeric string.
{rand_number} – random numeric value.
{year} – current year.
{month} – current month.
{day} – current day of the month.
{next} – auto-incrementing number.
Example:
Apartment {next|3} generates Apartment 001, Apartment 002, Apartment 003, and so on.
¶ Importing units from a file
The Import tab creates a generation from a prepared list of units, which is useful when the names and VLANs already exist in a spreadsheet:
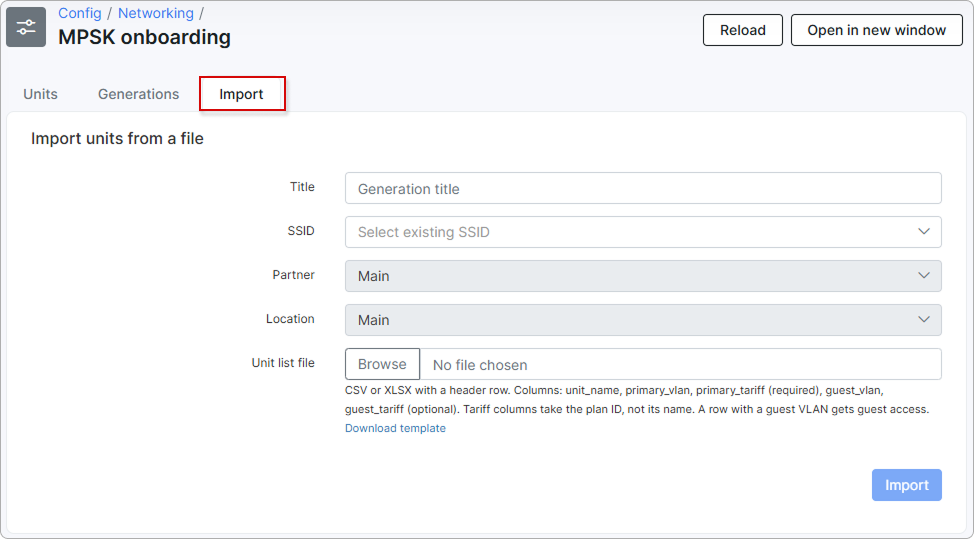
- Title — the title of the generation to create.
- SSID — the SSID the imported units are linked to.
- Partner and Location — assigned to the generated customers.
- Unit list file — click
Browseand select the file.
The file must be a CSV or XLSX with a header row and the following columns:
| Column | Required | Description |
|---|---|---|
unit_name |
Yes | The name of the unit |
primary_vlan |
Yes | The VLAN ID of the main service |
primary_tariff |
Yes | The ID of the tariff plan for the main service |
guest_vlan |
No | The VLAN ID of the guest service |
guest_tariff |
No | The ID of the tariff plan for the guest service |
Click Download template under the field to get a file with the correct header row, then click Import.
The tariff columns take the tariff plan ID, not its name. A row that has a 'guest_vlan' value gets guest access.
¶ Self-registration flow
Each unit has its own QR code that points at the public sign-up page. The QR code carries the unit, so the resident selects nothing but their plan. The page is branded with your logo and shows a progress bar.
¶ Welcome screen
The first screen greets the resident and shows the unit name from the QR code under You are setting Wi-Fi for, so they can check they scanned the right card before going any further. Clicking Next starts the sign-up.
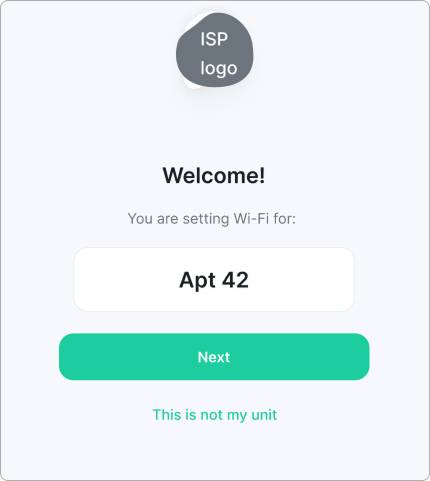
If the unit is not theirs, the resident follows the link below the button to a screen with your phone number and email address, so they can report the mix-up instead of signing up for the wrong apartment.
¶ Choosing a plan
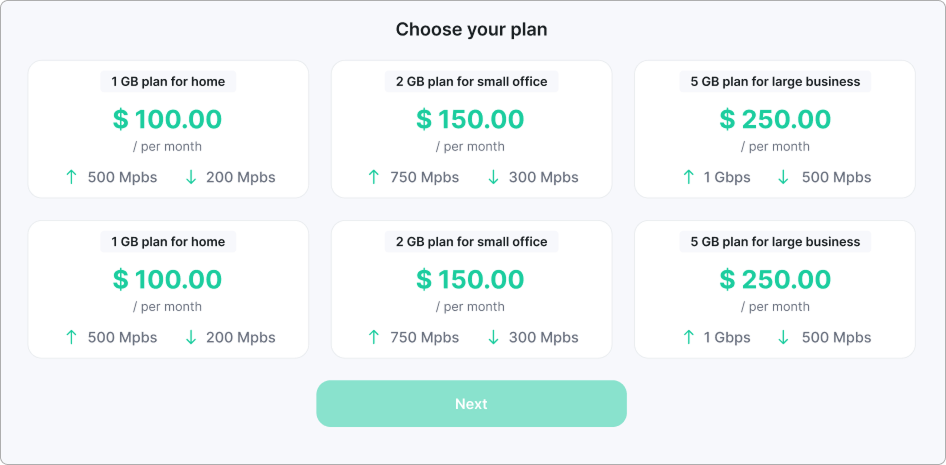
Under Choose your plan, the resident picks one of the tariff plans the generation offers. Each plan is shown as a card with its name, monthly price, and download and upload speeds. The selected card is outlined, and Next stays inactive until the resident selects a plan.
¶ Personal information
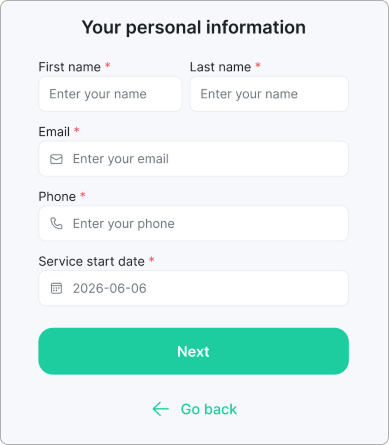
Under Your personal information, the resident fills in the details Splynx uses to create the customer record. All fields are required:
- First name
- Last name
- Phone
- Service start date — picked from a calendar; it sets the date the service starts and the amount the resident is charged.
¶ Checkout
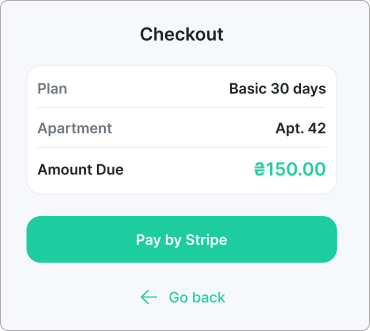
The checkout screen summarizes the order before payment — the plan, the apartment the QR code points at, and the amount due. The amount is prorated from the service start date, so the resident pays only for the remaining part of the billing period.
Clicking Pay by Stripe opens the Stripe payment form. Go back returns to the previous step.
¶ Connecting to Wi-Fi
After a successful payment, Splynx creates the customer and their services, and the resident lands on the connect screen. It shows the network name (SSID) and the password, with a copy icon next to the password, a QR code to scan, and a Connect button that joins the network without typing anything.
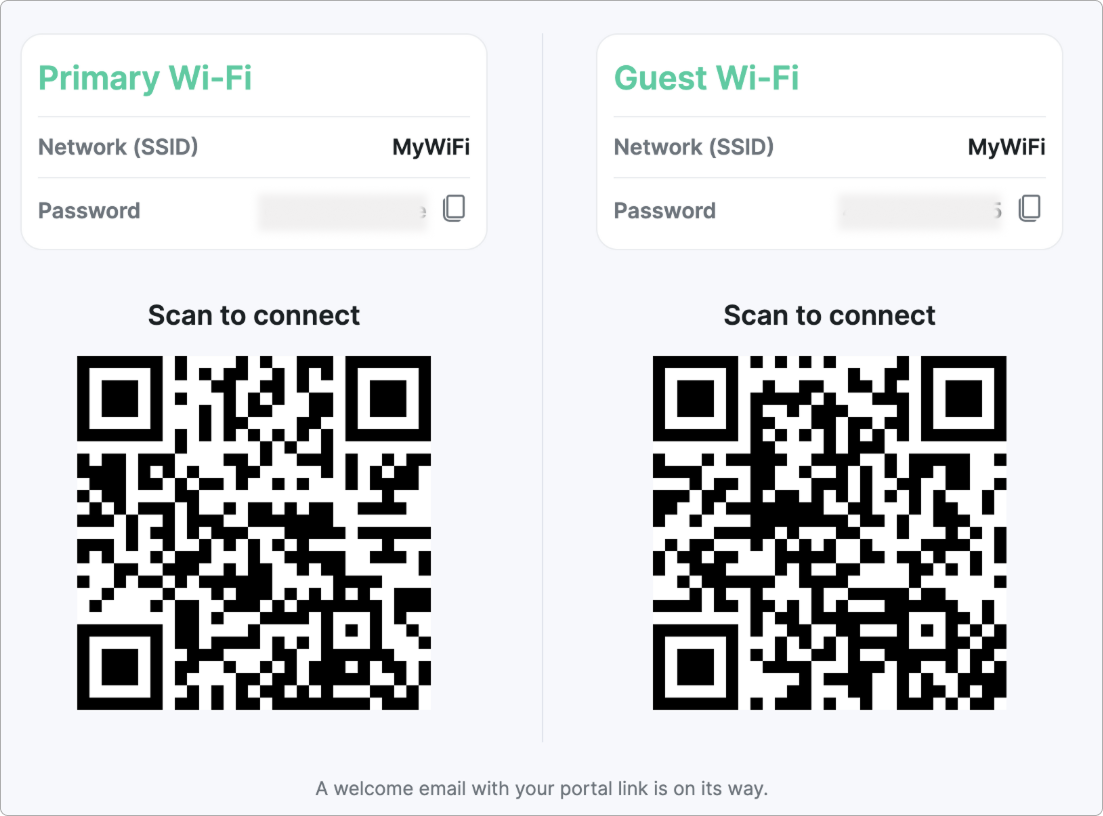
When the generation has Enable guest tariff selected, the screen shows two blocks — Primary Wi-Fi and Guest — each with its own password, QR code and Connect button, because the customer is created with two services on separate VLANs.
The resident also receives a welcome email with their credentials, built from the Welcome email template.
¶ What Splynx creates
Splynx fills in the new customer and services from the QR code:
- the unit name goes into an additional field on the customer;
- the VLAN goes into an additional field on the service;
- the SSID is set on the service itself.
The customer's name comes from the First name and Last name fields, and their contact details from Email and Phone.