¶ Sign-up flow
¶ Overview
The Sign-up flow is a standalone online registration page that lets a prospective customer subscribe to your services without help from an operator. On the public page, the visitor checks service availability at their address, browses and selects a plan, submits their details, and completes checkout — optionally paying, verifying their phone or email with an OTP (One-Time Password), and signing a contract. Splynx then creates a Lead or a Customer automatically, with the selected tariff plan and address already filled in.
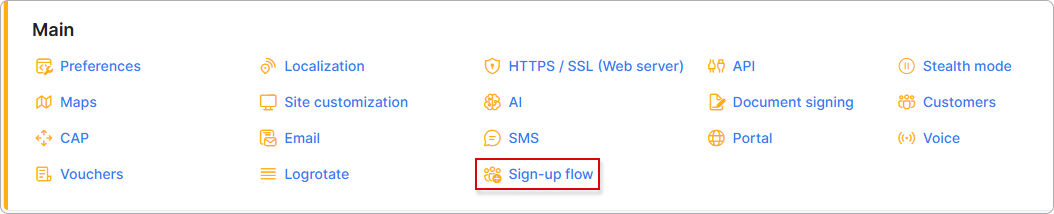
This page describes how to configure the flow in the admin panel. To open it, go to Config → Main → Sign-up flow:
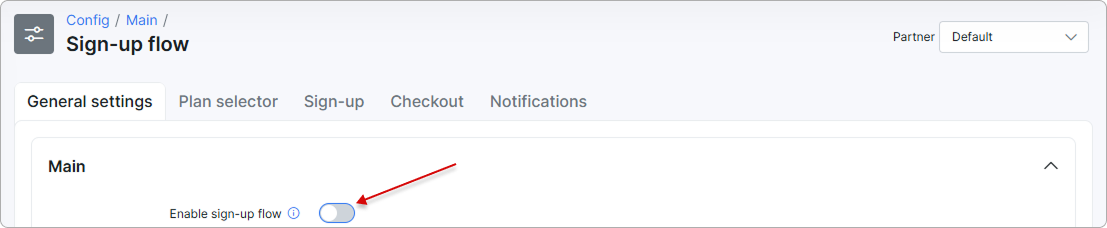
The flow is off by default and enabled per partner with the Enable sign-up flow toggle on the General settings tab (see General settings):
¶ Configuration
All settings live on the Config → Main → Sign-up flow page and are stored per partner. Select the partner in the Partner selector in the top-right corner before you change anything — the partner you select is remembered for your admin account, so the page opens on the same partner the next time you come back. Work through the tabs in order and click Save on each tab to apply the changes.
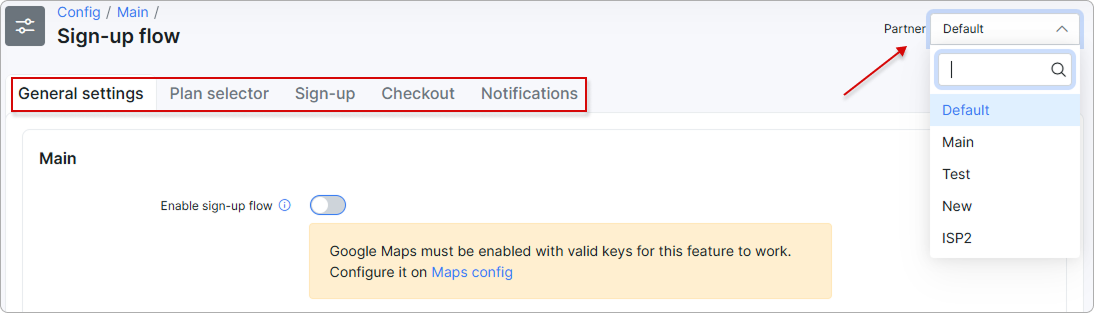
The settings are split across five tabs:
- General settings — turns the flow on, controls the coverage checker, and sets the branding, colors, and marketing metadata of the public page.
- Plan selector — chooses which tariff plans are offered, how customers filter them, which additional products the Package builder adds, and whether services are created automatically.
- Sign-up — defines the fields of the registration form and the labels assigned to the records created at registration.
- Checkout — controls payment, phone or email verification, and contract signing on the final step.
- Notifications — sets which order channels are accepted, which tickets are opened, and which emails are sent to your staff and to the new subscriber.
When a setting differs from its default value, the section it belongs to shows the warning "Fields marked with a triangle have non-default values", and each changed field is marked with the same triangle icon. The warning appears on the General settings, Checkout, and Notifications tabs.
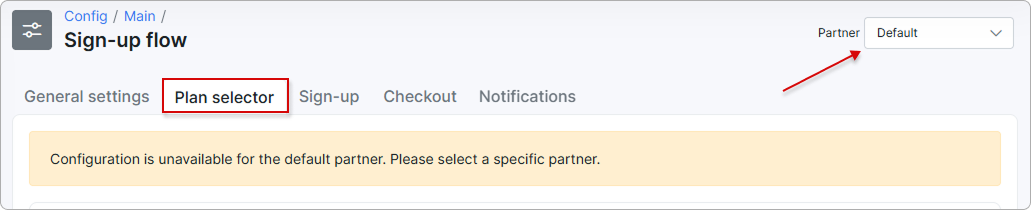
Most tabs can be configured for the Default partner, but Plan selector requires a specific partner. While the Default partner is selected, the tab shows the message "Configuration is unavailable for the default partner. Please select a specific partner."
¶ General settings
The General settings tab controls branding, colors, and the marketing metadata of the public sign-up page.
¶ Main
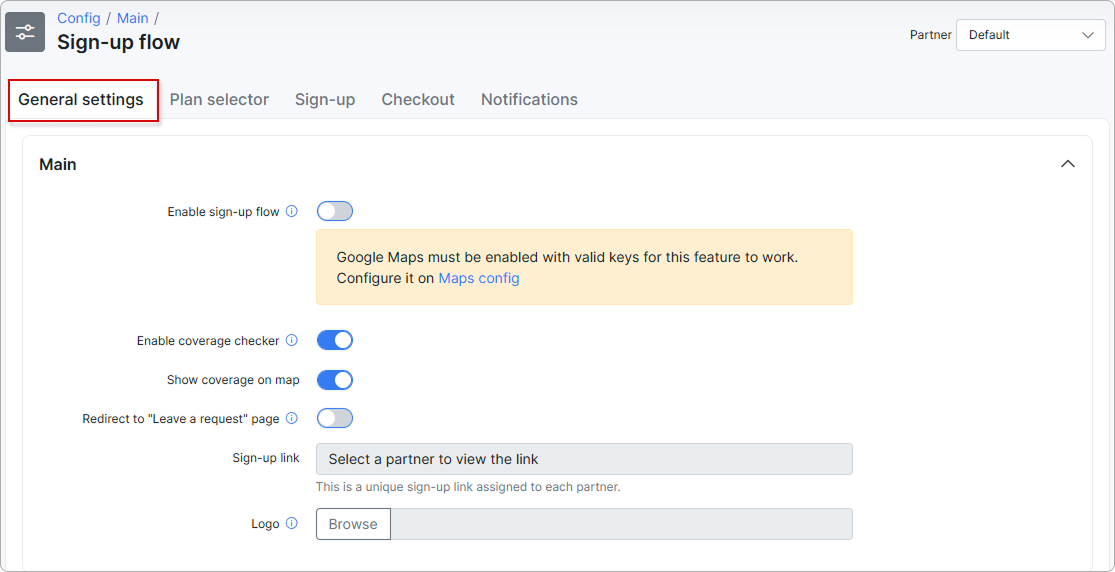
- Enable sign-up flow — turns the sign-up flow on or off. It is off by default and is set per partner, so you can run the flow for some partners and keep it closed for others. When disabled, the partner's Sign-up link returns a 404 page — even a saved or shared link with the partner's hash. Turn it on to make the flow live for the partner.
Google Maps is required. The sign-up flow relies on Google Maps for address selection and coverage checks. If Open Street Map is selected under Config → Main → Maps, or your Google Maps keys are invalid, a warning appears under the Enable sign-up flow toggle:
"Google Maps must be enabled with valid keys for this feature to work. Configure it on Maps config."
The Maps config link opens the Maps page in a new tab. Enable Google Maps with valid keys before turning the flow on.
- Redirect to "Leave a request" page — when enabled, visitors are sent to a Leave a request page straight after the coverage map, skipping the rest of the sign-up flow. There they submit their contact details, which automatically creates a new lead for your sales team. See Leave a request page for what the visitor sees and which fields appear.
- Steps order — sets the order of the two middle steps on the public sign-up page. Choose Choose additional services → Submit your information (the default) or Submit your information → Choose additional services. Coverage, plan selector and checkout keep their position. Set per partner, like the rest of the tab.
- Sign-up link — the unique sign-up link assigned to each partner. Select a specific partner in the Partner selector (top-right) to view its link; while the Default partner is selected the field shows "Select a partner to view the link". Share this link with prospective customers. While Enable sign-up flow is off, the link returns a 404.
- Logo — click
Browseto upload the logo shown at the top of the sign-up page.
Formats: SVG, PNG, WEBP, JPG. Photo size up to 5 MB.
¶ Colors
These colors are applied to the public sign-up page so it matches your brand.
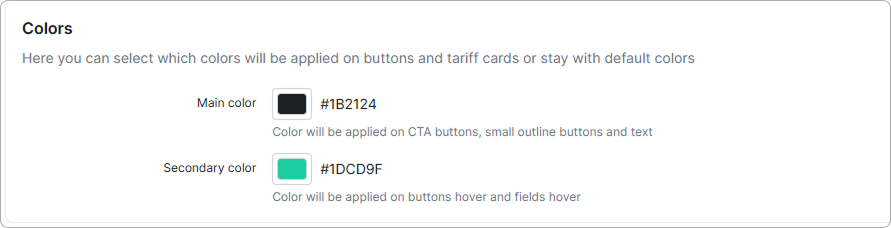
- Main color — applied to call-to-action buttons, small outline buttons, and text.
- Secondary color — applied to button and field hover states, and to the map pinpoint.
¶ Marketing
This section sets the page metadata used for search engines (SEO) and social media link previews (Open Graph).
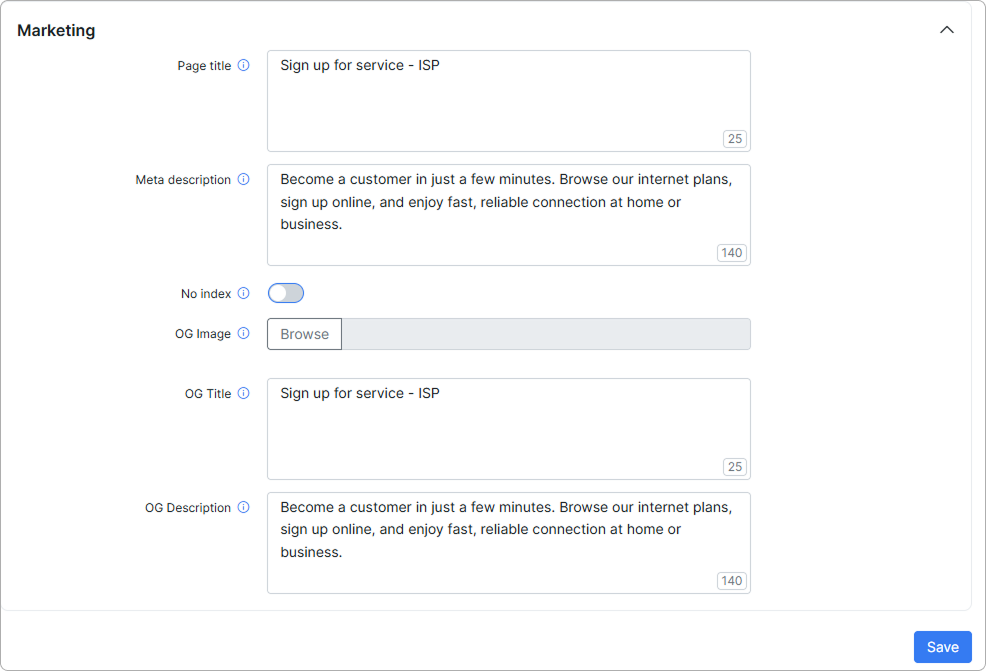
- Page title — the browser tab title of the sign-up page. Recommended length: 50-60 characters. Max: 150 characters.
- Meta description — the summary shown by search engines under the page title. Recommended length: 150-160 characters. Max: 300 characters.
- No index — when enabled, asks search engines not to index the sign-up page.
- OG Image — the image shown when the page is shared on social media. Recommended size: 1200×630 pixels. Formats: JPG, PNG.
- OG Title — the title shown in the social media preview. Recommended length: up to 60 characters. If empty, Page title will be used. Max: 150 characters
- OG Description — the description shown in the social media preview. Recommended length: up to 200 characters. If empty, Meta description will be used. Max: 300 characters
Click Save to apply the changes.
¶ Plan selector
The Plan selector tab defines which plans appear on the sign-up form and how customers can filter them.
This tab requires a specific partner to be selected. Configuration is unavailable for the default partner.
¶ Choose your plan
Select the tariff plans for the sign-up flow. Only the chosen plans appear on the sign-up form, and they are hidden from the Package builder to prevent duplicate checkouts.
Three toggles at the top of the block decide whether coverage limits the plan list. All three are saved per partner, like the rest of the sign-up flow settings:
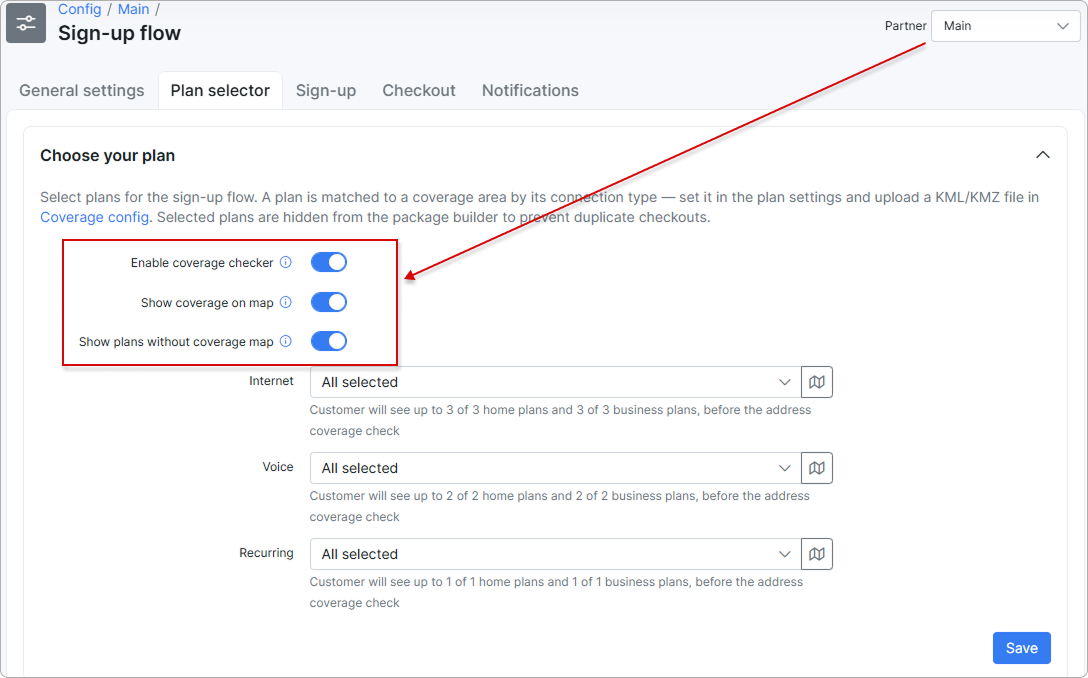
- Enable coverage checker — turns the address coverage check on for this sign-up flow. Tooltip: "Enables whether coverage checking is available for this sign-up flow". Moved here from General settings → Main; the behavior is unchanged.
- Show coverage on map — draws the coverage areas from your KML/KMZ files on the map during the address check. When disabled, the visitor sees the map without the coverage areas. Tooltip: "Shows the coverage map on the sign-up page so the customer sees the covered areas." Moved here from General settings → Main.
- Show plans without coverage map — on by default. Tooltip: "Show plans that have no active coverage map. Such plans are available at any address."
Show plans without coverage map is on by default. Any selected plan that has no active coverage map is offered at every address, including addresses you do not cover. Turn it off if you want the plan list limited strictly to your mapped coverage areas.
Plans are grouped by type:
- Internet
- Voice
- Recurring
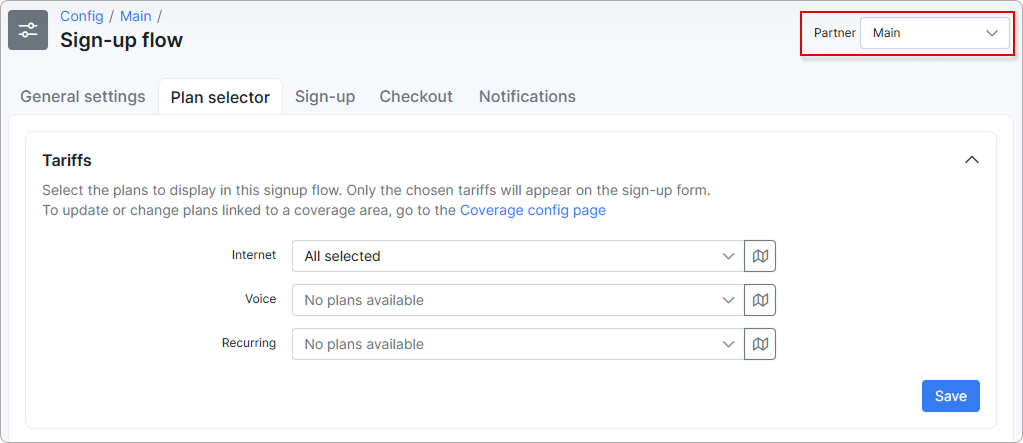
Pick the plans in the Internet, Voice, and Recurring multi-selects. A plan does not need a connection type to be selected — the list is filtered only by partner and by the plan's own Enabled flag, and options are never greyed out.
Each plan name is followed by a grey hint in brackets giving the customer categories the plan is available to and whether it has an active coverage map — for example (Home/Business, with coverage) or (Home/Business, no coverage). A plan marked no coverage reaches customers only while Show plans without coverage map is on.
Selecting no plans offers no plans. An empty field means zero plans on the sign-up form — it does not mean "all plans".
The map icon next to each field opens the Coverage map dialog, which aggregates the KML/KMZ files of the selected plans and lets you filter the view by Connection type. When any selected plan has no active coverage map, the dialog shows the notice "N selected plans are not limited by coverage".
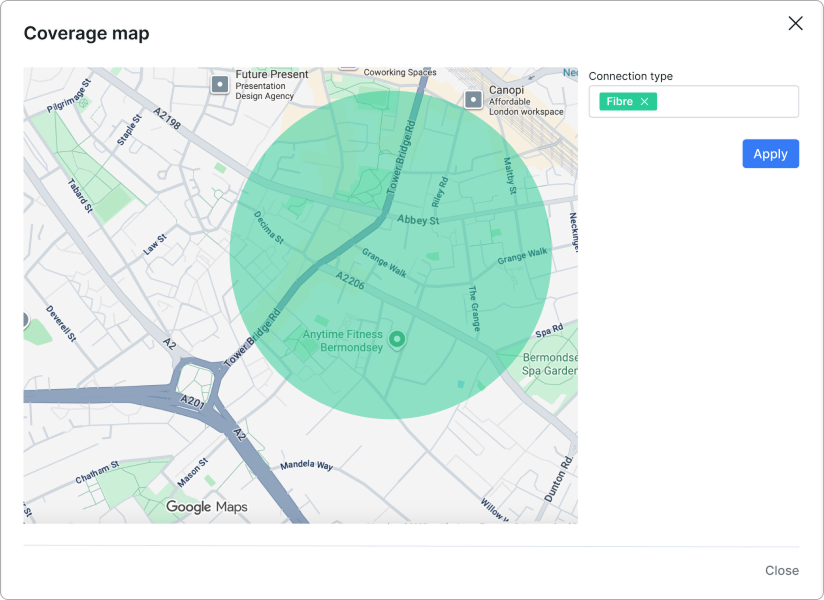
To change which plans a coverage area serves, go to the Coverage maps config page and edit the tariff settings of the coverage area. A connection type is added to a Recurring plan in its Plan availability section.
Click Save to apply the changes.
The coverage check works only when coverage is configured beforehand. Set it up in this order:
- Create a coverage map and upload the KML/KMZ file in Config → Networking → Coverage maps.
- Assign a Connection type to that coverage area on the map.
- Add the same connection type to the plan in its Plan availability section.
Until all three steps are done, the map shows no coverage areas and no plans are offered for the checked address.
¶ Service auto-setup
The Service auto-setup section lets Splynx automatically create the customer's services and login credentials during sign-up, so a new subscriber is provisioned without manual operator work.
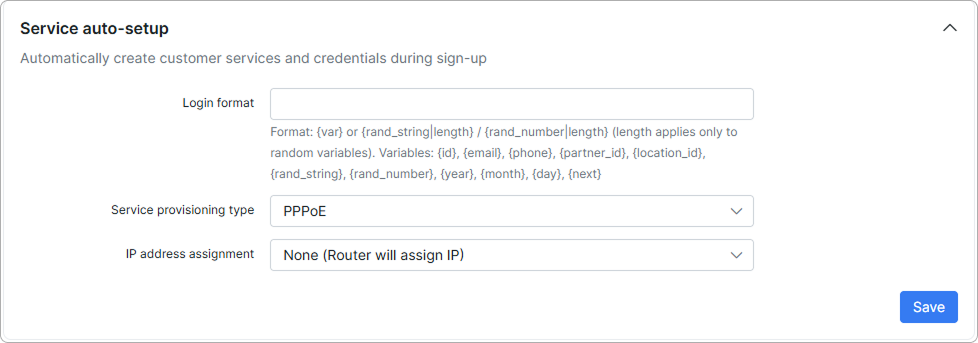
- Login format — the template used to generate the login (username) for the new service. Enter a fixed prefix together with variables. Variables use the
{var}syntax, and{rand_string|length}/{rand_number|length}accept an optional length (the length applies only to the random variables). Available variables are{id},{email},{phone},{partner_id},{location_id},{rand_string},{rand_number},{year},{month},{day}, and{next}. - Service provisioning type — how the service connects to the network, for example
PPPoE. - IP address assignment — how the service receives its IP address, for example
None (Router will assign IP).
Click Save to apply the changes.
¶ Filter categories
Filter categories let customers narrow the plan list on the sign-up form. Filters are created from tariff labels.
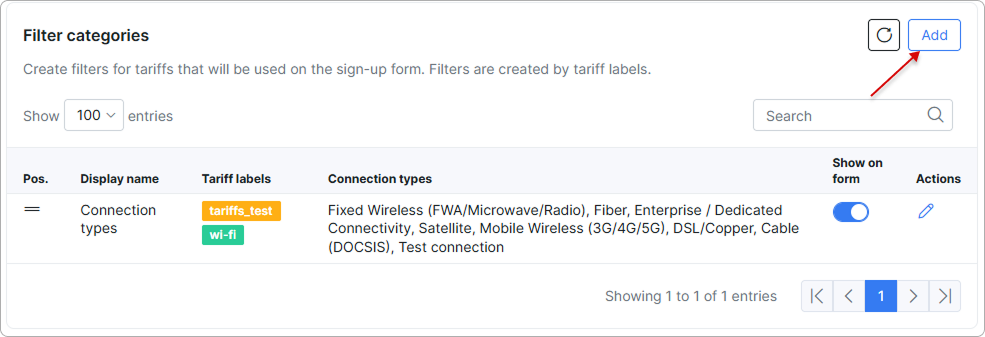
Click Add above the table to create a filter.
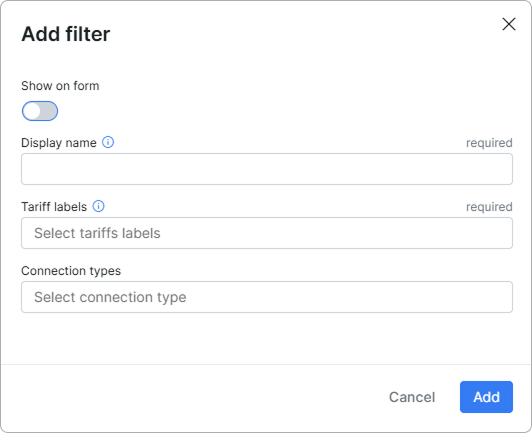
Each filter has the following options:
- Show on form — whether the filter is shown on the sign-up form.
- Display name — the filter name shown to customers (required).
- Tariff labels — the labels that define which tariffs fall under this filter (required). These labels are shown to customers as options in the filters section during sign-up. Labels are configured on the Labels config page.
- Connection type — the connection type the filter applies to.
The table lists each filter with its position (Pos.), Display name, Tariff labels, Connection types, and Show on form status. You can reorder, edit, and delete filters, but the last remaining filter cannot be deleted.
¶ Package builder
The Package builder links additional products or services to the sign-up form. Use it to offer hardware rentals or extra services bundled with specific tariff plans.
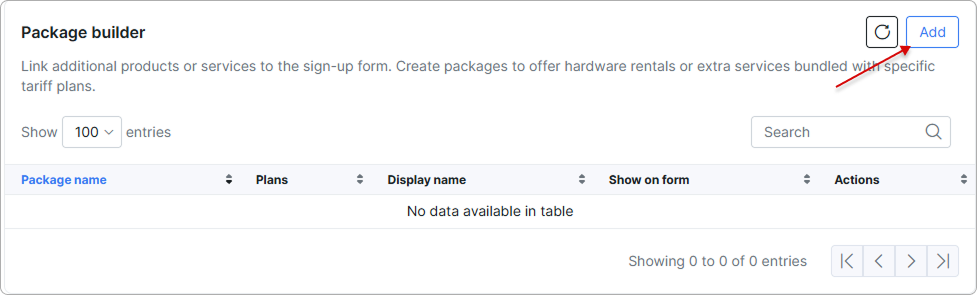
Click Add to open the Add additional services for group of tariff plans dialog.
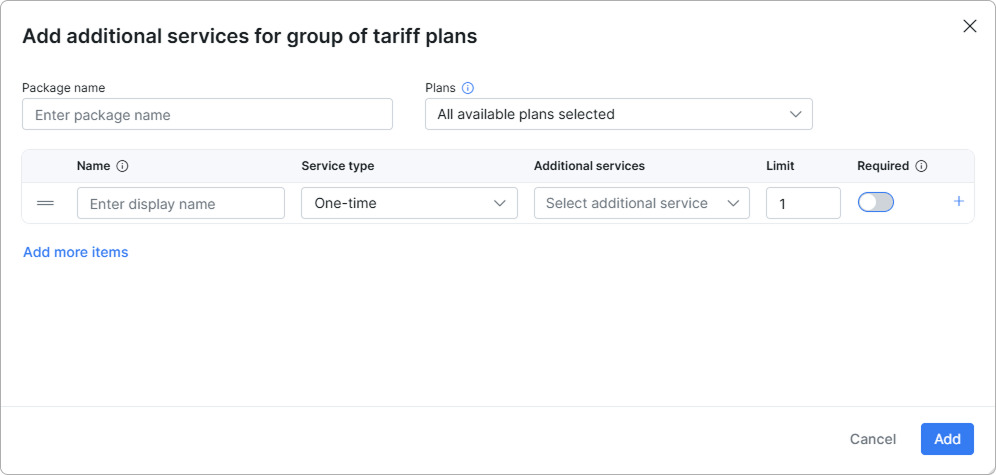
At the top of the dialog, set the package details:
- Package name — the name of the package.
- Plans — the tariff plans the package applies to. By default All available plans selected.
Each item line in the package has the following columns:
- Name — the display name of the item shown to the customer.
- Service type — the type of service to add, for example One-time.
- Additional services — the additional service to offer with the package.
- Limit — the maximum quantity the customer can add. The default is
1. - Required — when enabled, the customer must add this item to continue.
Use the handle on the left to reorder items, the + icon to add another item line, and the Add more items link to extend the list. Click Add to save the package, or Cancel to discard it.
¶ Sign-up
The Sign-up tab defines the fields the customer fills in and the labels assigned to the records created at registration.
¶ Form fields
The form is built from two columns — Left column and Right column — and the fields correspond to the main and additional fields configured on the Config page. Drag a field by its handle to reorder it; the order on the sign-up form follows the order here. Each field has a Required toggle.
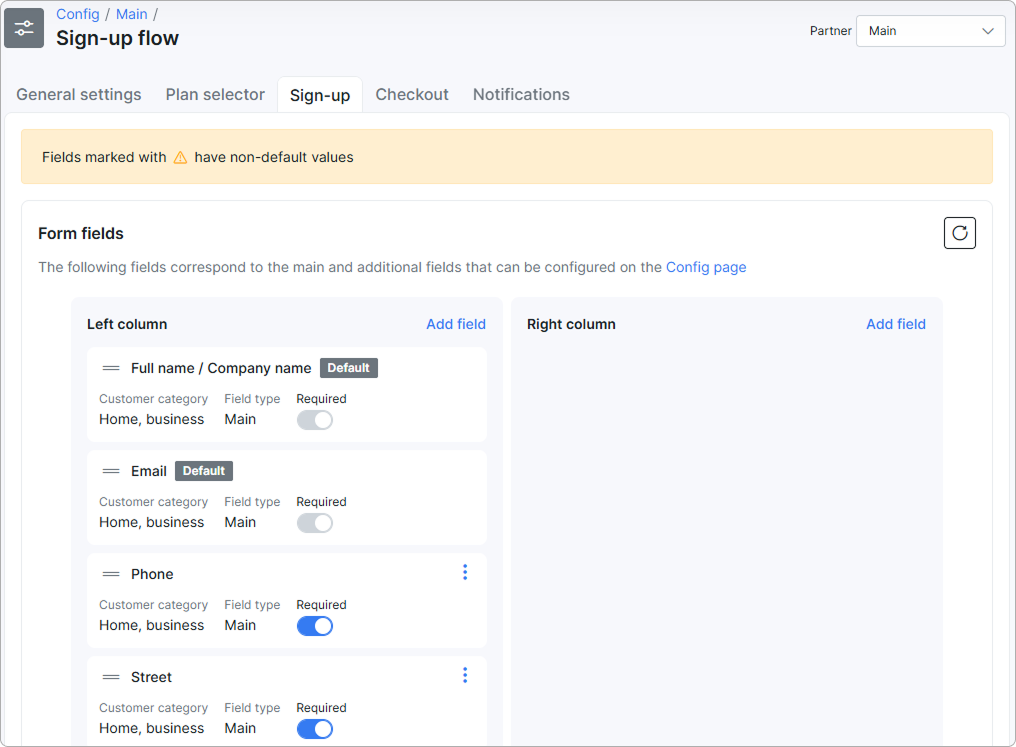
A set of default fields is created automatically, including Full name / Company name, Email, Phone, and Street. The Full name / Company name field changes based on the account type the customer chooses — Full name for an individual, Company name for a business — and cannot be edited or deleted.
To add a field, click Add field and set:
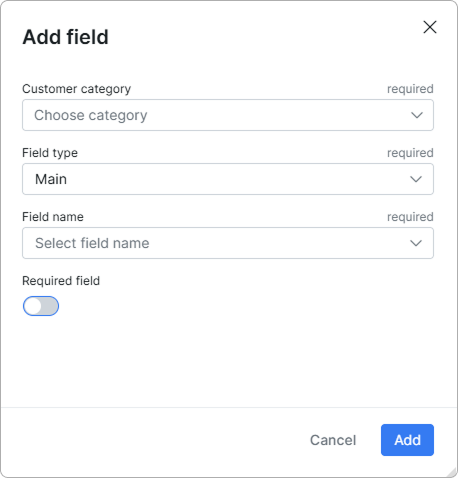
- Customer category — the account types the field applies to: Home, business, or both.
- Field type — Main, Additional, or Document upload.
- Field name — for Main and Additional, choose an existing field from the additional fields configured in the admin panel. For Document upload, enter a name for a new upload field. Files uploaded to a Document upload field are saved automatically to the customer's or lead's Documents.
- Required field - enable this toggle to make the field mandatory.
- Show on "Leave a request" page — when enabled, the field is also shown on the Leave a request page. Fields without this toggle appear only in the main sign-up form.
The same options are available in the Edit field dialog when you change an existing field.
¶ Additional settings
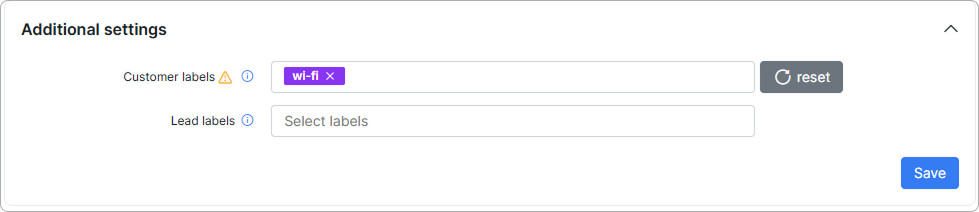
Assign labels to the records created during registration so they are easier to find in the customer and lead lists.
- Customer labels — the label assigned to the customer created at registration.
- Lead labels — the label assigned to the lead created at registration.
Only labels configured on the Labels config page are available.
Click Save to apply the changes.
¶ Checkout
The Checkout tab controls payment, phone or email verification, and contract signing on the final step of the sign-up flow.
¶ Payment details
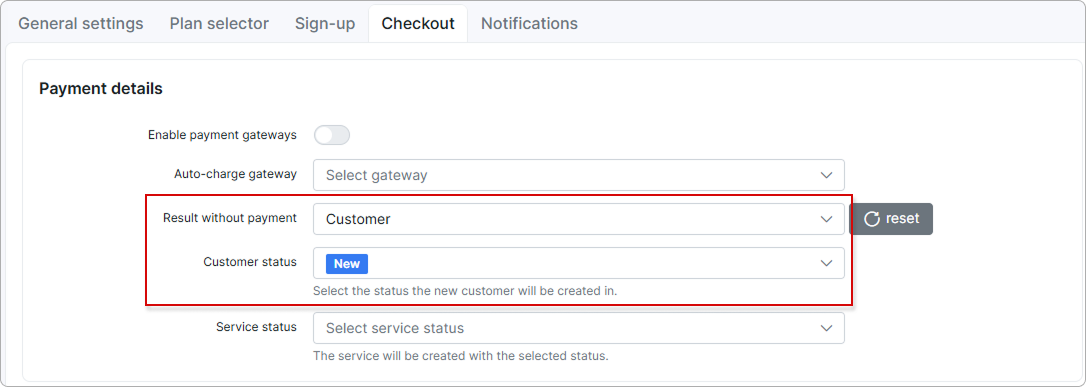
Customer:
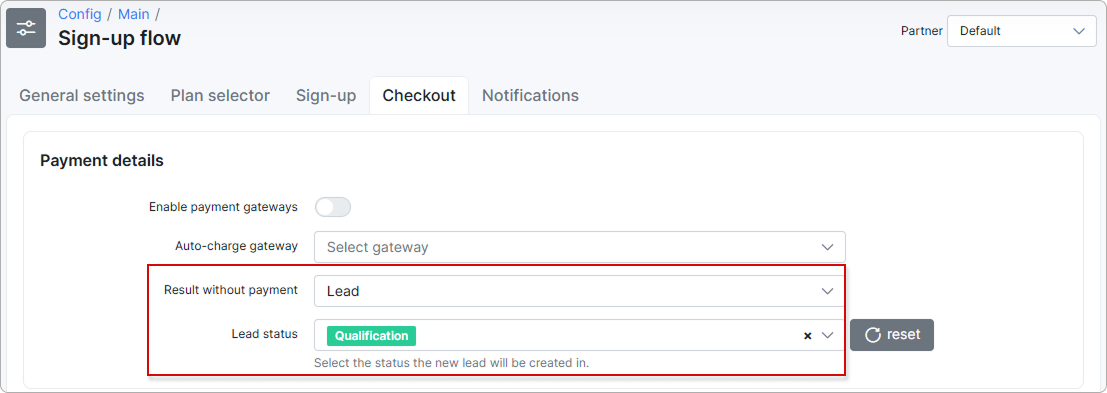
Lead:
- Enable payment gateways — turns on online payment at checkout. The toggle is available only when at least one payment gateway exists in the system. The fields shown below change depending on whether it is on or off.
- Payment gateways — (shown when Enable payment gateways is ON) select one or more gateways the customer can pay with at checkout.
- Auto-charge gateway — the gateway used to charge the customer automatically for later recurring payments. Shown whether or not online payment is enabled.
- Service status — (shown when Enable payment gateways is ON) the status the service is created with: Active or Pending. With Pending, the paid amount is added to the customer's balance.
- Result without payment — (shown when Enable payment gateways is OFF) defines whether a lead or a customer is created when no payment is made at checkout:
- Customer status — (shown when Result without payment is set to Customer) the status the new customer is created in: New (default) or Active.
- Lead status — (shown when Result without payment is set to Lead) the status the new lead is created in. The options are the statuses of the lead pipeline configured in Config → CRM → Leads pipeline, and the default is the first status in that pipeline. See Leads pipeline.
A customer or lead created by a checkout without payment is created in the status selected here.
How the checkout result is decided
- With payment gateways enabled, a successful payment creates a Customer, with services in the selected Service status; if no payment is made, a Lead is created.
- With payment gateways disabled, no payment is taken at checkout, and the Result without payment select decides the outcome — Lead (default) or Customer.
- OTP verification, the Terms & Conditions checkbox, and Sign contract apply regardless of the result (Lead or Customer).
¶ One-time password
The OTP (One-Time Password) verifies the phone number or email address the customer entered.

- Enable one-time password — available only when Email or Phone is a required field on the Sign-up tab.
¶ Additional settings
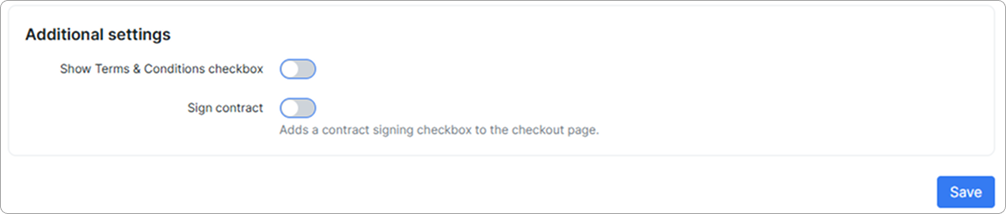
- Show Terms & Conditions checkbox — adds a Terms and Conditions checkbox to the checkout page. When enabled, choose the Terms & Conditions template used for the linked text.
- Sign contract — adds a contract-signing checkbox to the checkout page. When enabled, choose the Document template the customer signs.
Click Save to apply the changes.
¶ Notifications
The Notifications tab controls how Splynx reacts when a new order comes in through the sign-up flow — which order channels are accepted, what tickets are opened, and which email notifications are sent to your staff and to the new subscriber.
¶ Notifications settings
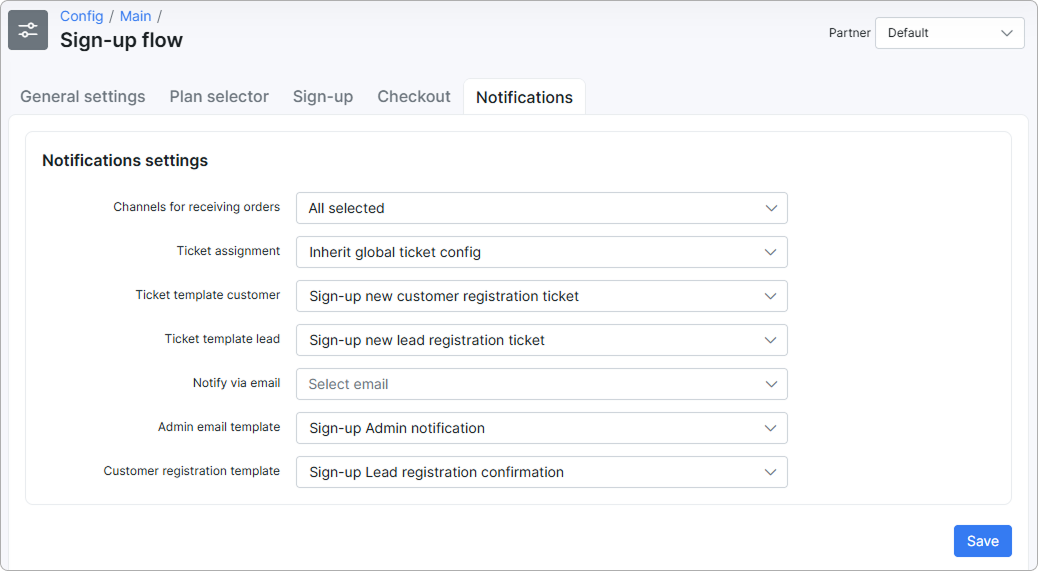
- Channels for receiving orders — the order channels the sign-up flow accepts. By default All selected.
- Ticket assignment — who the registration ticket is assigned to. Choose Inherit global ticket config to use the system-wide ticketing rules, or select a specific assignment.
- Ticket template customer — the ticket template used when a registration creates a customer.
- Ticket template lead — the ticket template used when a registration creates a lead.
- Notify via email — the staff email addresses that receive a notification when a new order is submitted. Leave empty to send no admin email.
- Admin email template — the email template used for the notification sent to your staff.
- Customer registration template — the email template used for the confirmation sent to the customer or lead after registration.
Only templates configured on the Templates config page (Sign-up type) are available in the template selectors.
Click Save to apply the changes.
¶ What the customer sees
What the customer sees depends on your configuration. The steps shown, the fields on the form, and the checkout options all change based on:
- whether the coverage checker is enabled and whether your services are available at the customer's address;
- which plans, filters, and Package builder items you make available;
- which fields you mark as required on the Sign-up tab;
- whether online payment is enabled and which payment methods you offer;
- whether the customer must verify a one-time password (OTP) or sign a contract at checkout;
- the Steps order setting on the General settings tab, which decides whether Choose additional services or Submit your information comes first.
Steps where the visitor has nothing to select are skipped and do not appear in the progress bar — if you have not configured the Package builder, for example, the Choose additional services step is not shown at all. The total number of steps therefore varies, and the order below is the default one.
The flow below shows the most common variant: coverage is available for the chosen address, online payment is enabled, and no contract signing is required.
The screens below are what the customer sees on the public page, not the admin panel.
¶ Check coverage
The customer enters their address or clicks Use my current location, and a map confirms the location. When your services are available at that address, they click Confirm to continue.
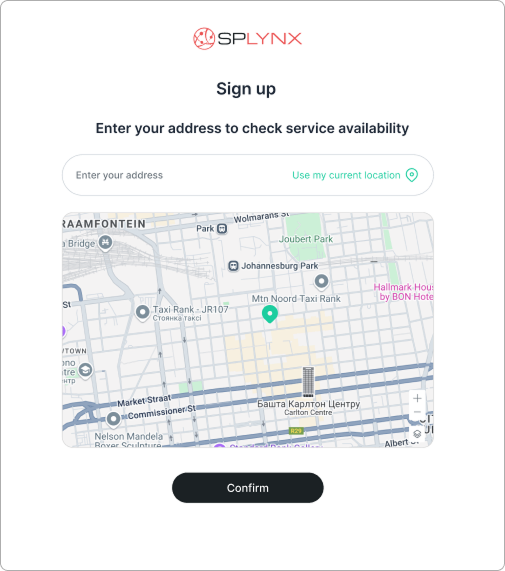
This step appears only when Enable coverage checker is turned on on the Plan selector tab, and the coverage areas come from your Coverage maps. A plan is matched to the checked address by the connection type it shares with the coverage area — but a plan that has no active coverage map is offered at any address while Show plans without coverage map is on.
¶ Choose your plan
The customer picks an account type with the Home / Business toggle, then browses the available plans. Each card shows the plan type (Internet, Voice, or Recurring), the monthly price, and the upload and download speeds, and may carry a promotional badge such as Special offer. The customer clicks Select on a plan, then Next.
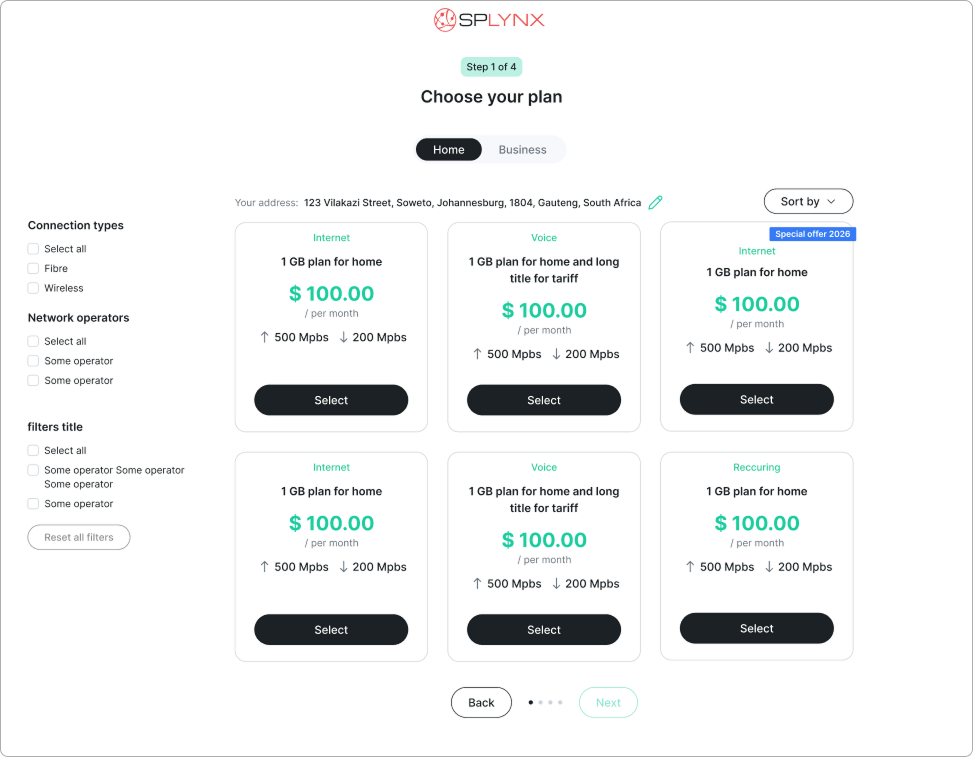
The filters on the left — Connection types, Network operators, and any custom filters — come from the Filter categories you define on the Plan selector tab. The Sort by control lets the customer order plans by price, download speed, or upload speed.
Which plans reach this step depends on the coverage toggles on the Plan selector tab.
The rules are identical for Internet, Voice, and Recurring plans.
¶ Choose additional services
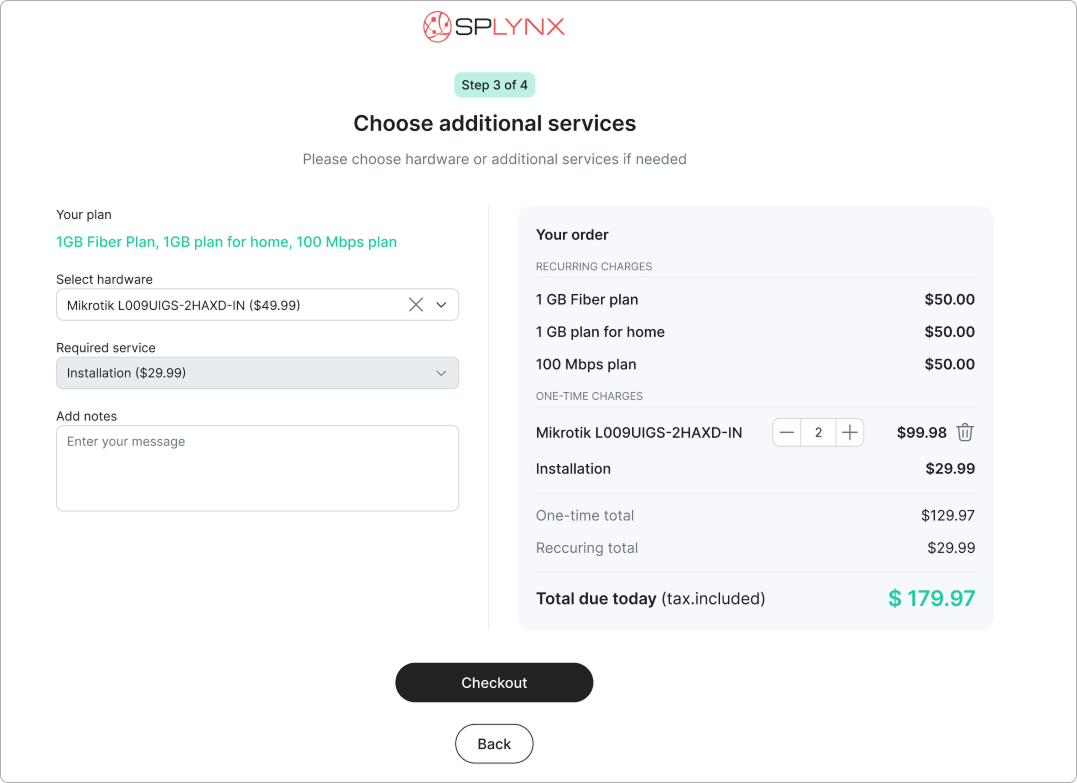
If you configured the Package builder on the Plan selector tab, the customer can add hardware or extra services here. A live Your order summary lists the recurring and one-time charges and the Total due today. The customer then clicks Next.
¶ Submit your information
The customer completes the registration form. The fields shown here — and which are marked required — are the ones you arrange on the Sign-up tab, including any Document upload fields such as Upload ID card and Proof of address. The customer then clicks Next.
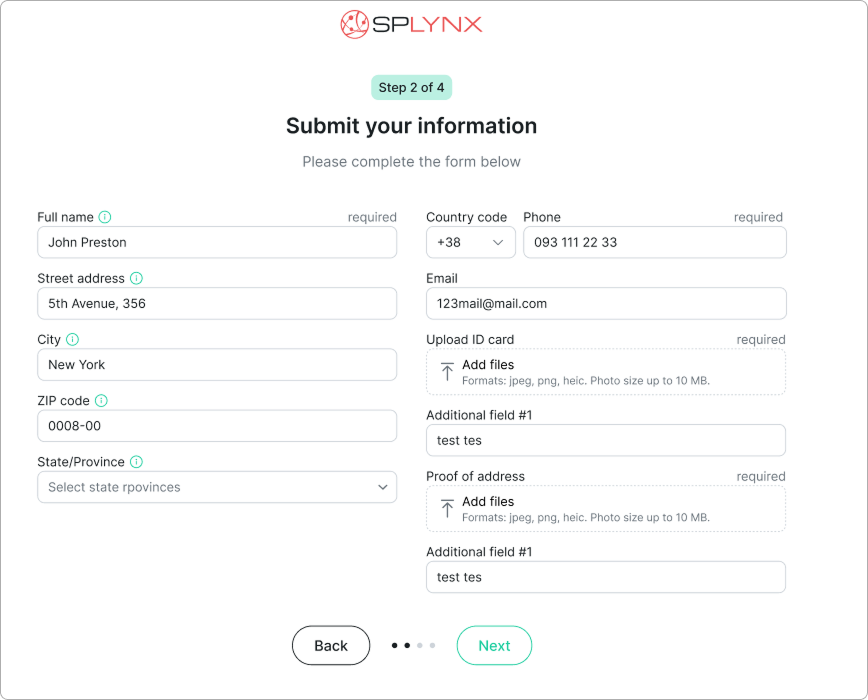
If the phone number or email entered already belongs to an existing record, the form shows an error under the field — for example "This phone number already exists." — followed by a 'Log in instead' link that opens the Customer portal login page, so the visitor can sign in instead of registering again.
¶ Checkout
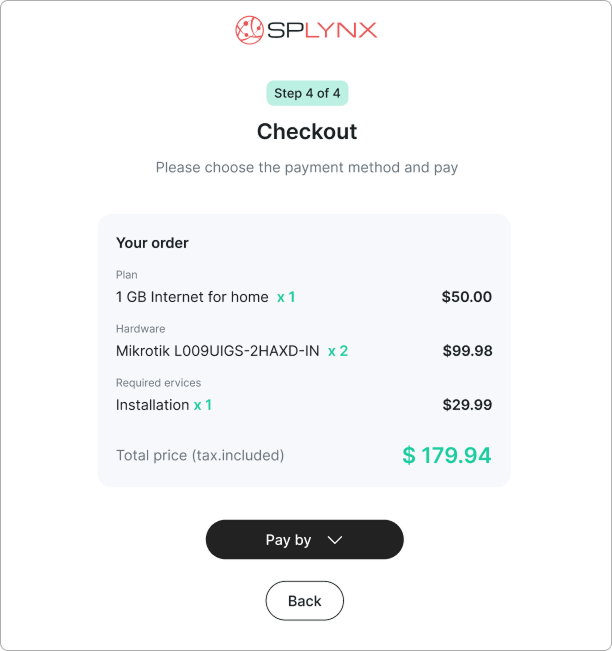
The customer reviews the final order, selects a payment method with the Pay by control, and pays. The available payment methods come from the gateways you enable on the Checkout tab.
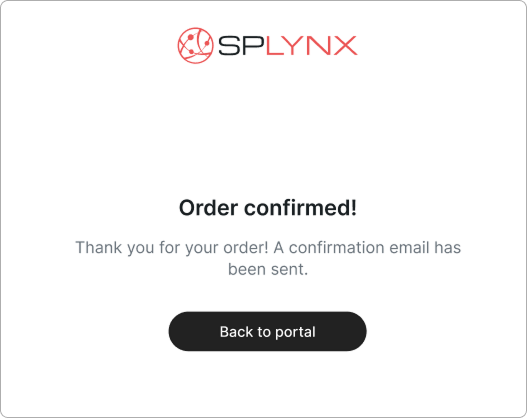
After payment, a confirmation screen thanks the customer and notes that a confirmation email has been sent. Splynx creates the lead or customer with the selected plan and address already filled in, opens the registration ticket, and sends the emails configured on the Notifications tab.
¶ Share link
Every step of the public sign-up page has a Share link button. Clicking it generates a link that carries everything the visitor has entered so far, encoded into a hash. The page URL itself does not change — the generated link is produced for saving or sending on.
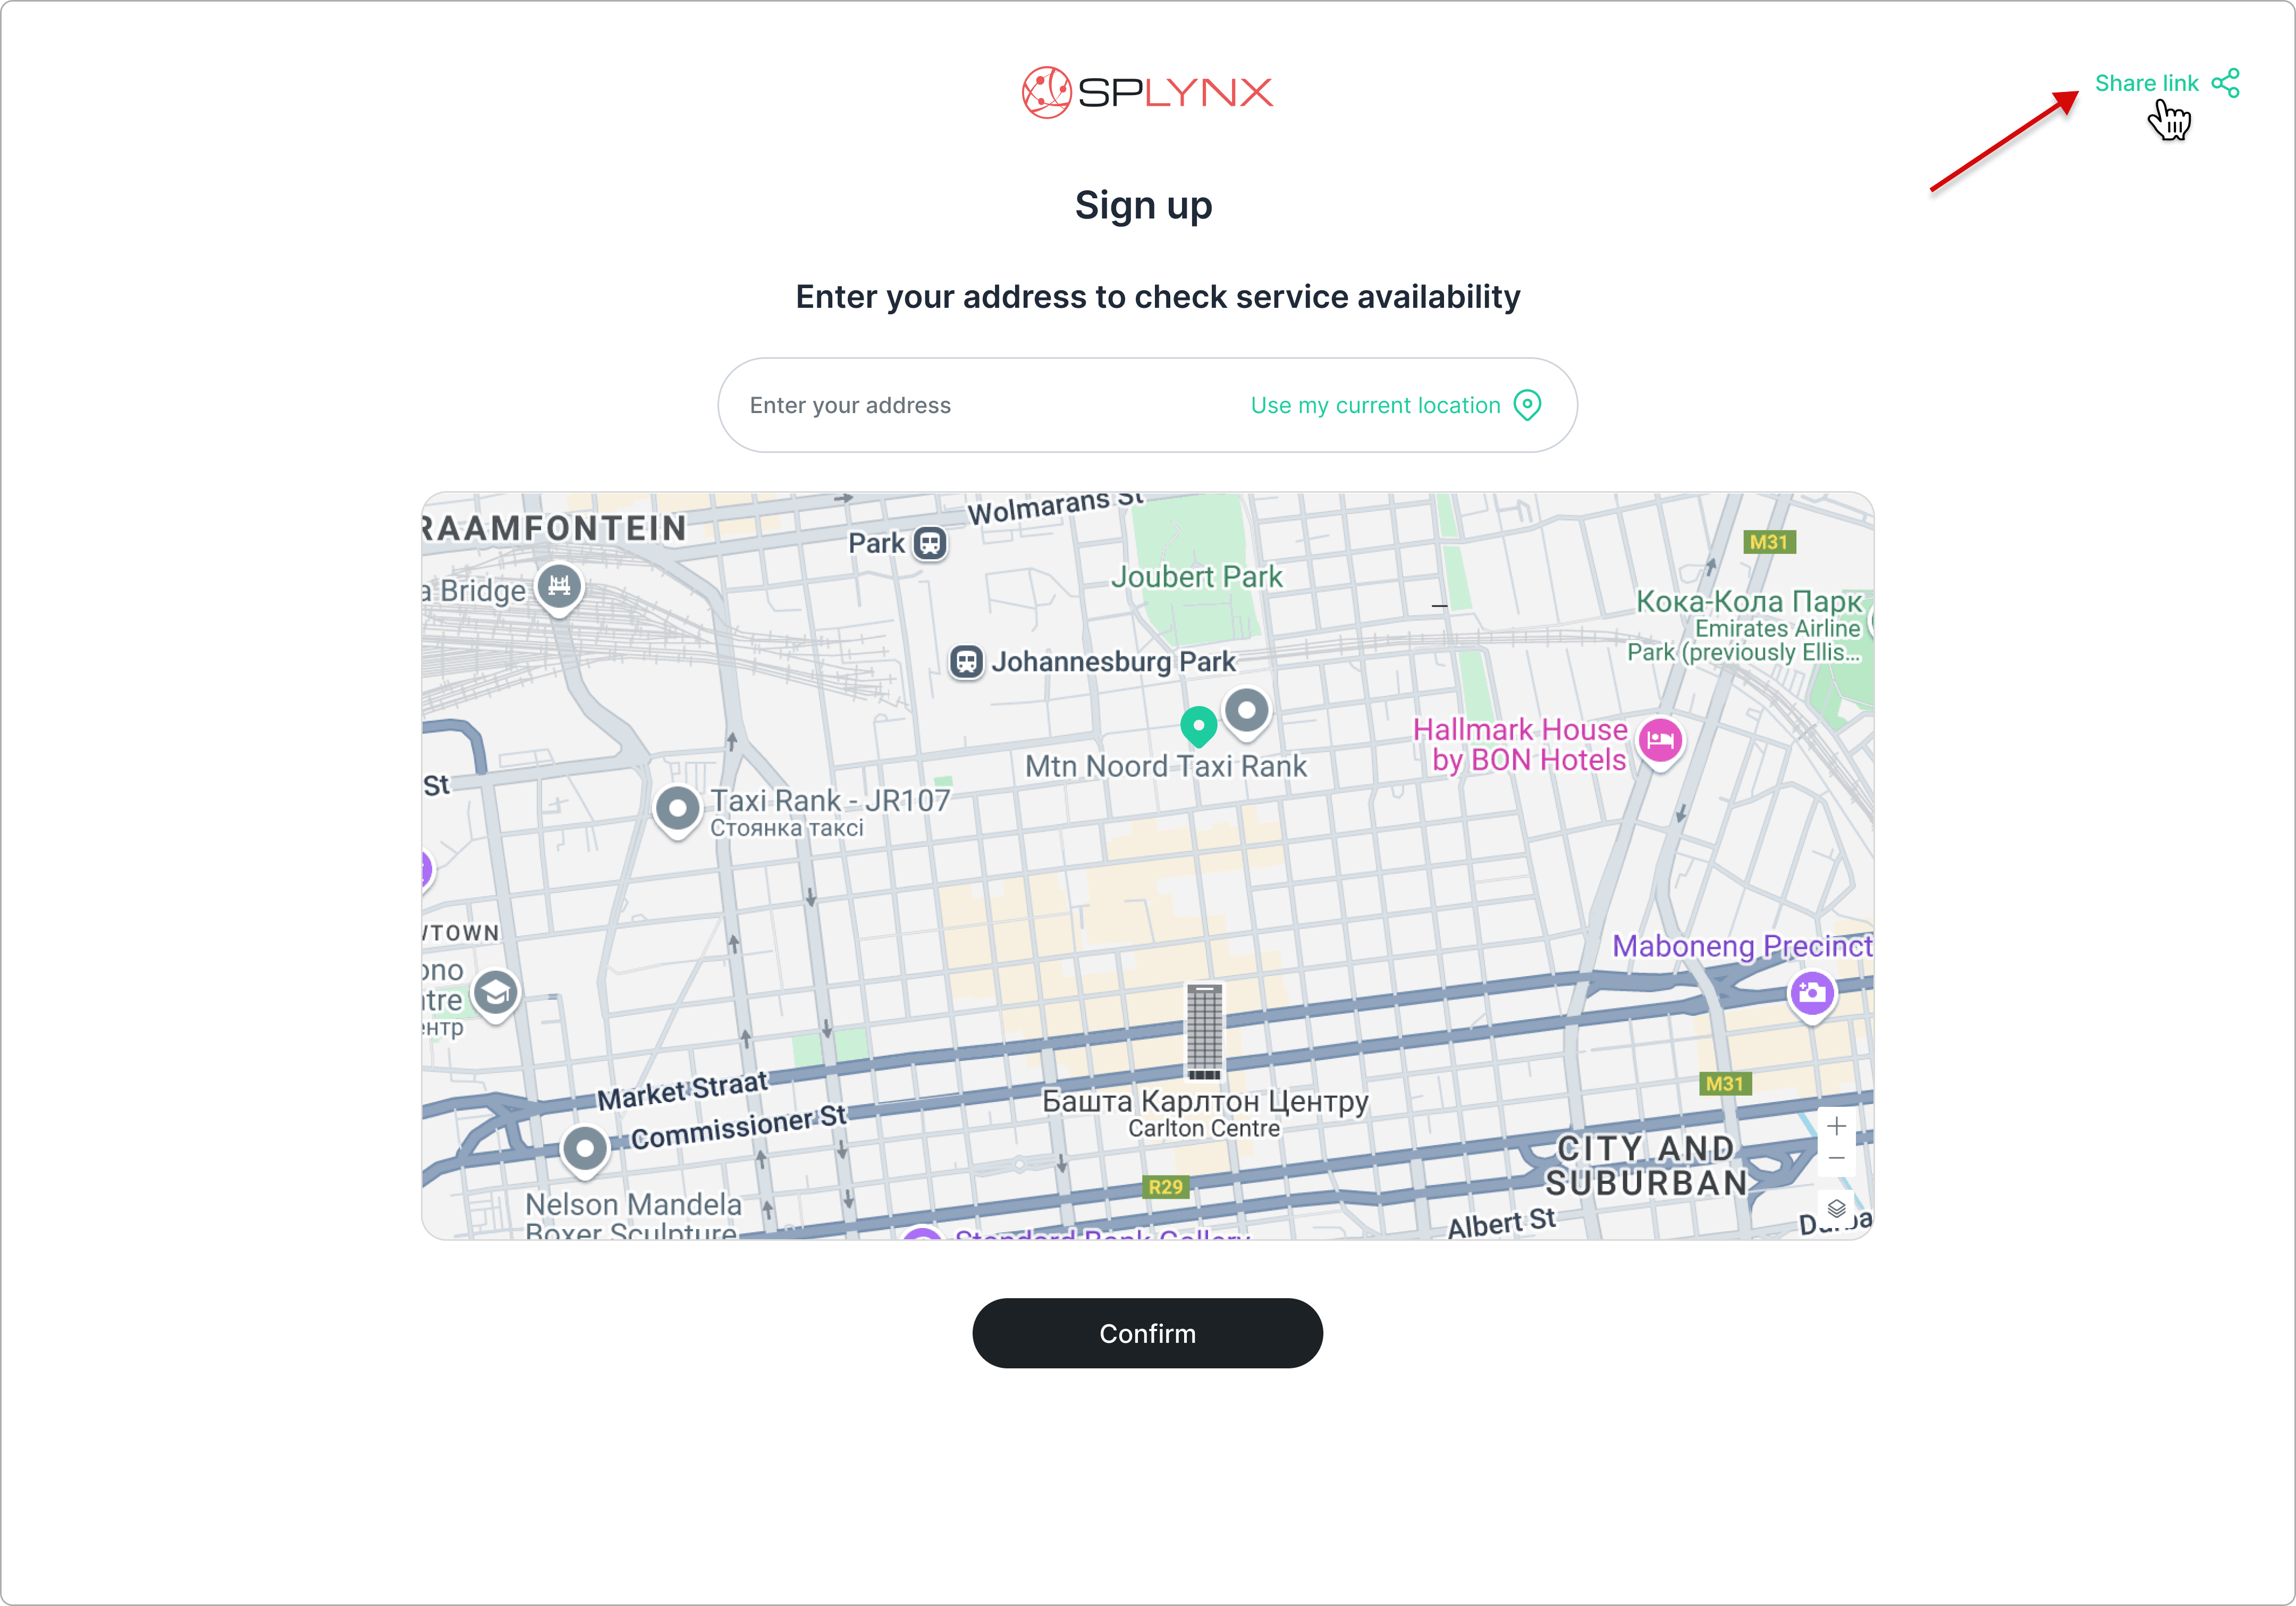
What the link stores depends on the step it is created on:
- Check coverage — the address;
- Choose your plan — the selected plan;
- Submit your information — the profile details entered on the form;
- Choose additional services — the selected additional services.
Once the Submit your information step is submitted and the visitor moves on, the link also carries the lead created from those details, so whoever opens the link can finish the registration to the end.
Opening the link brings the visitor to the step the link was created on, with all previous steps prefilled. Use it to hand a half-finished registration over to a colleague, or to let a visitor pick it up later.
A shared link works for 30 days. After that it stops working, and anyone who opens it is sent back to the address step.
Some of the saved data can become invalid before the link is opened. In those cases the flow falls back as follows:
- the selected tariff plan is disabled — the visitor lands on the plan selection step, with the profile details from Submit your information still prefilled;
- one or more of the selected additional services are disabled — those services are cleared from the selection;
- no plans are available at the saved address — the visitor is sent to the Leave a request page.
¶ Leave a request page
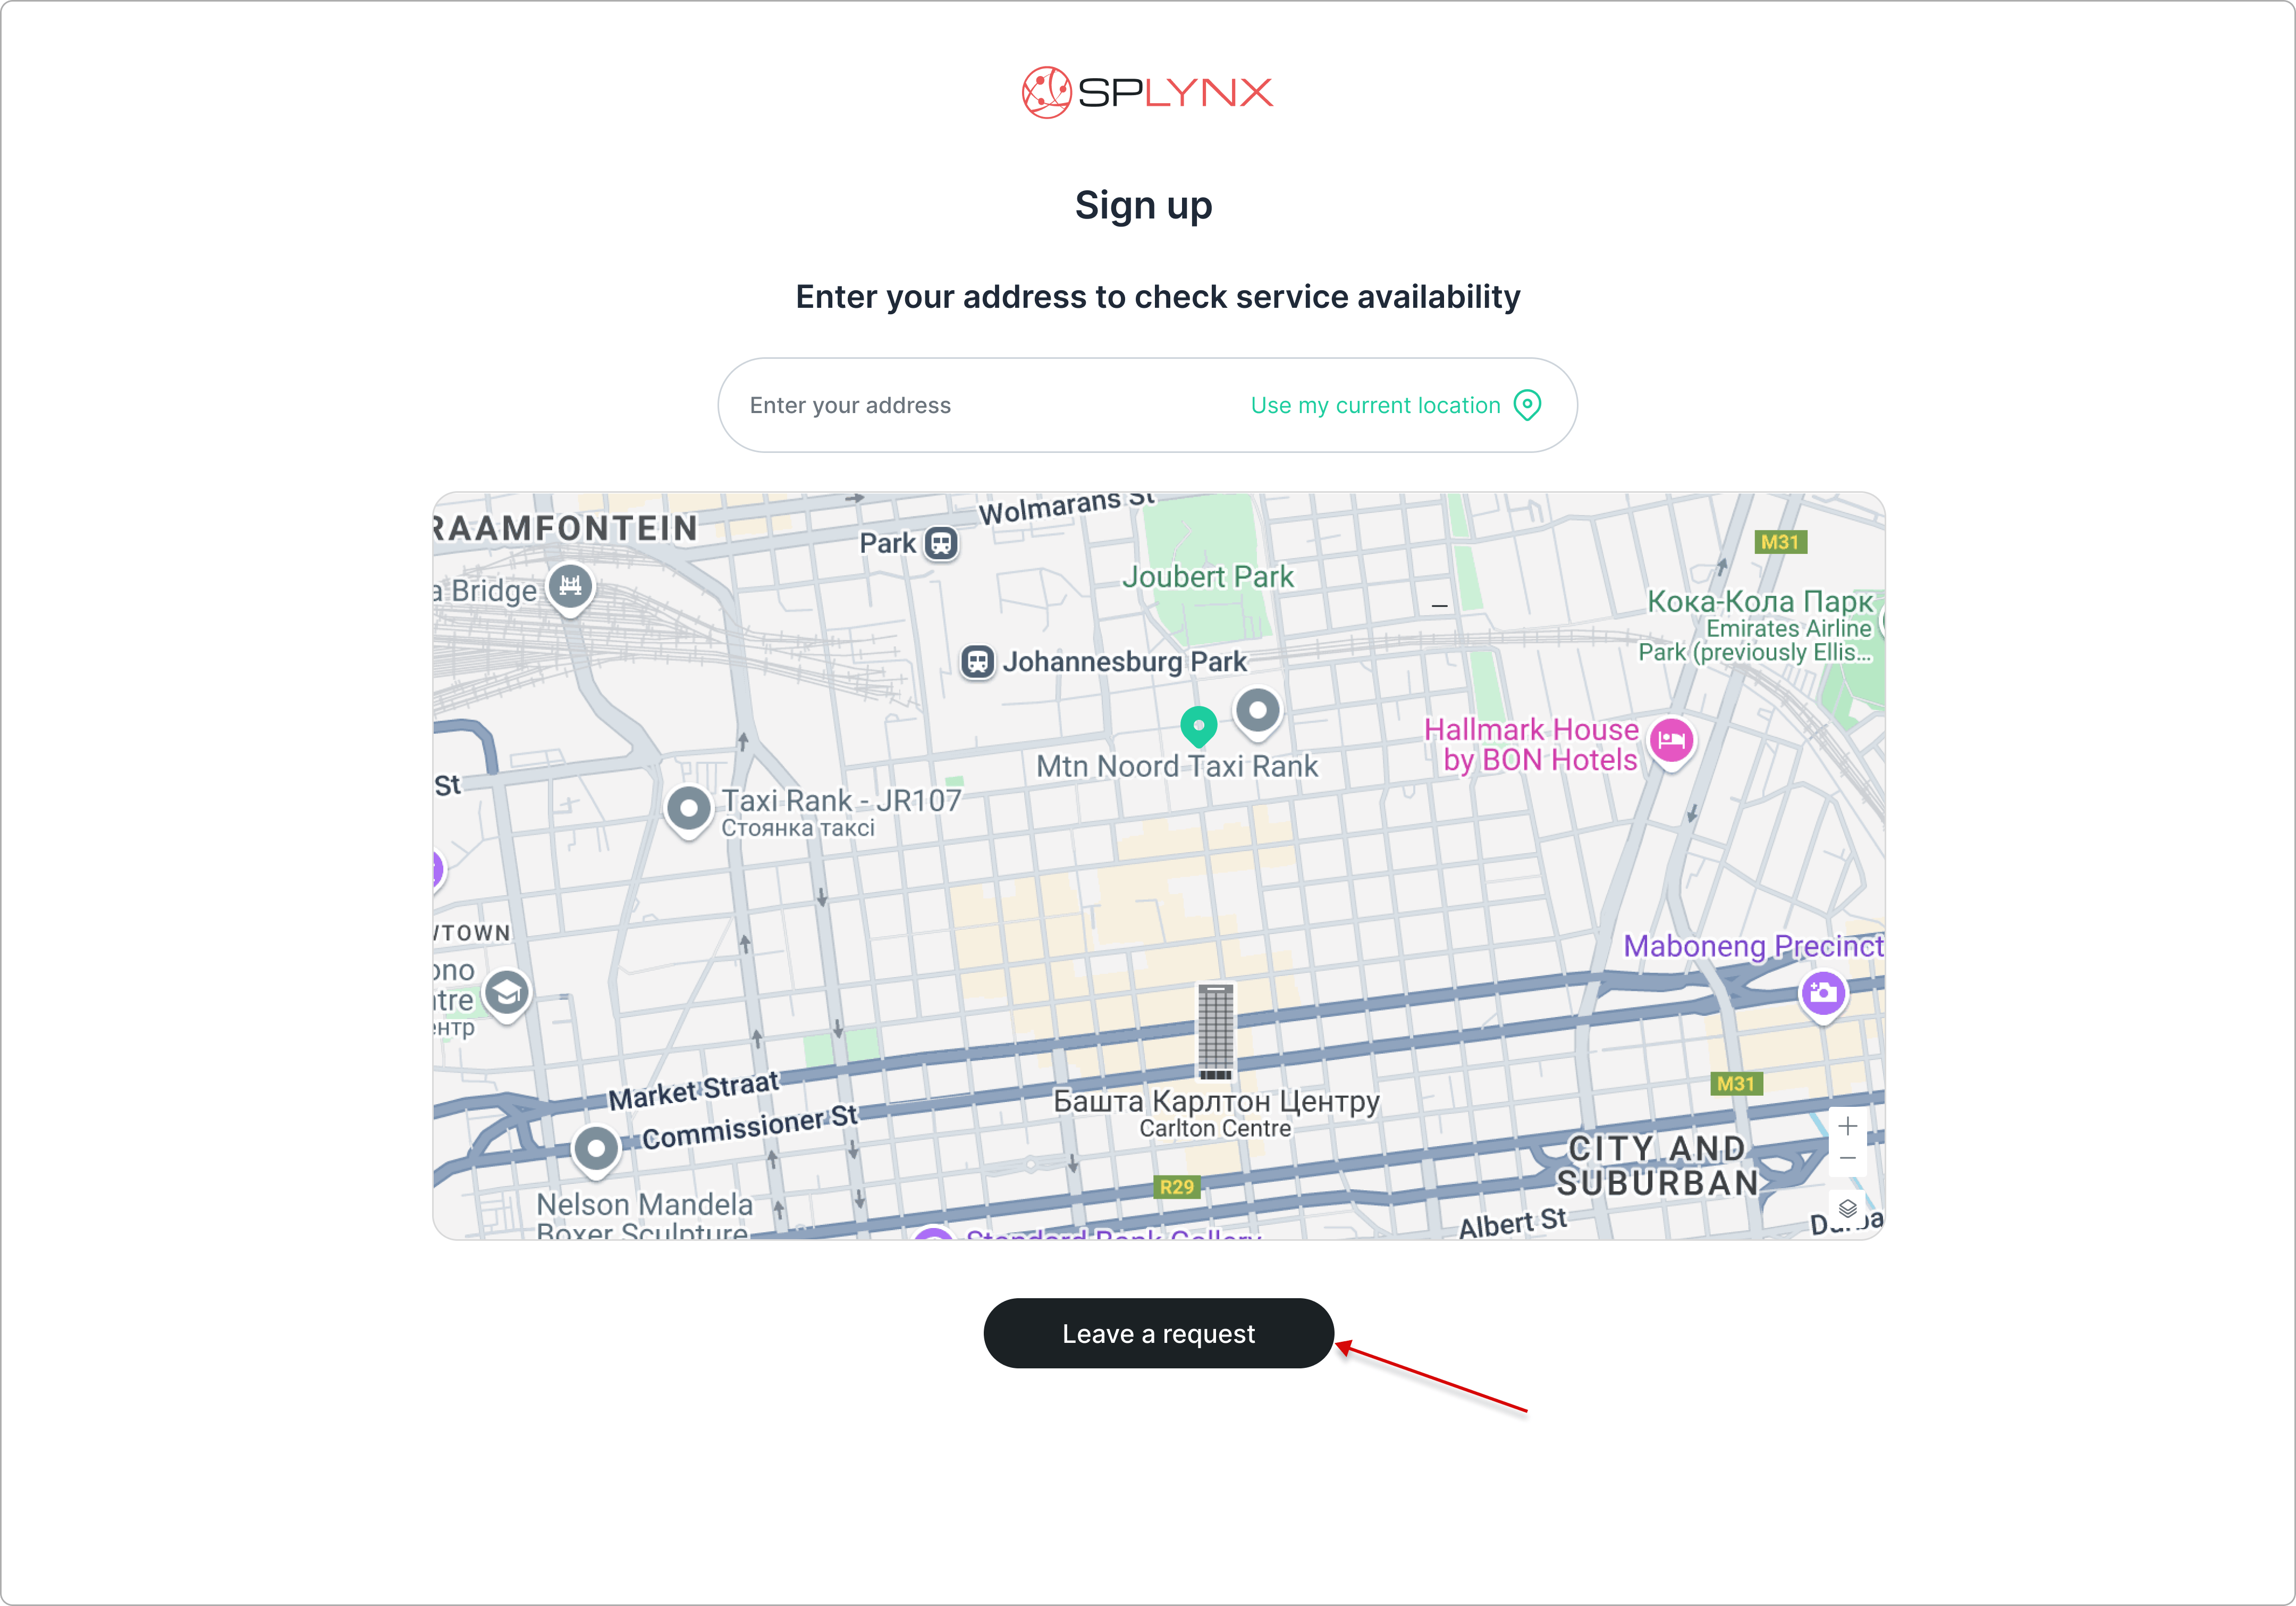
When Redirect to "Leave a request" page is enabled on the General settings tab, the coverage map step ends the flow instead of continuing to plan selection: the Confirm button becomes Leave a request, and clicking it opens the Leave a request page. Use this for visitors you cannot serve through the standard flow — an address outside your coverage, or a business customer who needs an individual offer.
The page shows only the fields that have Show on "Leave a request" page enabled in the field settings on the Sign-up tab. The visitor fills them in and submits the form, and Splynx creates a lead from the details for your sales team.
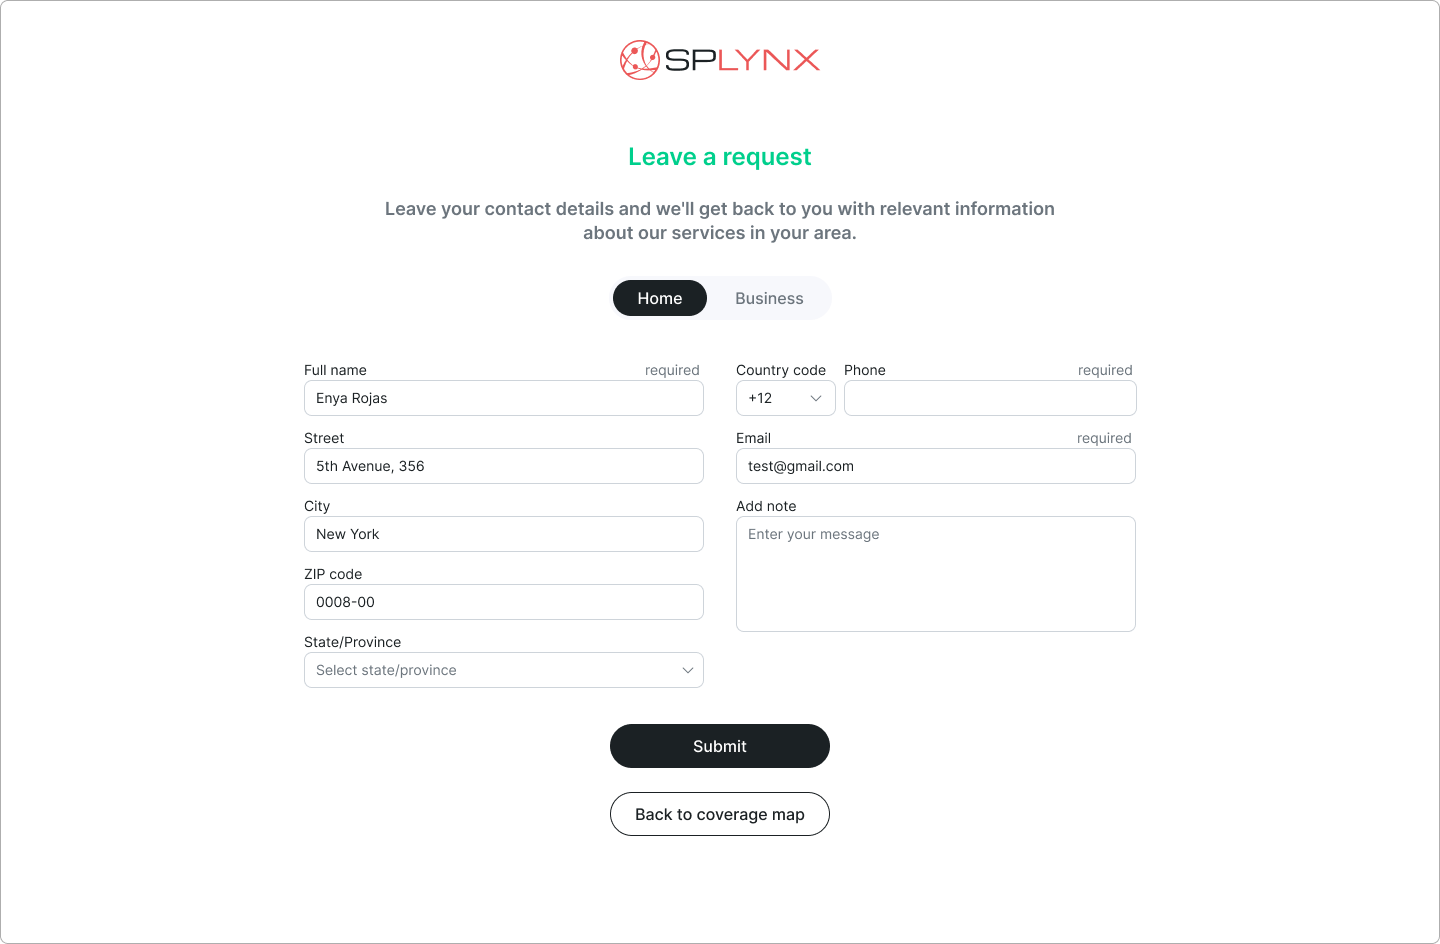
If the visitor already picked an address on the coverage map, that address is saved to the lead's profile even when the address fields are hidden on the page.